
1. In the Trayicon (next to the operating system clock) there should be the AVSAgent icon, on this right-click, go to the option Configuration.
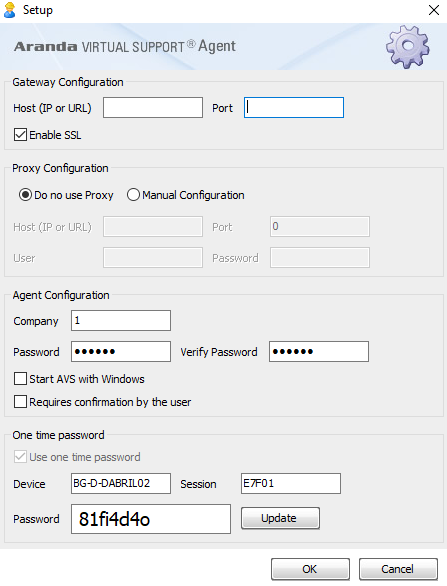
2. A configuration window is presented, with three sections:
- Gateway Configuration: Where the host and port where the Aranda AVS Gateway is hosted is indicated, and the option to enable the use of SSL.
- Proxy Settings: Where the Proxy to be used for the connection is optionally configured.
- Agent Configuration: Where the code of the company to which it belongs is indicated (it must be associated with a company previously created in the Aranda AVS Web Admin) and the optional password, so that users of the Aranda AVS Console can take remote control of the machine.
3. Next, confirm the configuration by clicking Accept.
4. The Aranda AVS Agent will attempt to connect to the Aranda AVS Gateway, if you want an immediate connection attempt, on the AVSAgent icon, right-clicking, go to the option Connect Now.
5. In case of success the Aranda AVS Agent receives a session identifier, and will be available for support by a Specialist.
6. In the field Launch AVS with Windows you will be able to indicate whether you want the Agent to load each time the Operating System starts.
7. In addition, you can choose user confirmation before starting the remote control of the machine.
8. If automatic password generation is enabled, you can view a suggested password field that changes after each login or customize your own password.