
Gateway Configuration
1. Upon completion of the installation process, a window is loaded, for the initial configuration of the Aranda AVS Gateway, with the name Aranda AVS Gateway Configurator as shown below.
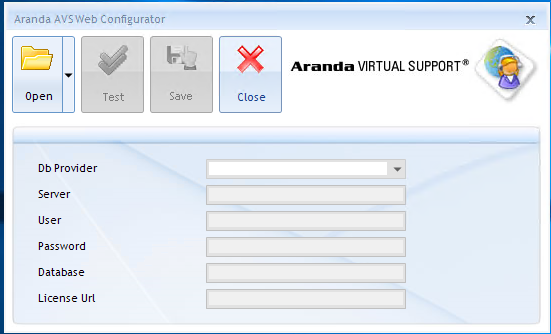
2. Configure the database configuration for the web application and gateway.
- In Aranda AVS Web Configurator, click Open and choose Gateway Configuration. Then, select the .config file from the Aranda Gateway.
- Fill in the blank data to establish the connection to the database (See table).
- Repeat these steps for Web Configuration.
3. Verify that the database connection is correct by clicking Test.
4. Save the changes by clicking on Save.
| Database provider | You must select MSSQL |
| Server | To which the Database is connected |
| User | With which you enter the Database |
| Password | With which it is registered for entry into the Database |
| Database | Database Name |
| Licensing Service URL | URL of the previously installed Aranda AVS Gateway licensing Web Service. |
Web Console
1. With the Aranda AVS Web Admin installed, open the application, which by default is http://localhost/ArandaGatewayAdmin/Login.aspx. However, if you installed AVS Gateway on a server, in localhost Enter the server name.
2. If the web application was installed correctly, an authentication page will be presented, remember that the default user is “admin” with password “admin123”, when entering you will have access to the system administration.
3. If the web application does not install correctly, please review the following permissions section.
Permissions
1. If there is a problem with the permissions for the AVS Web Admin, go to the physical path on disk, of the defined virtual directory.
2. Give write permissions on the “audit” and “installers” folders to the assigned IIS user, so that the Aranda AVS Web Admin can log the audit information, in addition to generating the Agent installers per company, it is necessary that the “audit” and “installers” folders of the installation have write permissions.
Ports and host
1. If you need to manage port or SSL settings, in AVS WEb Admin go to the section: -> Gateway Configuration and modify the data you require.
2. To configure the gateway host, go to the section: -> Gateway Configuration, select a setting, and on the top taskbar, choose the Edit option:
- In the field host Enter the DNS of the server where AVS Gateway is installed.
- Then on the top taskbar choose Save.
3. For proper operation, the port must be configured in the firewall, which by default is 443 as the entry rule
- The port must not be being used by another application or by IIS
4. You can test the correct functioning of the Web Service, by entering the URL of the site in a http://localhost/ArandaGatewayAdmin/LicensingWebManager.asmx Browser.
License Application
IMPORTANT: If you purchased a license follow these steps, if not, go to the Register Demo License.
1. You must enter the following link: https://arandasoft.com/serials/ and request a master license for each provider.
2. Below is the form that must be completed to apply for the license for Aranda Virtual Support.
3. The “products” box must be completed as follows, If the customer will have their own virtual support gateway (if they will install it on their server) they must select the option “Aranda Virtual support”, but if the customer will use the gateway that Aranda has, they must select the “Aranda Virtual Support (Service)”, then press the “Select” button to enable the “Aranda VIRTUAL SUPPORT” box in which the number of licenses must be specified of the type named and concurrent. In the “Provider Code” field, you must enter the code that was entered when the provider was created within the Aranda Virtual Support in the providers section and the CD Key is extracted from the Licenses -> Gateway Installation in the Aranda AVS Web Admin. Finally, press the “Send” button.
4. Once submitted, the system will register an application number, which will be used to check the status of your application. This request will also be sent to your email.
5. The email is the one that brings the license request, the “Serial” field must be copied.
Register Demo License
1. Once you enter the Aranda AVS Web Admin console, go to the main menu (left) and go to the section: Licenses -> Gateway Installation. In the Company field, enter the name of the company to which the Aranda AVS Gateway belongs and save the changes using the option on the top taskbar.
2. With the company name of the Aranda AVS Gateway assigned, proceed on the same page to generate a CD Key, with the options in the upper taskbar.
3. To register the license serial you must create a user for the provider and the company to which the license will be assigned
- In the section: Suppliers select New in the top bar. Enter the required fields and save your changes.
- In the section: Users -> Vendor Managerat the top, select New. Enter the required fields and save your changes.
- In the section: Enterprises select New in the top bar. Enter the required fields and save your changes.
4. Log out and Log in with the provider’s username, in the section: Licenses -> Master Licenses Select New and enter the “AVS3030100” demo serial
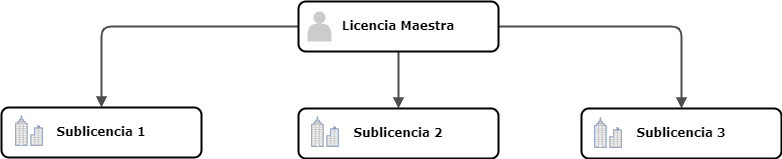
Sublicense assignment
Sublicenses are licenses derived from a master license, which allow distribution among multiple companies, with the same serial number of the master license.
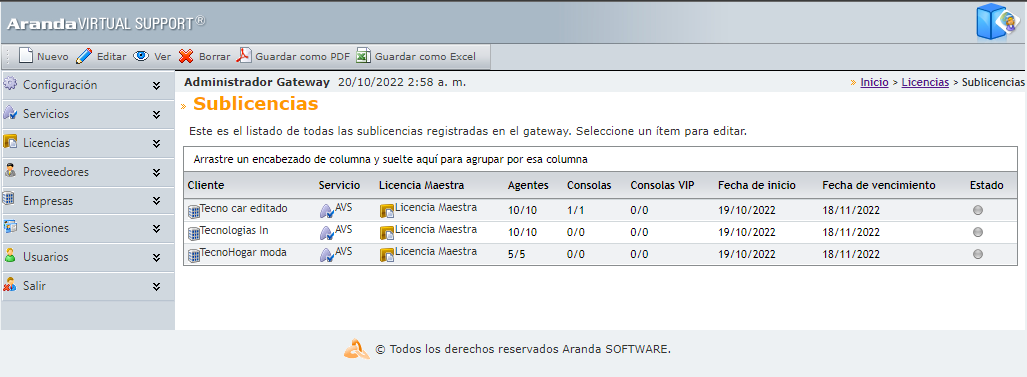
1. Go to the section: Licenses -> Sublicenses and create a new sublicense using the New option on the top taskbar, the following image should be displayed:

2. Enter the data by selecting the company and assigning the license information. See the table below:
| Datum | Description |
|---|---|
| Enterprise | Name of the company to which the sublicense is assigned. Select an option from the Registered Companies dashboard. |
| Master License | It is the serial number that was assigned to you when you applied for the license. The license has a number of agents and consoles assigned, which you can divide into several sublicenses. Select the license with the AVS service from the drop-down pane. |
| Agents | It’s a number defined by the number of workstations you want to serve in that company. Assign the number according to the agents that are available. |
| Consoles | This is the number of web consoles you will have available for that particular company. Select a number according to the consoles that are available. |
| VIP Consoles | Select a number according to the VIP consoles that are available. |
| Description | Area to which the sublicense is assigned. Reason or purpose for assigning the sublicense. |
| Start Date | Date on which the support service comes into effect. |
| Expiration Date | Last day of support service. |
3. Click Save.
4. Once the data is saved, log back into the web console as a Gateway Administrator user, in the Licenses -> sublicenses You will be able to view the registered companies.
Notes:
- Upon receiving the license, you will be assigned a certain number of agents and consoles. Define the number of companies to which sublicenses will be assigned; and how agents and consoles will be distributed. Once they are assigned, they cannot be modified.
- Companies with a sublicense and associated sessions cannot be deleted.
- Once all agents have been assigned, they cannot be redeployed.
Create Specialist User
1. To create a specialist user, you must have a vendor and a company which was previously made. - Go to the Users -> Specialists and select the New option in the upper panel, fill in the data and before finishing check that the Is active is active and the company is the one previously created.
2. With the specialist user you will be able to enter the AVS console.
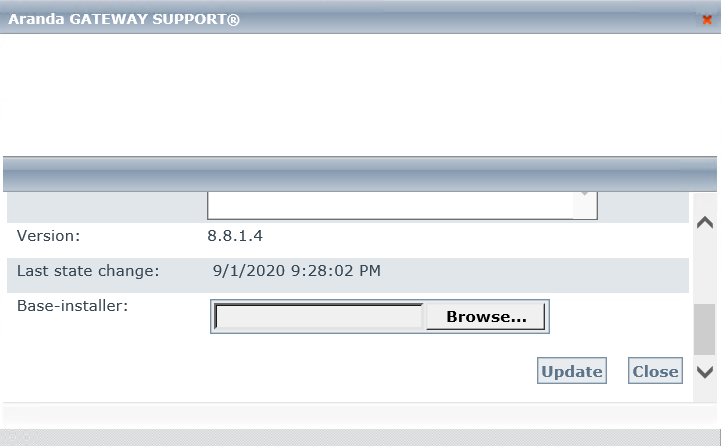
AVS Agent Installer
1. To generate the Aranda AVS Agent installer, log in to Aranda AVS Web Admin as administrator and go to the section: Configuration -> Software Clients.
2. You will be able to view the list of supported operating systems and the database with their respective version.
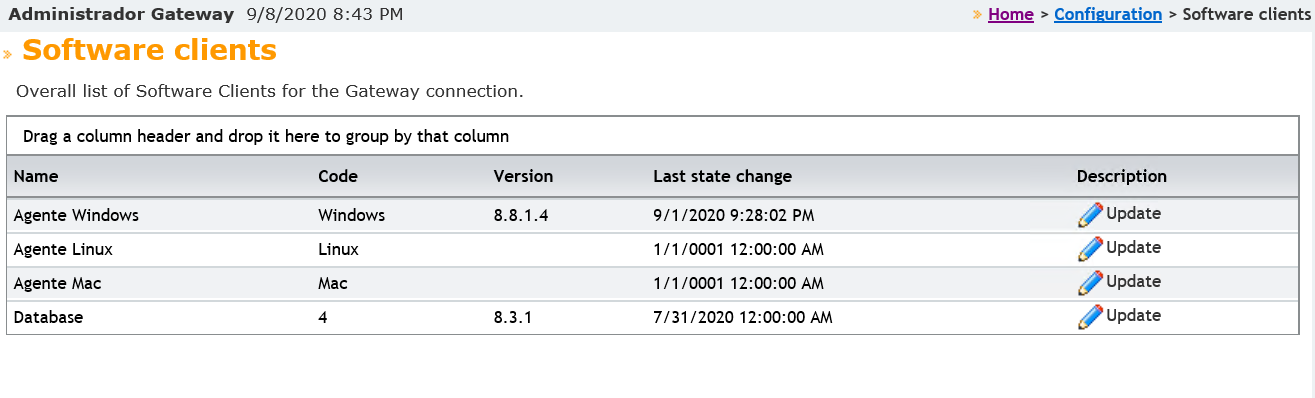
3. Choose the operating system for which you want to generate the installer and select Update located in the description.
| Name | Software Name |
| Code | Software Identifier Number |
| Description | Software Client Features. |
| Version | Software Version. |
| Last change of status | Last known date on which the client was updated. |
| Base Installer | Option where it allows you to upload an update or patch of the Software Client, it must be in DAT format, and must comply with the system’s own format. |
4. In the field Base-installer Click the Browse.., when File Explorer opens, locate the avsa.dat and save the changes.
5. In the companies section, select the company and in the top taskbar select the agent icon depending on the operating system for which you are going to download the installer.

It is advisable to leave the Windows service down, until you have the Aranda AVS Web Admin running, as the Aranda AVS Gateway requires knowledge of where the Administrator is running.