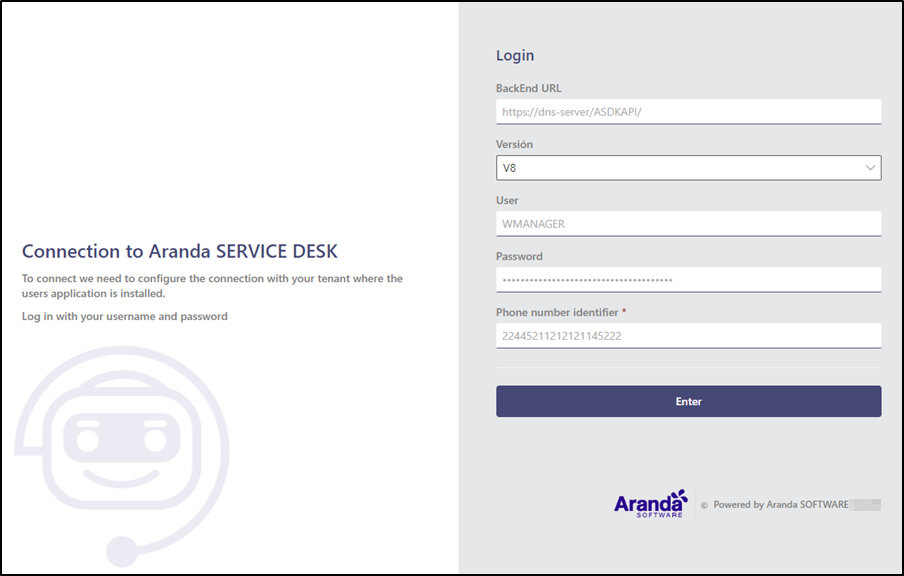
To configure the WhatsApp Bot service, you must enter https://albiwsp.arandasoft.com/ or, if the client has its own implementation of the Bot, enter the access URL.
Login in the Bot environment
1. In the Section Login of the bot environment, enter the following data in the requested fields and click the Enter
| Field | Description |
|---|---|
| URL del BackEnd | Aranda Service Desk API URL (ASDK) https://(Domain)/ASDKAPI/ |
| Version | ASDK (V8) ASMS (V9) Environment Version |
| User | User associated with the WhatsApp Manager group (wmanager) |
| Password | Password of the user associated with the WhatsApp Manager group |
| Phone number identifier | Data that was saved when Obtained the number identifier |
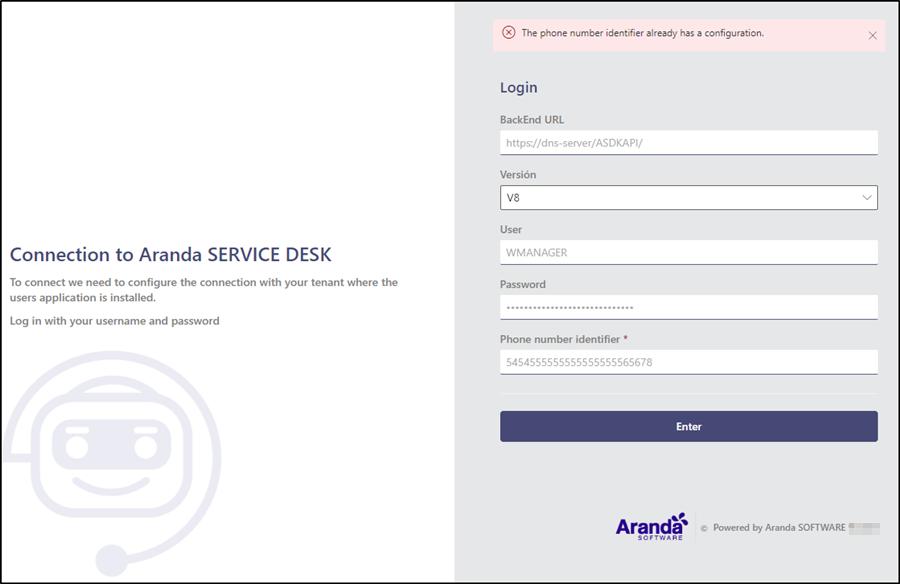
⚐ Note: When connections are already configured, the login must be made with the USDK BackEnd URL of the connection that is currently active. If the URL of any connection other than the configured one is entered, the following message will be displayed:
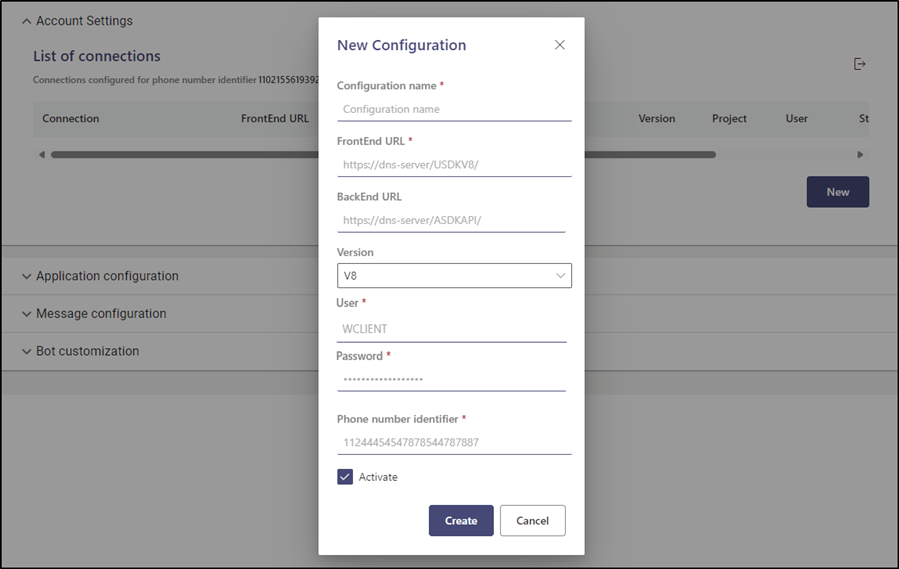
Account Setup in the Bot Environment
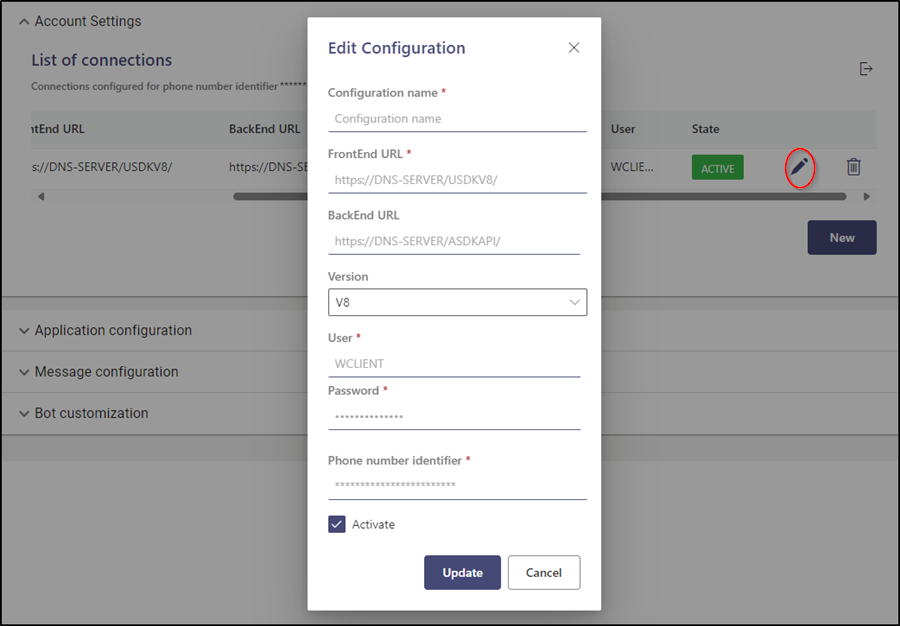
1. When you log in for the first time, a pop-up window will appear New Settings where the requested fields must be completed and then click on the Create.
| Field | Description |
|---|---|
| Configuration Name | Name that identifies the connection |
| URL del FrontEnd | Aranda Service Desk Users Web Console URL (USDKV8) https://(Domain)/USDKV8/ |
| URL del BackEnd | Aranda Service Desk API URL (ASDK) https://(Domain)/ASDKAPI/ |
| Version | ASDK (V8) ASMS (V9) Environment Version |
| User | User associated with the WhatsApp Client group (wclient) |
| Password | Password of the User associated with the WhatsApp Client group |
| Phone number identifier | Data that was saved when Obtained the number identifier Loads by default |
| Active | Enable/Inactivate the setting |
2. If the configuration is correct, the following window will appear with the configuration made.
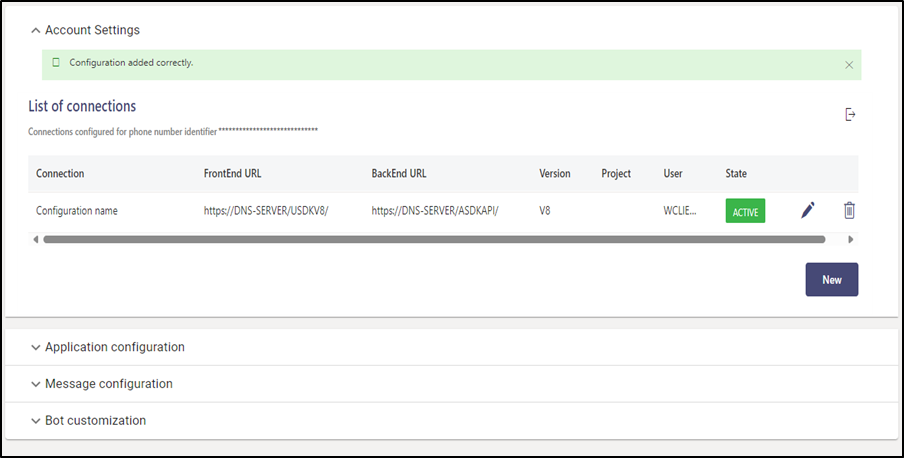
3. To create new connections, click the New; To edit an existing connection, click the pencil icon, to complete the respective information. When finished, click the Create/Update.
⚐ Note: If you see the message when you create or update your account settings, The entered BackEnd URL does not belong to an Aranda service; You must validate that the data entered in the URL del BackEnd correspond to the Aranda Service Desk (ASDK) product environment.
Configuración de aplicación en el ambiente del Bot
This section configures the data that was obtained during the configuration of the Meta Application and that the Bot will use to interact with users; The configuration must be made for each connection that exists within the environment. When all the fields are filled in, the configuration is completed by clicking on the Save.
Can be exchanged between the different connections configured from the field Select the connection for which you are making the change; The last connection established is the one that is maintained as Active.
| Field | Description |
|---|---|
| Permanent Access Token | Token that was saved when the Permanent token |
| Verification Token | The value to be entered is ArandaAdmin |
| Template Create Case | If the customer does not have a custom template, enter create_case_default_aranda, if you created custom template enter the name assigned to the template Create Case |
| Template see case | If the customer does not have a custom template, enter view_case_default_aranda, if you created custom template enter the name assigned to the template View case |
| Template to approve case | If the customer does not have a custom template, enter approve_case_default_aranda, if you created custom template enter the name assigned to the template Approve Case |
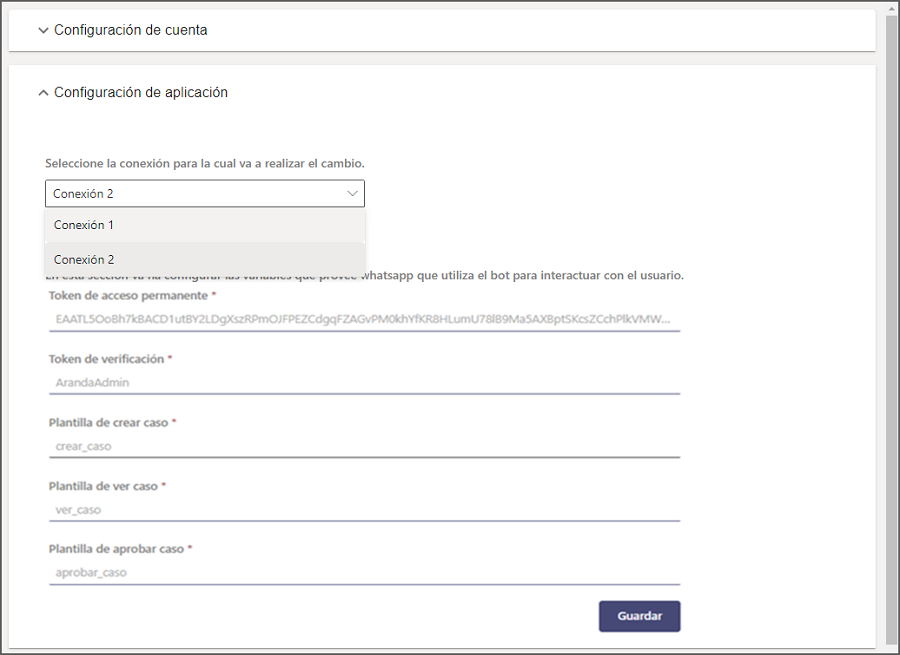
All fields are required; If the configuration is stored correctly, a message is displayed: Successfully updated application settings
Configuring messages in the Bot environment
In this section, the name of the Bot, the message of attention and the farewell message, which the Bot uses when interacting with users, can be customized in each culture (Spanish - English - Portuguese); The configuration must be made for each connection that exists within the environment. When all the fields are filled in, the configuration is completed by clicking on the Save.
Can be exchanged between the different connections configured from the field Select the connection for which you are making the change; The last connection established is the one that is maintained as Active.
| Field | Description |
|---|---|
| Bot Name | Name assigned to the Bot (maximum 46 characters). |
| Message of attention | The message that the Bot will use when it starts categorizing a case (maximum 1000 characters). |
| Farewell message | The message that the Bot will use when displaying the Create Case and View Case buttons (maximum 1000 characters). |
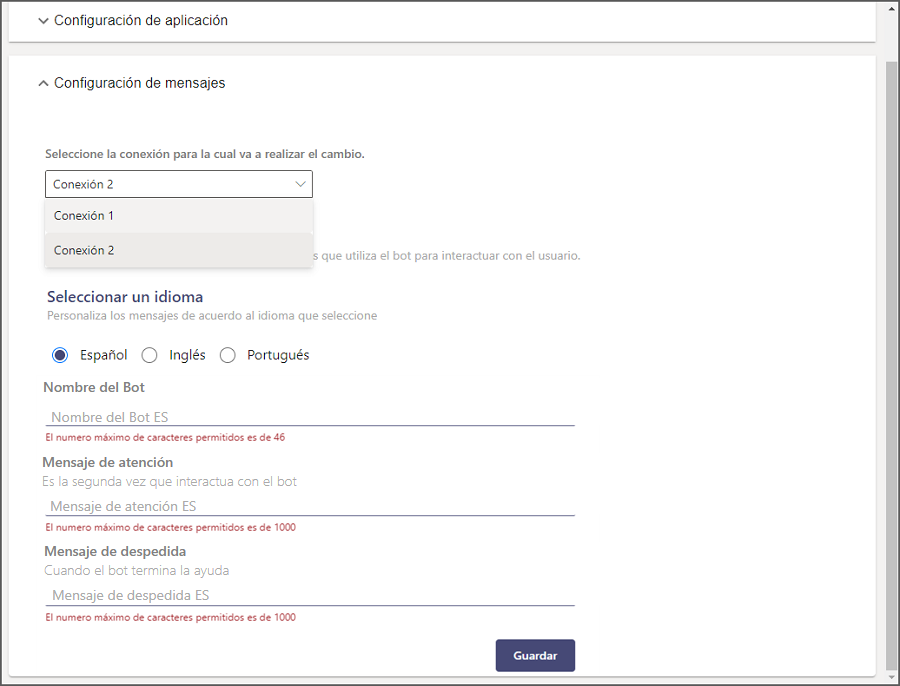
All fields can be filled out according to the needs that need to be customized; If the configuration is stored correctly, a message is displayed Correctly updated message settings.
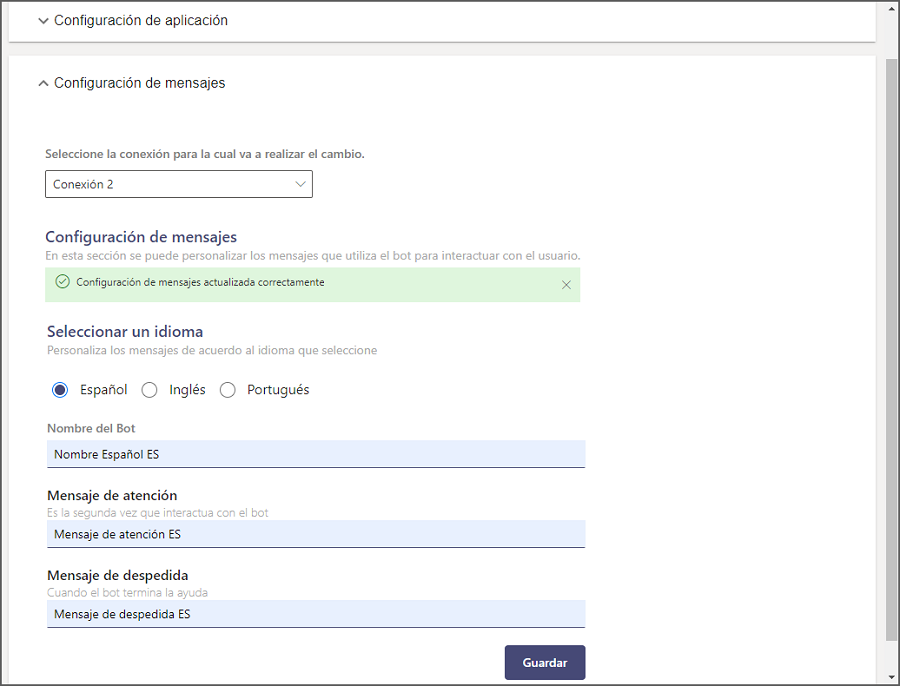
⚐ Note: If the changes are saved leaving the fields empty (Bot Name – Attention Message – Farewell Message), the default values that the Bot comes with are set preconfigured by each culture
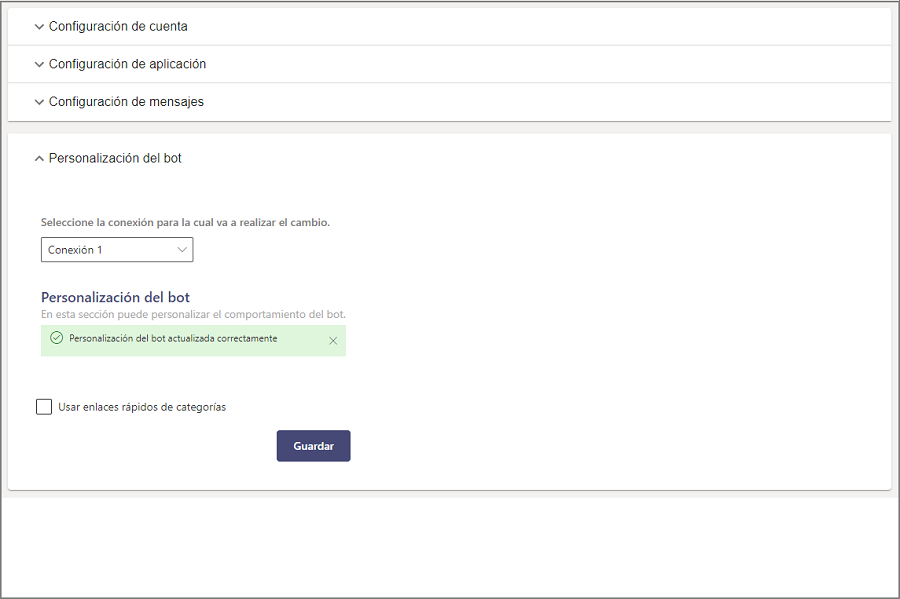
Bot Customization
In this section, the client will be able to customize the way cases are categorized when interacting with the Bot.
When creating a case with the “Use category quick links” option disabled (Default option), the Bot initiates a dialog to select each option in order (Project - Service - Category).
When you activate the “Use category quick links” option, the Bot will display a list of quick links from the categories that have the “Category in the User Home” Check enabled in the admin web console (BASDK) > Itil > Categories. Thus, you will only have to select an option and the Bot generates the link or button (if you have custom templates) that allows you to create the case.
Can be exchanged between the different connections configured from the field Select the connection for which you are making the change; The last connection established is the one that is maintained as Active.
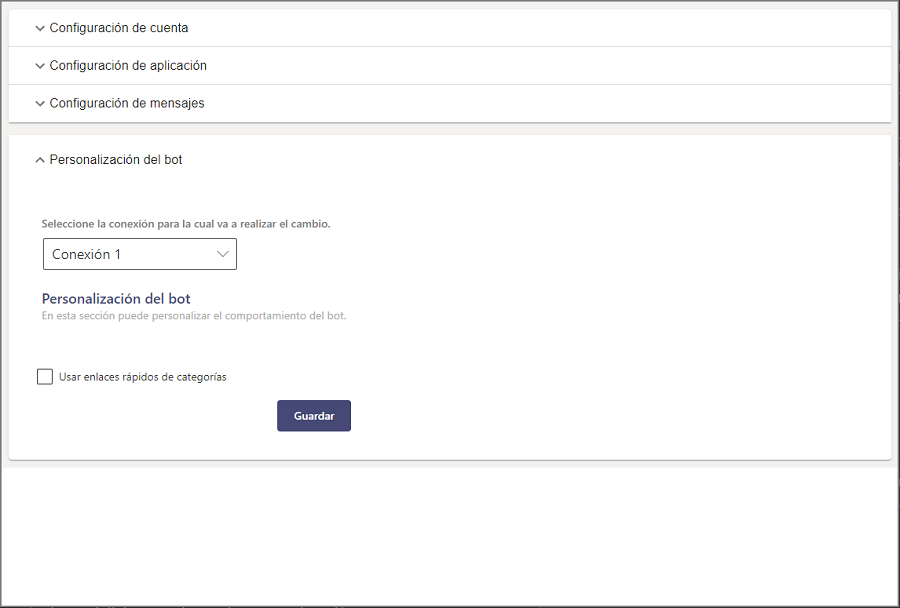
In this way, the customer will be able to personalize the user experience according to their needs and preferences; If the settings are stored correctly, you can display the message Properly updated bot customization.