
In this module of Aranda FIELD SERVICE AFLS, the event management for associated processes is managed.
1. To manage different events, go to the AFLS Configuration Console in the Administration from the main menu, select the Event Management. In the information view, select the required option from the drop-down menu:
- Application (This view does NOT apply to Multitenant environments)
- Bulk Uploads
- Work Orders
- Service Desk Integration Logs
- Service Desk Integration Synchronization
- Log Mobile Device Errors
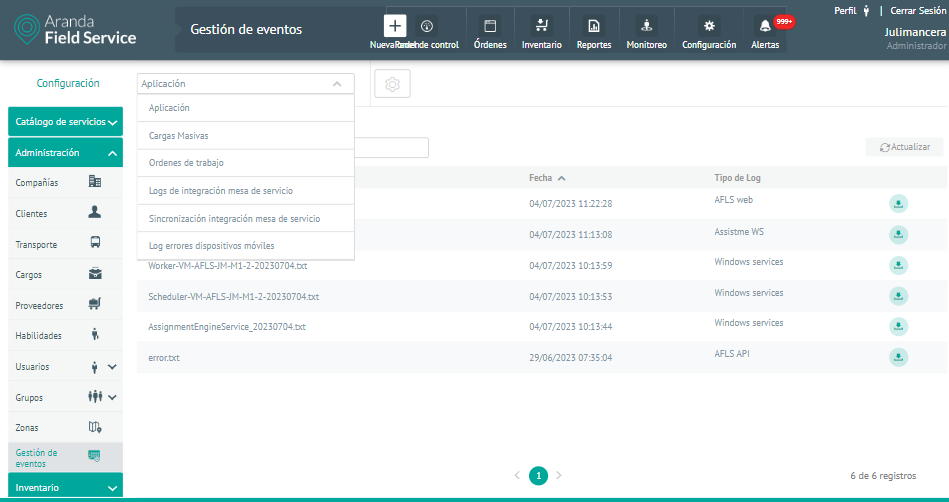
Application Logs View
2. In this module it is possible to configure the local routes where the logs generated by the web application or services can be viewed.
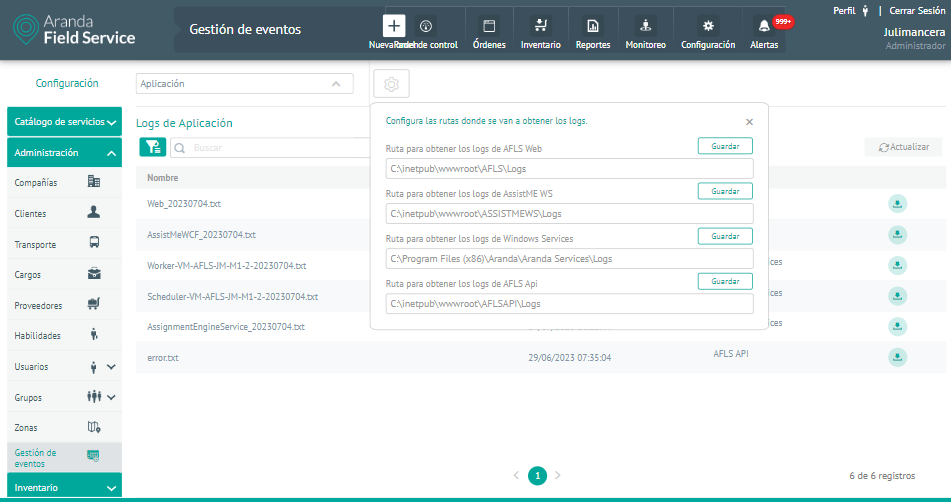
The Logs report the errors generated in the different processes of Aranda Field Service. In this module you will be able to view logs from the AFLS web application, logs from the AssistMe application, logs from Windows services that operate for AFLS and API logs. You can configure the routes to obtain the logs by selecting the Settings button  :
:
| Paths to get logs | Description |
|---|---|
| Path to Obtain AFLS Web Logs: | Corresponds to the local configuration of the application where the AFLS web application logs are hosted. The configured path that you will be able to display is: C:\inetpub\wwwroot\AFLS\Logs. |
| Path to AssistME WS logs: | It corresponds to the local configuration of the application where the logs of the ASSISTMEWS web application are hosted. The configured path that you will be able to display is: C:\inetpub\wwwroot\ASSISTMEWS\Logs. |
| Path to Windows Services logs: | It corresponds to the local configuration of the application where the logs of the Windows services are hosted. The configured path that you will be able to display is: C:\Program Files (x86)\Aranda\Aranda Services\Logs. |
| Path to get the AFLS Api logs: | It corresponds to the local configuration of the application where the logs of the exposed APIs are hosted. The configured path that you will be able to display is: C:\inetpub\wwwroot\AFLSAPI\Logs. |
| Save button: | This option validates and stores each of the routes in the database |
3. The options available to query and filter log logs are:
| Filter | It allows you to quickly search for the data by the name field, as well as filter the information by the following logs: AFLS WEB, AssistMe WS, Windows Services, AFLS Api and Todos. |
| Update | Allows you to update the information displayed in the Application Logs table |
⚐ Note: To perform the search with the filter by the name field, it is necessary to press the “Enter” key.
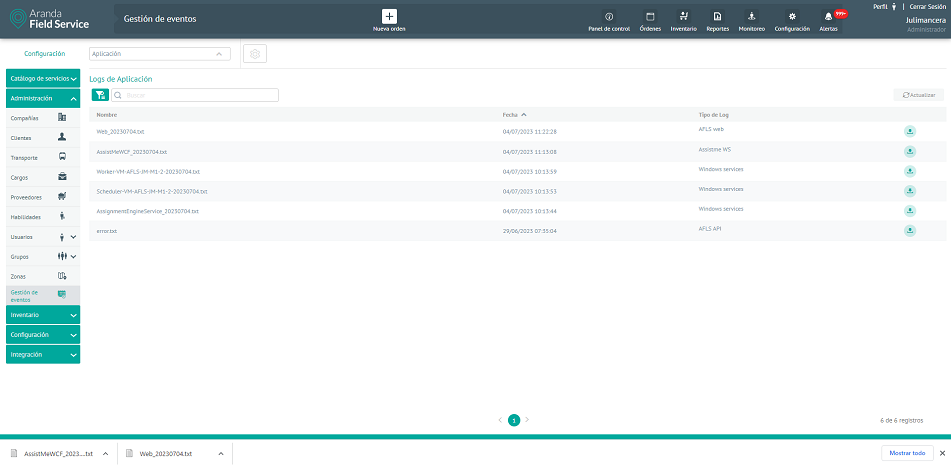
4. According to the selected filter, you will be able to view a list of the logs registered in the configured routes, with the following data:
- Name
- Date
- Log Type
- Download button: When you activate this button, the system generates a file with the selected log logs.
Bulk Uploads View
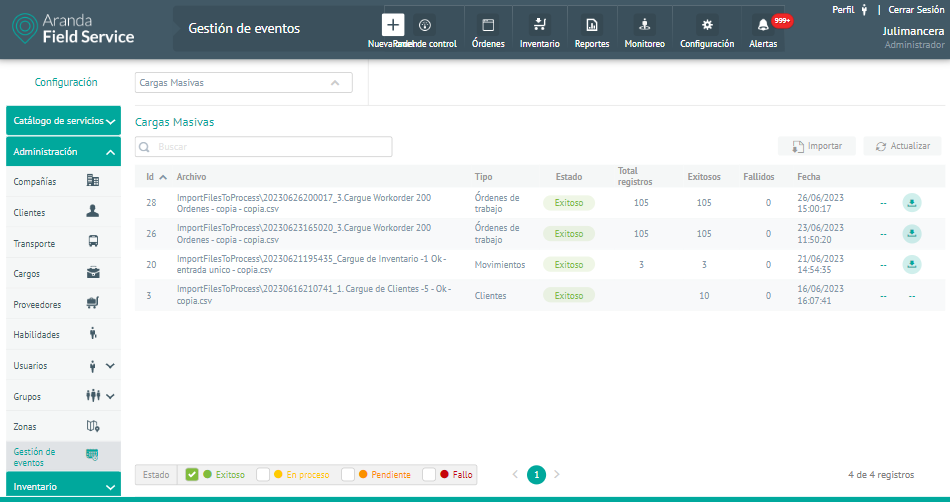
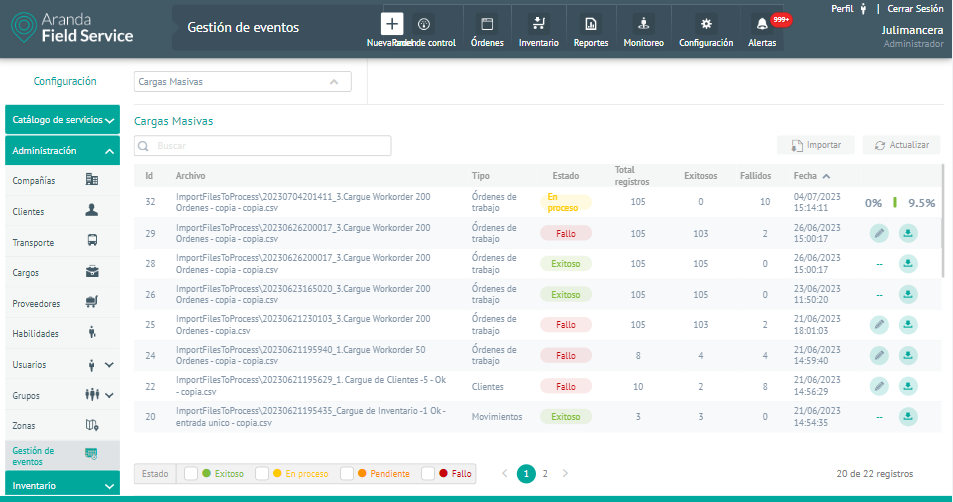
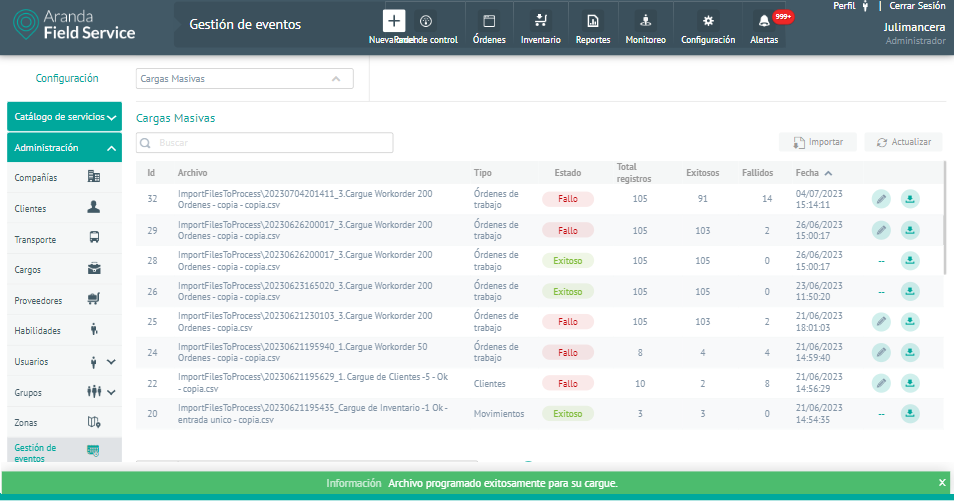
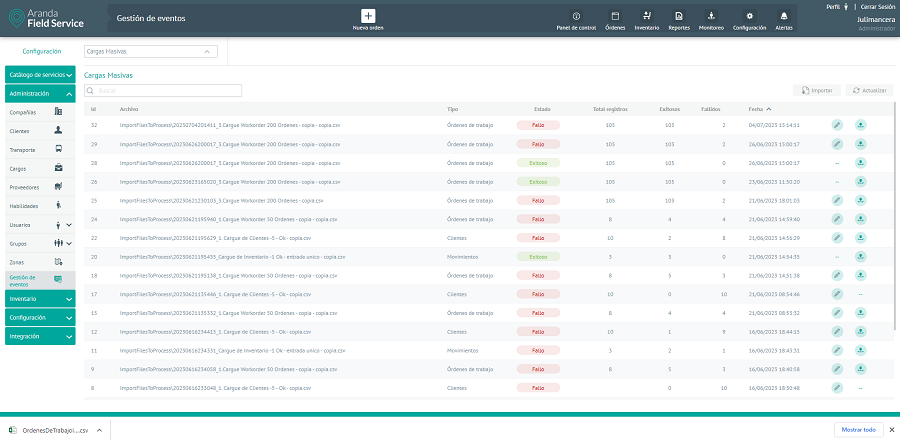
5. In the bulk upload information view, you can view the list of existing records, search for files by name, and sort the associated information by data type such as Id, File, Type (movement, orders, or customers), Status (Successful, In Process, Pending, or Failed), Total Records, Successful, Failed date, Failed data, and Successful file.
It allows you to view the bulk import history for the Orders, Customers, Transactions and Customer Groups modules.

6. The options available to query and filter bulk upload logs are:
| Filter | Allows you to search for the data using the File field. |
| Update | Allows you to update the information displayed in the bulk upload table |
| Filter by states | Each time the selection is deleted or added in any of the filters, the information in the bulk import history table will be filtered taking into account the data in the Status field. |
⚐ Note: To search in the filter it is necessary to press the “Enter” key.
Import option
7. Import is a functionality that allows you to upload customers, orders, movements and groups in bulk to Aranda FIELD SERVICE, through a .csv Excel file, with a specific format that allows you to manage and create records more efficiently.
In the Import View you can select the type of upload you want to perform, taking into account the selection it is possible to upload a file of the orders, movements, customers or customer groups that you want to add; when selecting the EXAMPLE. CSV You will be able to download a template to import.
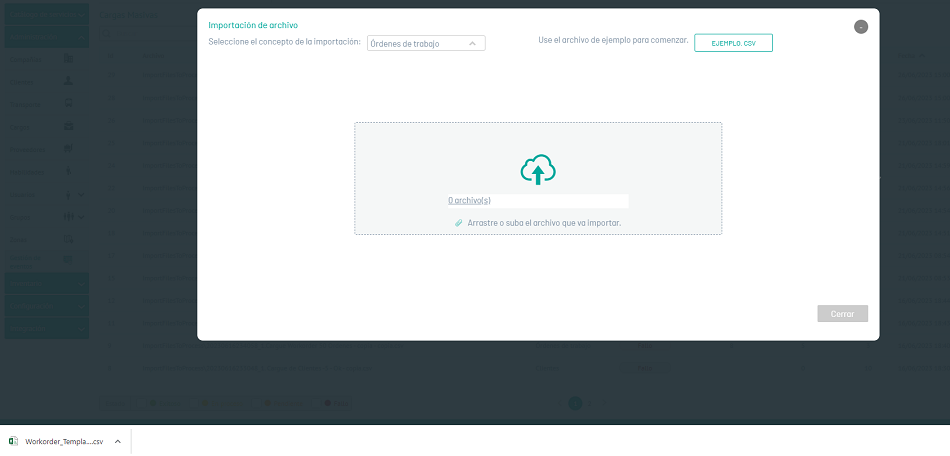
8. In the Import View select the Drag or upload the file you are importing to access the records of orders, movements, customers or customer groups and upload the information to be imported. The Windows Explorer window drops down where you can browse and select the file .csv.
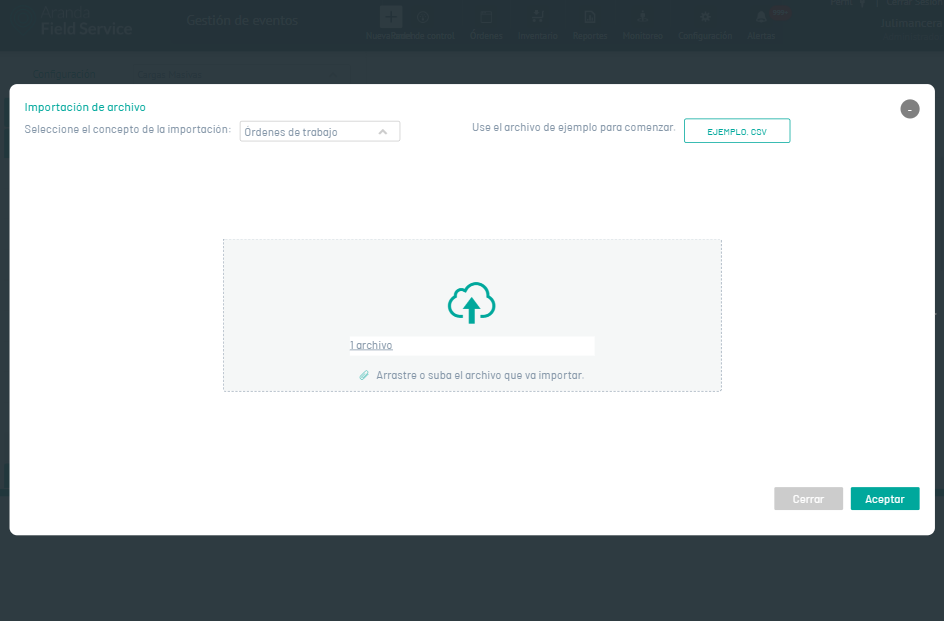
9. After selecting and loading the import file for orders, ledgers, customers, or customer groups, click Accept in the import view, to confirm the changes made and the system will schedule the processing of the file. By updating the information, you will be able to validate the progress of the upload.
Review records that weren’t imported
10. In the list of bulk upload logs, in the Retry, you can identify if the imported file contains one or more incorrectly configured records by activating the edit button  .
.
By clicking on the edit button you will be able to view the records that were not uploaded and at the end of the columns the reason for the failure to import the record will be displayed.
In this edit view, you can modify and correct erroneous data.
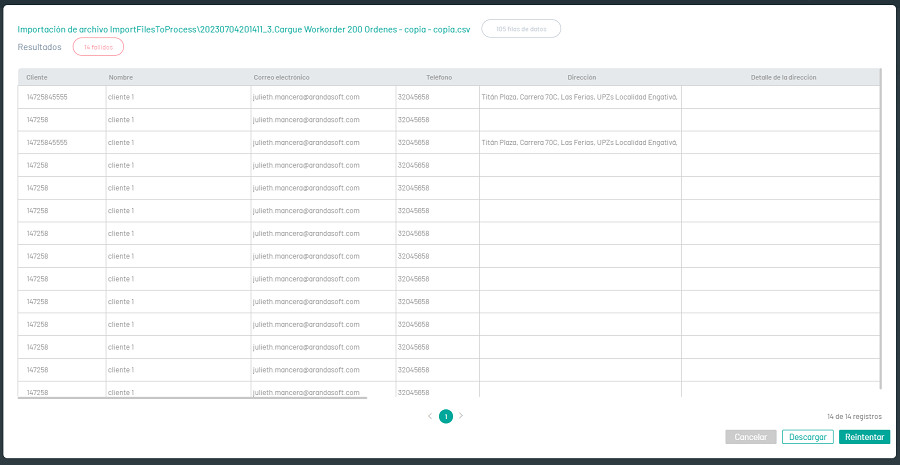
- Cancel button: Performs the cancellation of the editing of the records, closing the view and returning to the detail of bulk uploads.
- Download button: The system generates a CSV file with a proper name and records that were not imported into the application. Pressing the download button will automatically start downloading the file.
- Retry button: When you modify and correct the erroneous data in the upload, each of the records is validated and retried for import.
Review the records that were imported
11. In the list of bulk upload logs, in the Successful Log, you will be able to identify the imported records successfully, by activating the download button  .
.
The system generates a CSV file with a proper name and with the records that were imported into the application. By pressing the download button you will be able to access the generated file.
⚐ Note: In the last column of the imported record file, you can display the consecutive ID of the created record.
Work Orders View
12. In the order information view you can view the list of existing work orders and search for the files by name and sort the associated information by data type such as Order Number, Date Created, Customer, Vendor, Service, and Reason.
It allows you to view a list of orders that have presented some inconvenience at the time of making the assignment
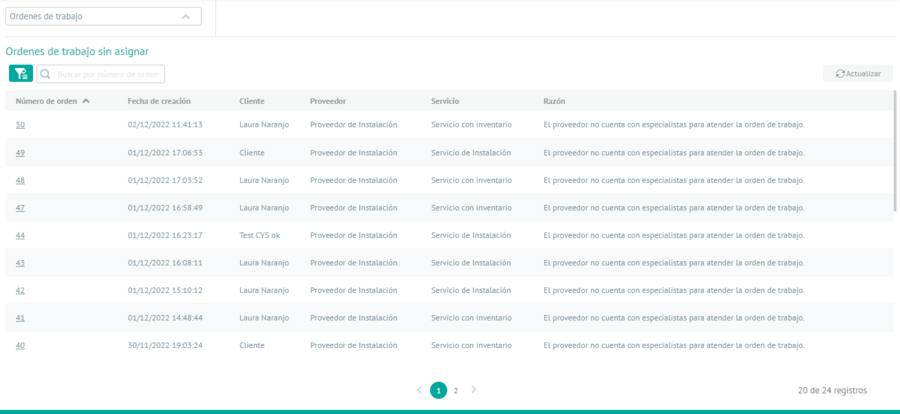
13. The options available to view and filter work order records are:
| Filter | It allows you to quickly search for the data by the order number field, it is also possible to filter by the following fields: Date of creation, Customer, Supplier and Service. |
| Update | Allows you to update the information displayed in the unassigned work order table |
⚐ Note: To search in the filter by the order number field, you need to press the “Enter” key.
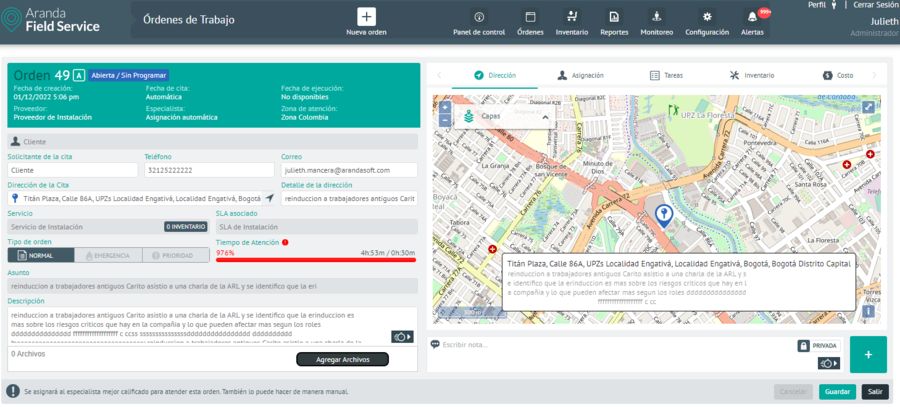
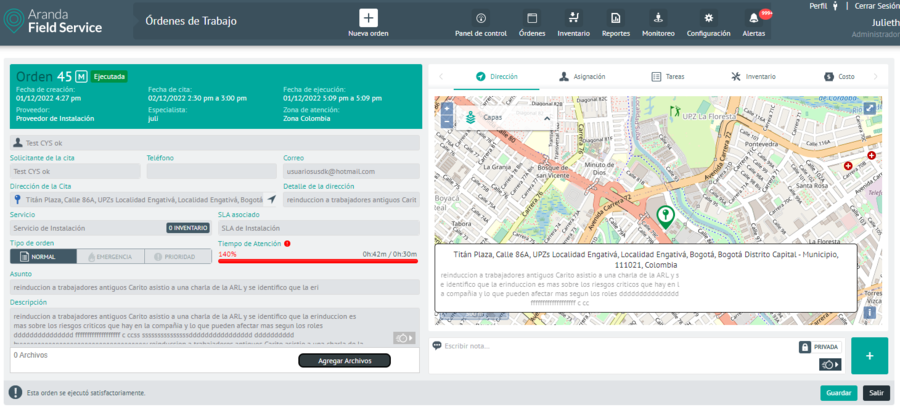
Work Order Quick View
14. By clicking on a work order number, you will be able to access a quick view with the most relevant data of the work order, with the following information:
- Order number
- State
- Date of creation
- Supplier
- Care area
- Location
- Location Details
- Service
- Attention Time
- Subject and description of the work order
- Open button
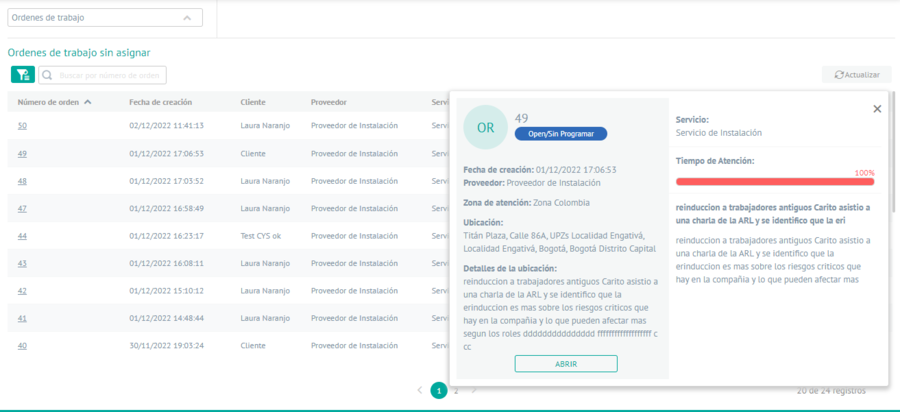
15. By selecting the Open, you can redirect the inquiry to the work order detail view.
Integration Logs View
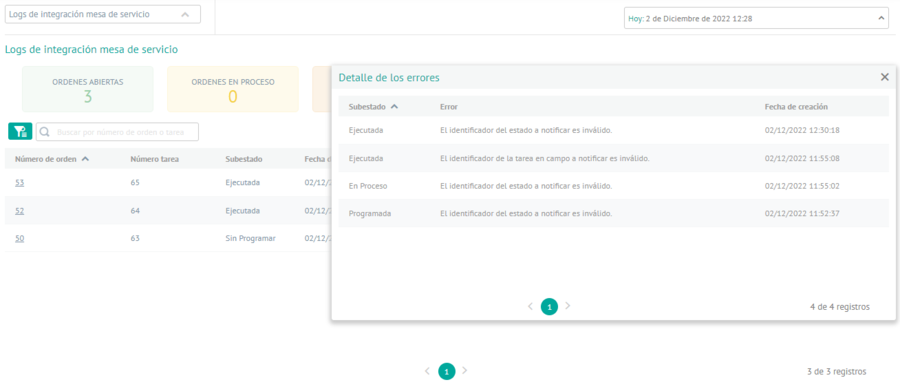
16. In the Service Desk Integration Log Information View, you can view the behavior of work orders created and managed in the ASDK or ASMS integration.
17. The options available to query and filter the integration log logs are:
| Filter | It is possible to filter the information by the following criteria: Today and Last Week, allows you to quickly search the data by the Order Number or Task Number field, and you can also filter by the sub-status of the integration log table. |
| Update | Allows you to update the information displayed in the integration log table. |
⚐ Note: To search in the filter by the order number or task number field, you need to press the “Enter” key
18. Teniendo en cuenta el filtro seleccionado se consulta por la fecha de creación y permite visualizar un resumen de las tareas en campo creadas desde la aplicación Aranda Service Desk (ASDK) o Aranda Service Management (ASMS), se visualizan las siguientes opciones:
| Orders | Description |
|---|---|
| Open Orders: | Field tasks that have been created from the ASDK or ASMS application to AFLS are displayed. |
| Orders in process: | Field tasks that are in the process state are displayed in the AFLS application. |
| Orders executed: | Field tasks that are in the executed state are displayed in the AFLS application. |
| Cancelled orders: | Field tasks that are in a canceled state are displayed in the AFLS application. |
| Unnotified Orders | The field tasks that are pending to be notified to the ASDK or ASMS application are displayed. |
| Failed orders to be notified: | The tasks in the field that failed at the time of making the notification to the ASDK or ASMS application are displayed. |
19. Taking into account the selected filter, the creation date is consulted and a detail of the orders that presented an error at the time of trying to notify the ASDK or ASMS application is displayed, the following data is displayed:
- Order number
- Task number
- Sub-Status
- Date of creation
- Date of notification
- Failed attempts
- Error

20. Al dar clic sobre un error se visualiza una vista el historial de los subestados de la orden de trabajo que generaron error al intentar notificar hacia ASDK o ASMS, se visualizan los siguientes datos:
- Sub-Status
- Error
- Date of creation
21. When you click on an order number, a quick view is displayed with the most relevant data of the work order, the following data is displayed:
- Order number
- State
- Date of creation
- Supplier
- Care area
- Location
- Location Details
- Service
- Attention Time
- Subject and description of the work order
- Open button
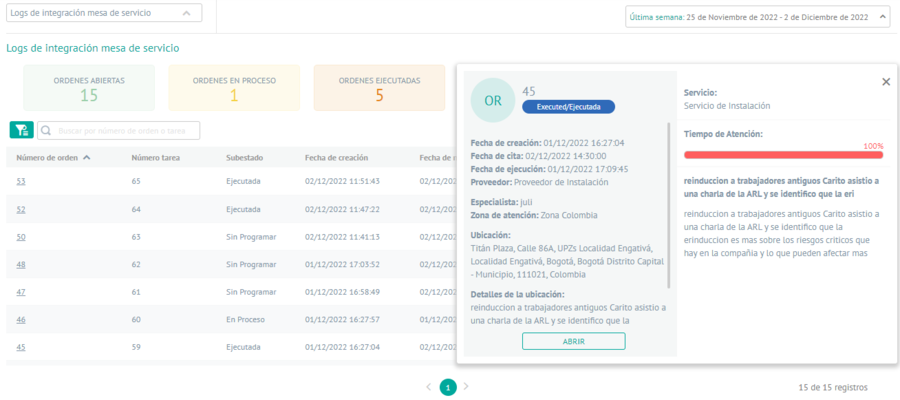
22. By selecting the Open, you can redirect the inquiry to the work order detail view.
Service Desk Integration Synchronization View
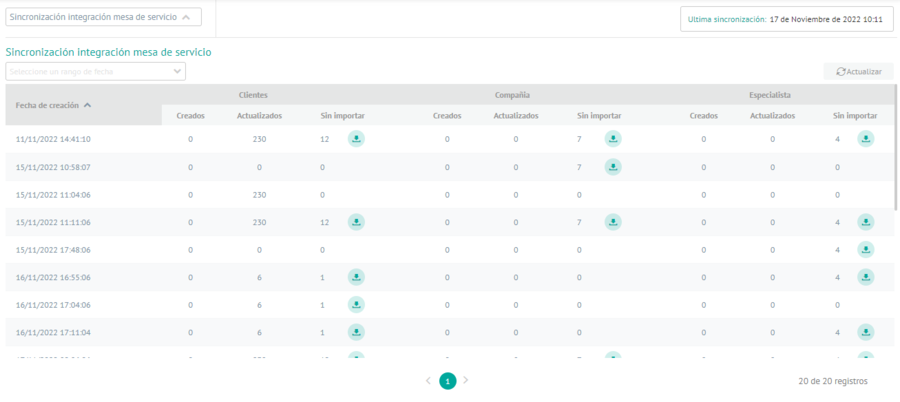
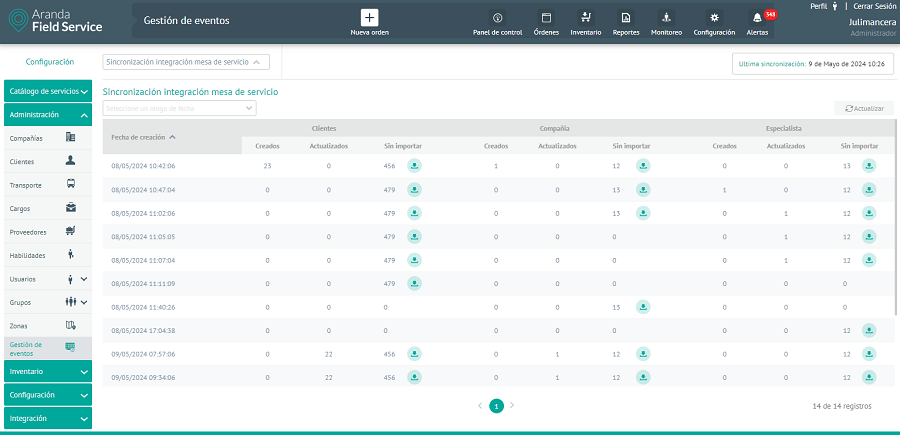
23. In the service desk integration synchronization information view, you will be able to view the history of synchronizations and each of their created, updated, or unimported data for customers, companies, and specialists in the integration with ASDK or ASMS.
24. The options available to query and filter the synchronization logs are:
| Filter | Allows you to search for the data by the creation date field by selecting start date and end date. |
| Update | Allows you to update the information that is displayed in the Service Desk Integration synchronization table. |
⚐ Note: To search the filter by the creation date field, it is necessary to press the “OK” button.
25. Teniendo en cuenta el filtro seleccionado se consulta por la fecha de creación y se visualiza un detalle de la sincronización para los clientes, compañías y especialistas desde la aplicación Aranda Service Desk (ASDK) o Aranda Service Management (ASMS), se visualizan los siguientes datos:
- Fecha de creación.
- Clientes: Creados, Actualizados y Sin importar.
- Compañías: Creados, Actualizados y Sin importar.
- Especialistas: Creados, Actualizados y Sin importar.
- Fecha de última sincronización: Se visualiza en la parte superior derecha del módulo.
Error log review
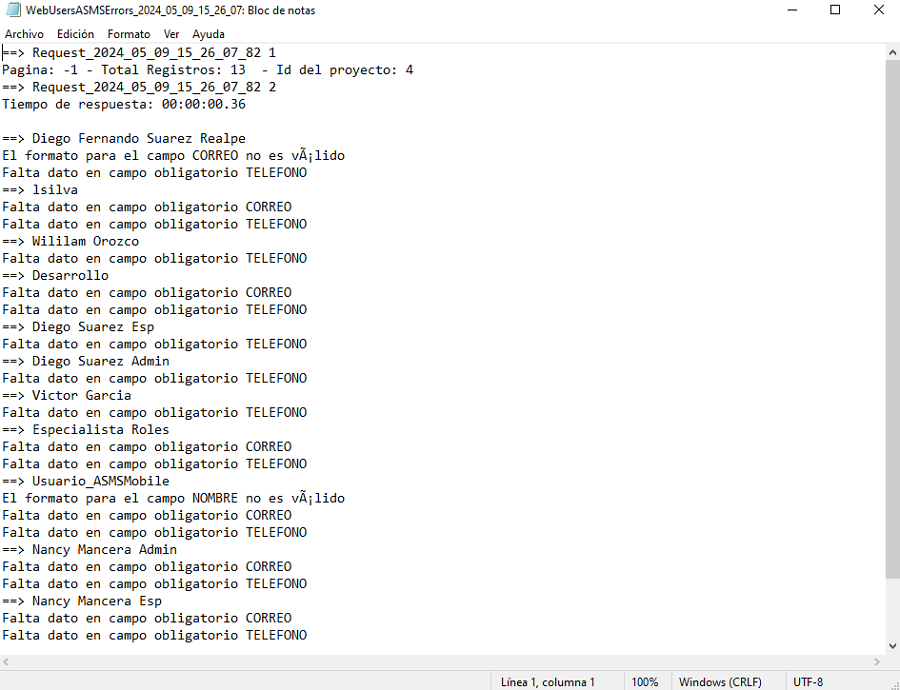
26. In the list of records, in the Not Importing column, you will be able to identify if the records to be synchronized of the clients, companies or specialists contain one or more erroneously configured data, activating the download button.
The system generates a TXT file with a proper name and with the records that were not imported into the application. Pressing the download button will automatically start downloading the file
When you open the file, you will see the logs that were not synced and the reason why the log could not be imported.
Log View Mobile Device Errors
27. In the Log view of mobile device errors, you can consult the list of errors reported by the devices, apply different filters and sort the information with data such as Android Version, Reference, Specialist, Server, Service, Method, Class, Error Date and Error.
This view allows you to view the list of errors that have been presented when requests are made to the web server.
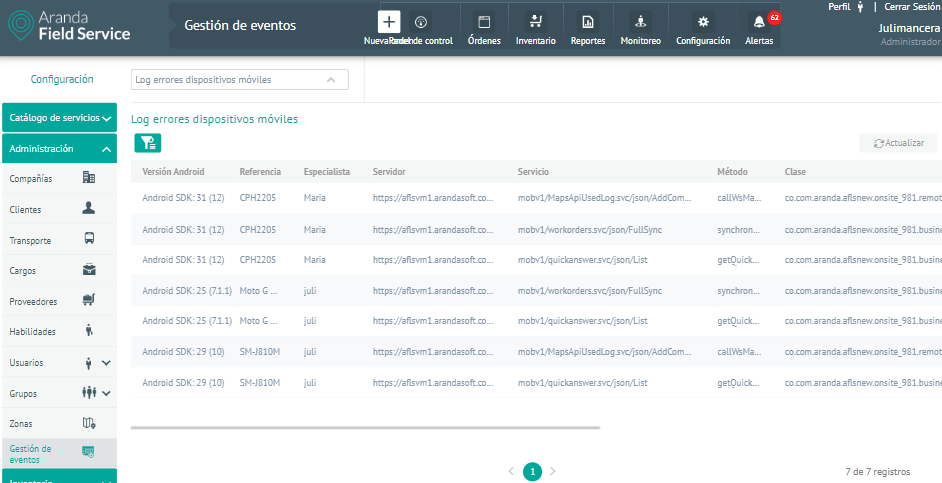
28. The options available for querying and filtering error log logs are:
| Filter | It is possible to filter by the following fields: Android Version, Reference, Specialist, Server, Service, Method, Class, Error Date. |
| Update | Allows you to update the information displayed in the Log table for mobile device errors |