In this module, you can make fundamental business modifications, such as changing the map provider, importing GeoJSON data, or enabling or disabling features for field specialists.
1. In the Aranda FIELD SERVICE web console, in the Configuration from the main menu, select the “Global Settings” option. In the View, turn on the Enable Editing and in the detail view fill in the Global Settings information.
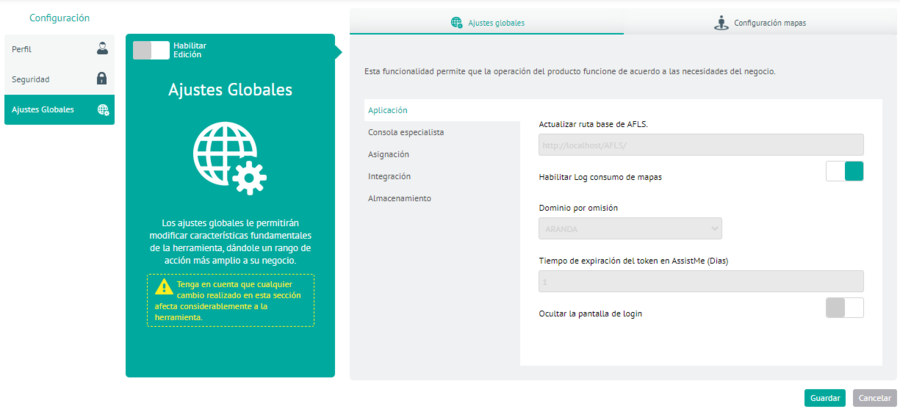
2. When you activate the editing of the Global Settings fields, a confirmation message is displayed to warn about the changes to be made in the tool.
3. In the Global Settings View in the AFLS web console, you can customize six operating parameters; The configuration of these parameters directly affects the operation and performance of the tool.
Application
In this option you can define the configuration parameters for the system in general:
| Fields | Description |
|---|---|
| AFLS Base Path: | Enter the public URL of the AFLS instance here. |
| Culture configuration: | Select the language to use when sending email templates. |
| Token Expiration Time on AssistMe | It allows you to configure the maximum time for the expiration of the client token when you log in to the AssistMe application, it must be configured in days. |
| Token expiration time in mobile app | It allows you to configure the maximum time for the expiration of the client token when you log in to the mobile application, it must be configured in minutes. |
| Enable Log Map Consumption: | Enable or disable map consumption logging for your app. |
| Enable/Unactivate Panic Button: | Enable or disable the setting to display the panic button in the mobile app. When enabled, the following fields are displayed: Permanent Access Token, WhatsApp Business Account ID, Select Alert Template, Phone Number ID, and the option to enter the phone numbers that will receive the message |
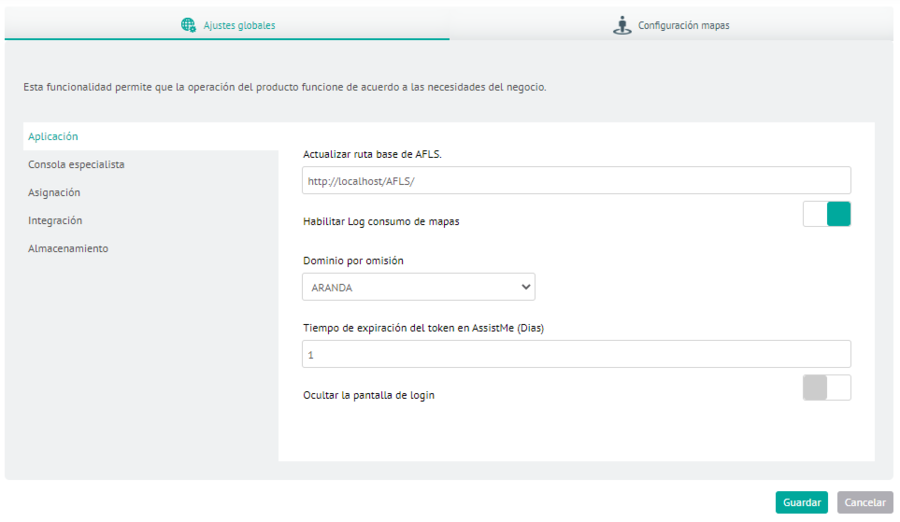
When you finish configuring the application options, click Save  to confirm the changes made.
⚐ Note: After enabling or disabling the app’s map consumption log, you need to log out and log in again to view the change.
Specialist console
In this option, you can define the configuration parameters to enable or disable functional capabilities for field specialists.
| Fields | Description |
|---|---|
| Edit or Create Customers and Create Orders: | Enable or disable the functional capabilities of creating, editing customers, or creating work orders to all field specialists. |
| News URLs: | Enter the public news URL here so that field specialists can view the content in the mobile app. |
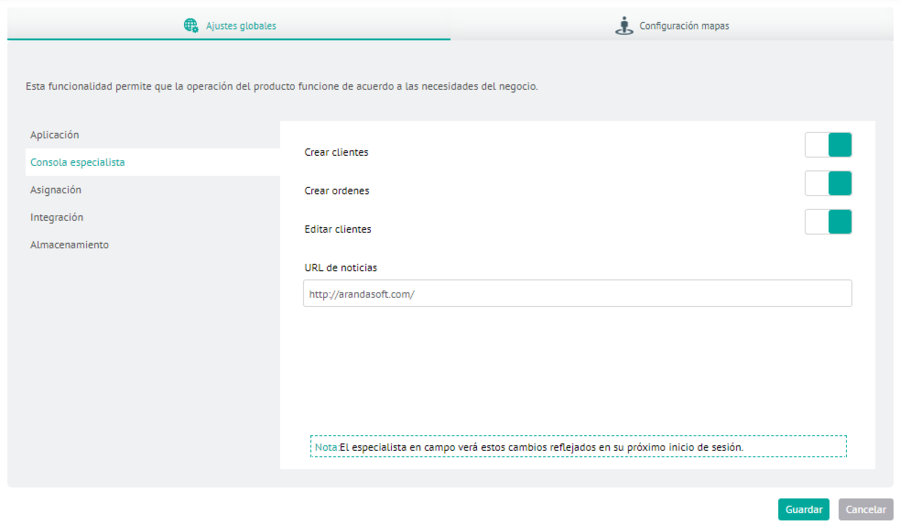
When you finish configuring the Specialist console options, click Save to confirm the changes made.
⚐ Note: After enabling or disabling any of the options in the Specialist Console, specialists need to log out and log in again before they can view the changes.
Assignment
Depending on the type of business, you can decide under what circumstances work orders are reassigned in the system. You can enable or disable the following options:
- Reassign orders due to availability change, inactivity, or license revocation.
- Maintain the assignment of manual orders, even if they have expired (otherwise they become automatic)
- Take the last location reported for work order assignment (otherwise the location associated with the specialist profile or facility location will be taken).
- Automatically assign tasks to the work order specialist. (When enabled, the option allows you to automatically assign the specialist, the date and time of the tasks associated with the work order.)
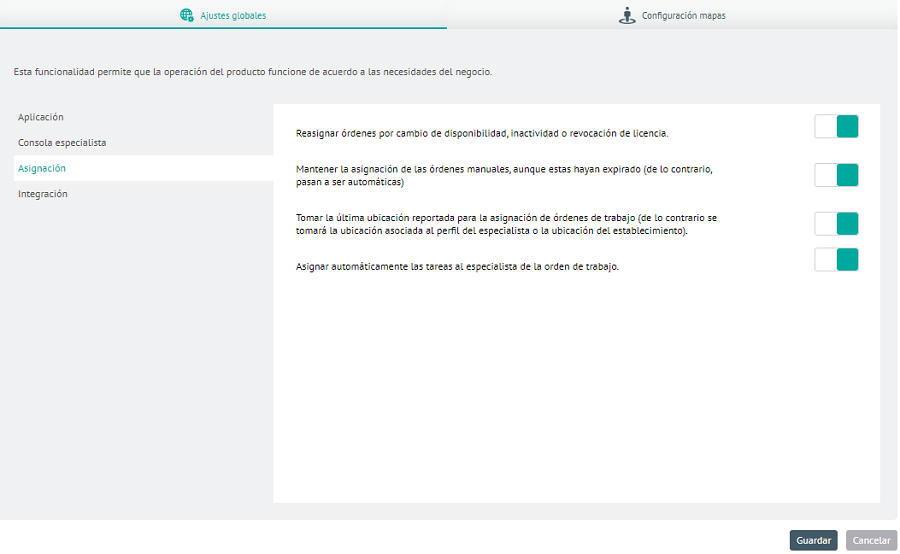
When you finish configuring the assignment options, click Save to confirm the changes made.
Integration
This parameter complements the integration with the ASDK tool by configuring the AFLS work order execution notification to ASDK field tasks. For newer versions of AFLS and ASDK, we recommend selecting the Direct integration type, which allows AFLS and ASDK to interact directly. To integrate via the WSO2 integration bus, select the ESB option. If you chose direct integration, you need to fill out the following fields:
| Fields | Description |
|---|---|
| Username | Integration User |
| User Password | Integration User Password |
| Name of the additional field for solution to ASDK | If you are having field feed rule solution of a case in ASDK from an AFLS work order, enter the system name of an additional AFLS field. |
| ASDK Status Approval | This option allows you to make ASDK and AFLS state ID pairs when state changes are to be reported from AFLS to the ASDK. |
| Homologation of AFLS states from ASDK | This option allows you to make state ID pairs of AFLS and ASDKs when state changes are to be reported from ASDKs to AFLS. |
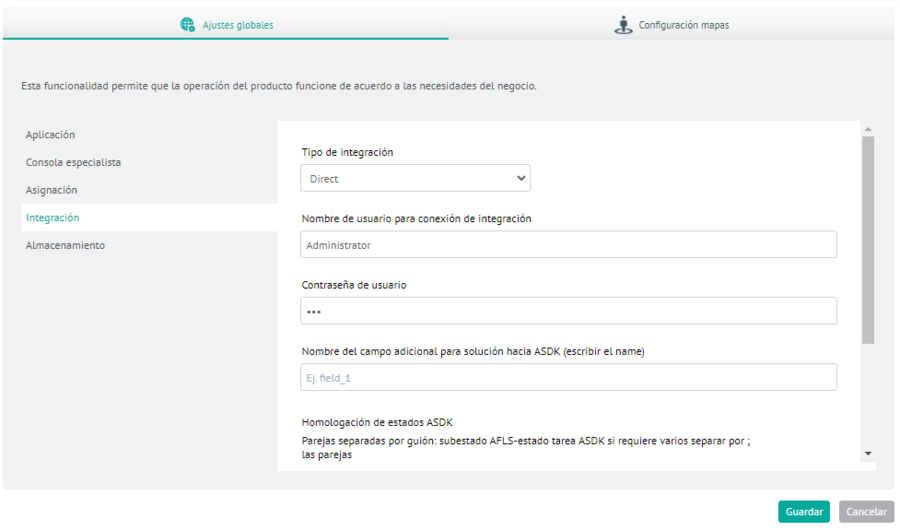
When you finish configuring the integration options, click Save to confirm the changes made.
Storage
In this option you can define the configuration parameters either local, remote or external for the physical storage of the files that are uploaded to the application:
File: Allows you to perform local or remote file system configuration. When you select the Local file system, the following fields are enabled:
| Fields | Description |
|---|---|
| Path: | It allows you to record the physical path where the files uploaded to the application are saved. |
When you select the Remote file system, the following fields are enabled:
| Fields | Description |
|---|---|
| Path: | It allows you to record the physical path where the files uploaded to the application are saved. |
| User: | It allows you to configure the user with whom the connection to the remote route is going to be made. |
| Password: | It allows you to configure the password of the user with whom the connection to the remote route is going to be made. |
| Domain | It allows you to register the domain of the user who is going to connect to the remote path. |
External: Allows you to configure the External file system in a storage account (Azure). When you select the External file system, the following fields are enabled:
| Fields | Description |
|---|---|
| Supplier: | It allows you to select the external provider where the physical files uploaded to the application will be stored, at the moment only the Azure option is displayed. |
| Connection String: | Allows you to configure the connection string of the storage account provided by the third-party provider to make the connection. |
| Validate button | It is displayed in both options (File or External) and allows you to check that the configuration supplied in the module allows the correct connection to any of the file system options |
| Save button | Allows you to save settings for the file system. |
When you finish configuring the storage options, click Save to confirm the changes made.
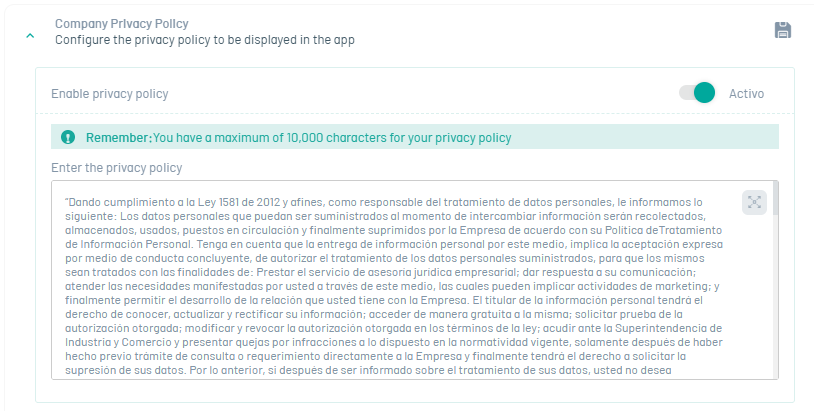
Company Privacy Policy
In this option, you can enable or disable and define the company’s privacy policy.
⚐ Note: The field to define the privacy policy allows a maximum of 10,000 characters.
Maps
In this option you can define the configuration parameters for the map provider or configure data for GeoJSON file import.
| Package | Default in installation | Guy | Cost | Considerations |
|---|---|---|---|---|
| OpenStreet Maps + Nominatim | Yes | Open source maps and geocoding with open source | None | Geocoding (Nominatim service) compared to the other two packages, has less effectiveness in the results. |
| OpenStreet Maps + ArcGIS | No | Open source maps and geocoding that consumes ArcGIS cloud service | Geocoding and reverse geocoding service consumption. Each request generates cost. | To register the service, go to the Arcgis page, register an application, and get the Client Id and Secret Id - API Key to be recorded in AFLS. |
| Google Maps | No | Maps and geocoding by Google Maps | Both map painting and geocoding and reverse geocoding generate cost per request | To register the service, you must access the Google Maps page and obtain the Secret Id - API Key Websites, API Key Android and API Key IOS (for BASIC packages) and if the package is PREMIUM, also the C_lient ID._ |
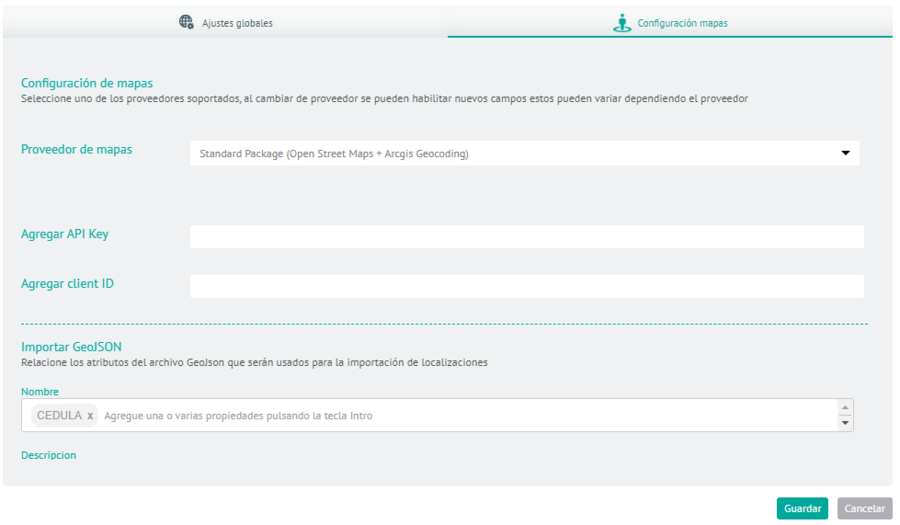
When you finish configuring the map options, click Save to confirm the changes made.
⚐ Note: When you make a change of provider, you will be able to enable new fields that vary depending on the provider chosen. Example: Google enables API Key Websites, API Key Android, API Key IOS, Client IDand Plan Type.
⚐ Note: After switching map providers and saving, users need to log in again to view the change in the web, mobile, and AssistMe apps.
For more information, please visit the Comparison between map providers
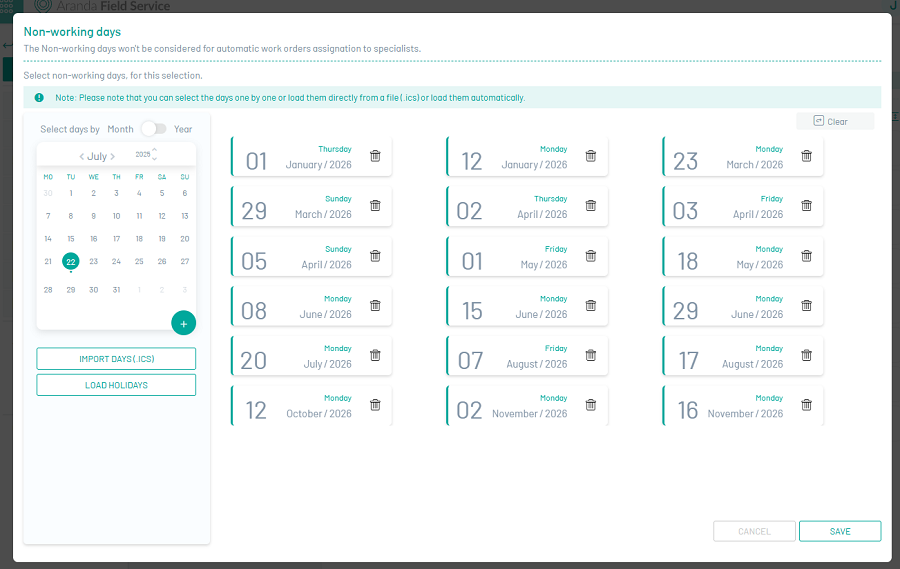
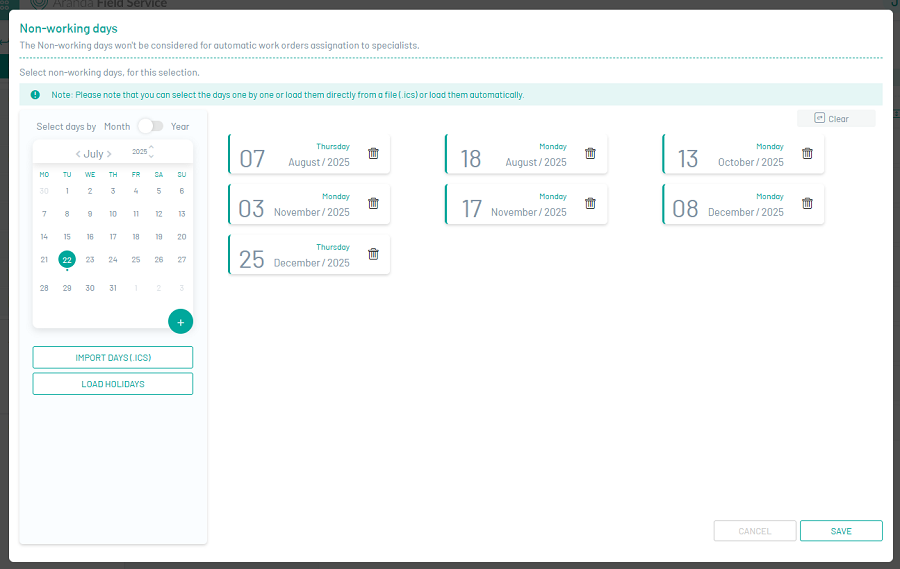
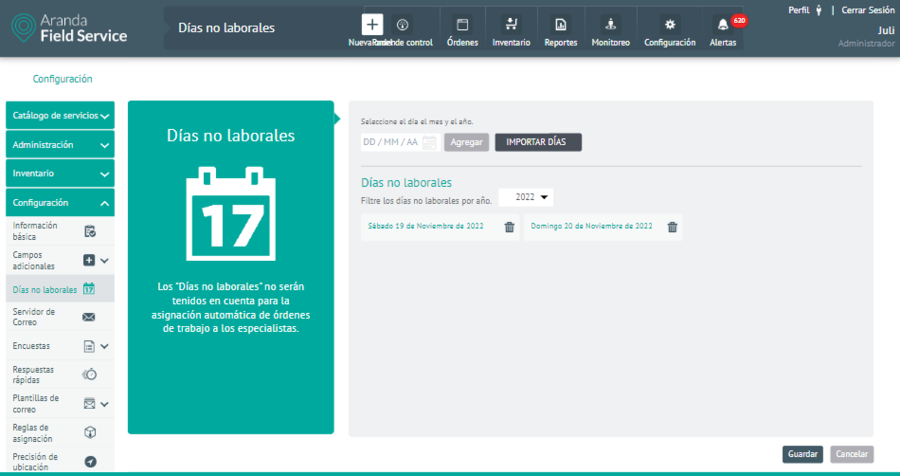
Non-working days
1. Non-working days are the days automatically assigned to specialists who do not have availability to attend to work orders, to enter the view and add days click on the Manage Dates.

2. The system allows you to select Non-Working Days in two ways:
- Per month
- Per year
3. Select the dates on the calendar, click “Add” or “Add” in the corresponding window, and verify that the selected days are added to the list.
4. To delete a Non-Working Day, select a record in the list and click the  or on the “Clean” button to delete the corresponding information.
5. When you finish setting up non-working days, click Save in the Detail View of the AFLS Configuration Console to confirm the changes.
⚐ Note: If you need to send a specialist to fulfill a work order on a non-working day, assign the specialist manually to the work order. Check the availability of the speciesist that day and have the skills to perform the service.
Import Days (. ICS)
6. To bulk import non-working days, click Import Days (. ICS) and attach a file with an extension .ics with the dates to be registered.
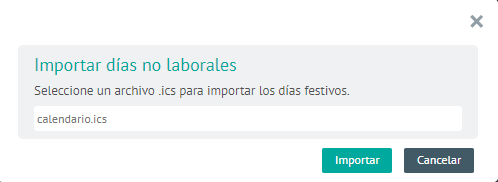
7. Once imported, the system displays the days of the .ics file in the Non-working days.
8. When you’re done setting up your non-working days, click Save in the Detail View of the AFLS Configuration Console to confirm the changes.
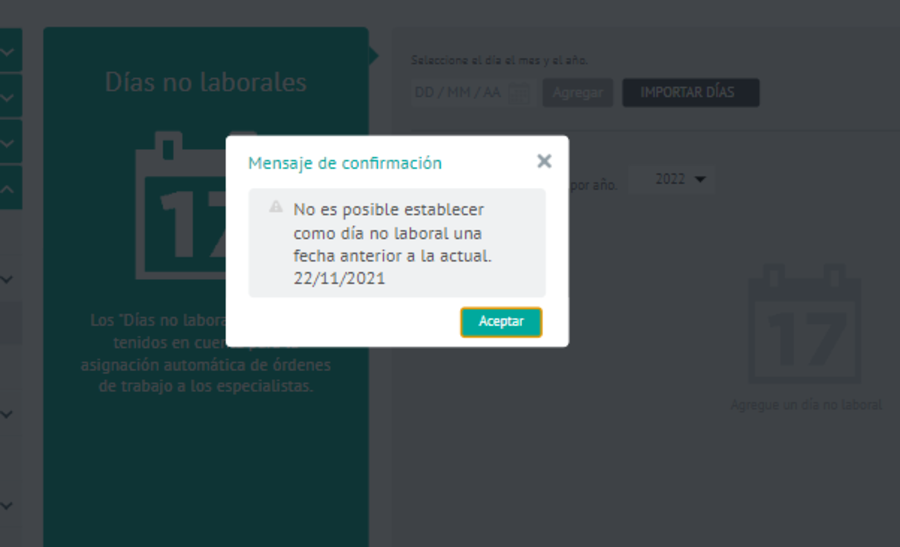
⚐ Note: If any date in the file is registered as a non-working day, the system will present a warning message, indicating that the date to be imported is already added. Validation is also performed so that the user does not add dates earlier than the current one.
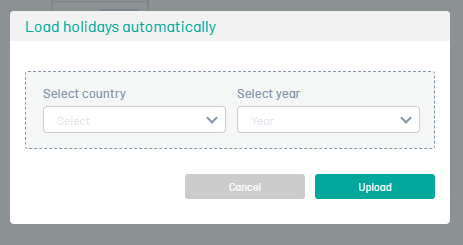
Load holidays
9. To bulk import non-working days, click Load Holidays, select country and year, click Upload to display the days configured for the chosen country.
10. When you finish setting up non-working days, click Save in the Detail View of the AFLS Configuration Console to confirm the changes.