


This module allows you to consult the information of the Synchronized VMs and Instances from the cloud infrastructures (IaaS) of Microsoft Azure, Amazon Web Services (AWS) and Google Cloud Platform (GCP), integrating them into the inventory of ADM.
Through this inventory, it is possible to identify which machines have the ADM agent installed, apply search filters, access detailed information, and easily navigate to other console screens.
View list of synchronized virtual machines
1. Enter the Beginning in the ADM, select the Inventory In the header menu, in the drop-down list, click the Infrastructure.

⚐ Note: Permission must be obtained Cloud Infrastructure > View Screens, which enables access to this module. The permission applies equally to Azure, AWS, and GCP machines.
2. This screen displays the list of Synchronized VMs across all platforms, with information discovered in the cloud and a summary of each device in the columns Name, Instance Type, Platform, Operating system, Availability Zone / Groups, Location and Subscription. The columns Platform and Subscription They allow you to distinguish the provider and the cloud subscription (IaaS) in which each machine was synchronized.
- Virtual machines that have the ADM agent They are identified by a green indicator next to their name.
- In the lower part there is Predefined filters by AGENT: INSTALLED and NOT INSTALLED.
- The seeker Applies to the fields: name, operating system and cloud subscription (IaaS).
- It’s possible Sort the records by any of the columns in the list.

⚐ Notes:
- The green indicator next to the VM name means that during the last synchronization, the machine had the ADM agent. However, it may happen that when entering the device detail, the option is not enabled DEVICE DETAIL, as the system performs additional real-time validation to display this button. Since syncs can be scheduled (every 12 hours, 1 day, or 7 days) or run on demand, it is possible that the agent has been uninstalled after the last sync and that information is still not reflected in the console until the next update.
- In AWS, the Name Displays the value of the tag Name of the instance. If the instance does not have that tag, the instance ID is displayed.
Filter the listing
3. To filter the listing, click on the filters button  icon next to the search engine. The filter panel allows you to select one or more values from the following categories:
- Platform: Azure, GCP, and AWS.
- Subscription: Cloud subscriptions configured.
- Operating System: Linux and Windows.
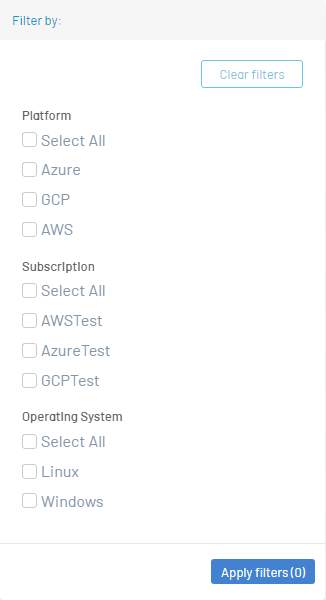
4. Click Apply filters to update the listing. To remove the selected values, click Clean filters.
Device detail detected by the subscription
5. To view detailed information for a virtual machine, click on the record in the listing.
A modal will open with more specific data, such as: operating system, instance type, cloud status (Cloud Status), location, subscription, number of cores, storage, associated tags, and date of last synchronization.
- If the virtual machine has the ADM agentbutton, the DEVICE DETAIL, which redirects to the device detail screen in the Inventory.

- If the virtual machine does not have the ADM agent, the DEVICE DETAIL it is not enabled and the modal indicates that the agent must be installed to see the device detail.

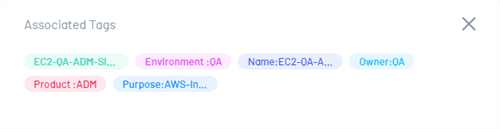
6. In the Associated Tags The first four tags of the virtual machine are displayed. When there are more than four, the (+).
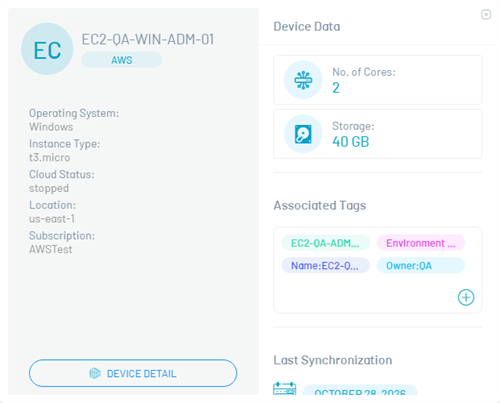
7. Click the (+) to see all tags in the modal Associated Tags.
⚐ Notes:
- The value of storage is the sum total of the disks allocated to the VM (managed disks in Azure, EBS volumes in AWS, and attached disks in GCP).
- In GCP, tags correspond to the key type and value tags of the instance. Network tags, which are used in firewall rules, are not displayed.
- Attributes that are not reported by the vendor are displayed with the value –.
Return to the settings screen
8. To return to the Configuration button on the console, click the CONFIGURATION, located at the bottom left of the view.
Return to the Device Inventory screen
9. To return to the default device inventory screen, click the Return, located at the top left of the view.
⎘ Related Links: