
In this module, configure the additional fields and Additional dependent fields necessary to add supplemental information to case types.
Creating Additional Fields
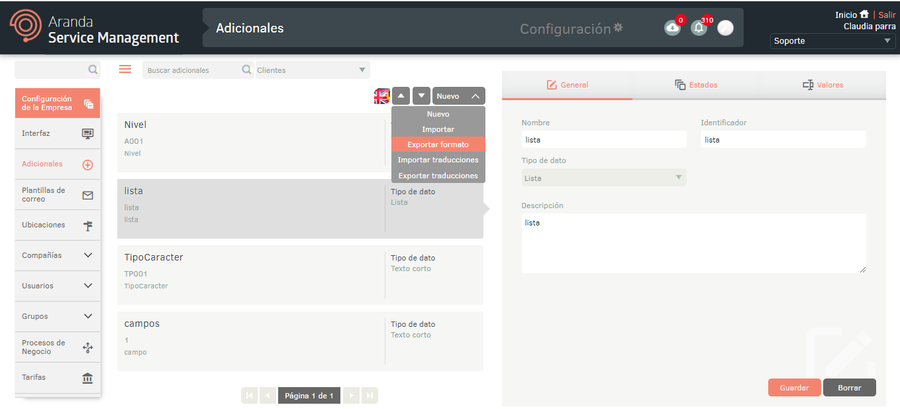
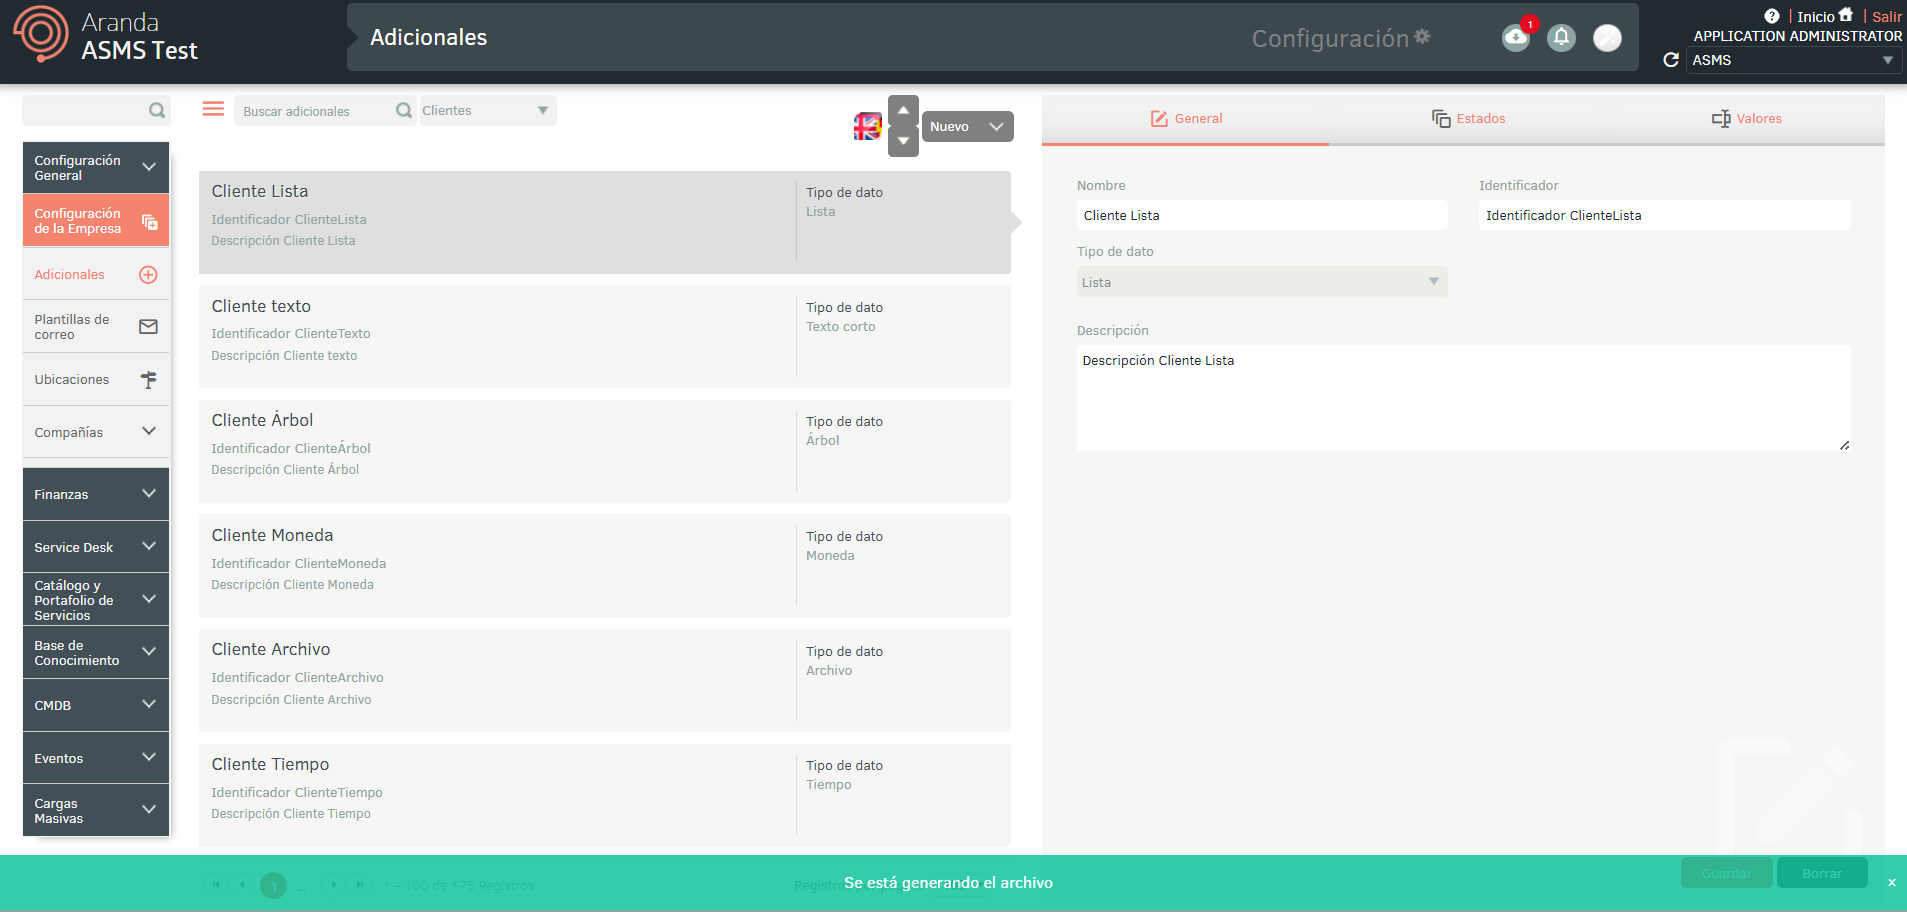
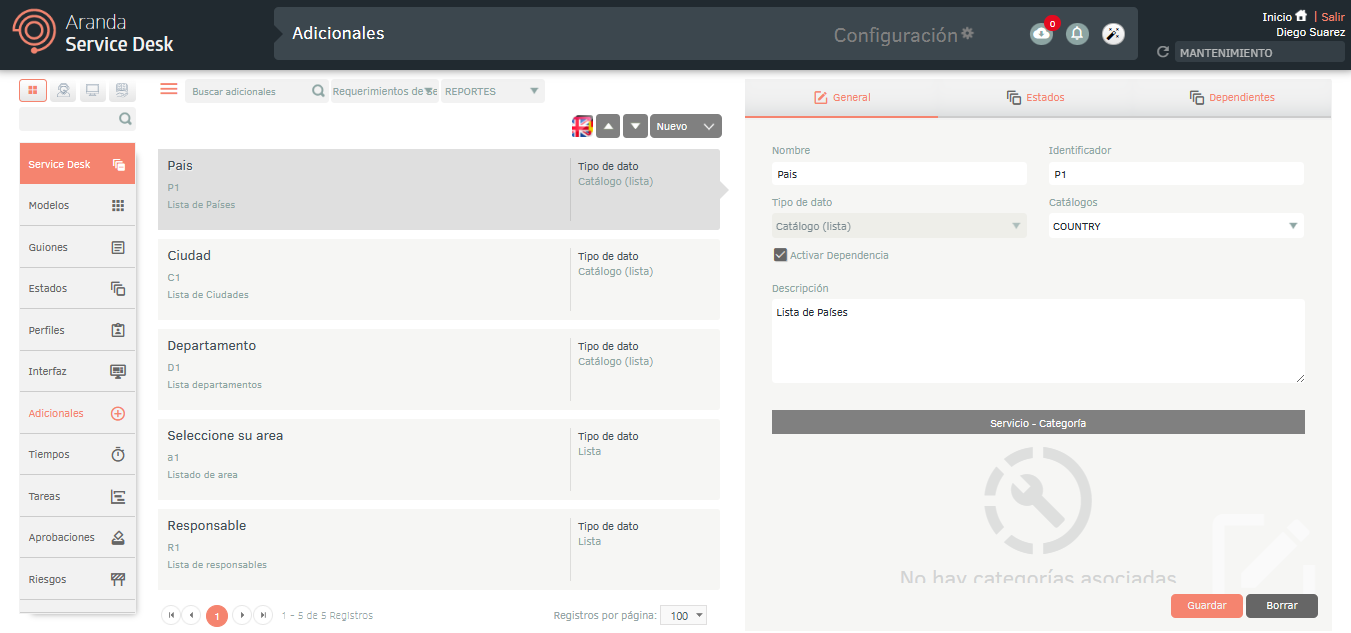
1. To create additional fields, log in to the ASMS Admin Console, in the Service Management from the main menu, select the Additional. Define a project, a case type, and a model on which you want to create the additional fields; In the information view, select the New , and in the Detail view, fill in the overview of the additional fields.

| Fields | Description |
|---|---|
| Name | Name of the additional field, must be unique to the case type and model. |
| Identifier | Reference for the homologation of additional fields between case types and models, must be unique per data type in the case type and model, no special characters are allowed. |
| Data type | Choose a data type for the field. See Glossary - additional fields section |
| Description | Description of the additional field. |
⚐ Note: For additional fields type Whole and Decimal:
- The maximum number of digits allowed can be configured, with 14 being the maximum value for both types of field.
- Included in the configuration is a checkbox that allows you to activate the use of the thousands separator, which will be applied according to the settings set in Thousands separator.
- If the thousands separator Global does not have a defined type and the checkbox is activated in the Integer or Decimal fields, the default separator will be used, since this configuration depends on the previous definition of the global separator.
2. When you finish setting up the basic information for the additional fields, click Save to confirm changes made; in the Detail View of the ASMS console, the States.
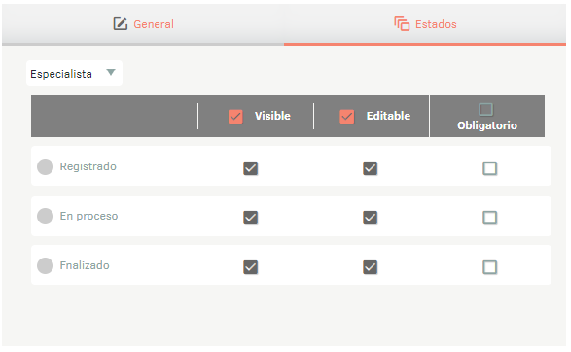
3. In the Additional Fields Detail View in the ASMS Management Console, select the States, where you can define the behavior of the field by specifying whether it is visible, editable, or required for specialists, customers, or administrators in the model states.
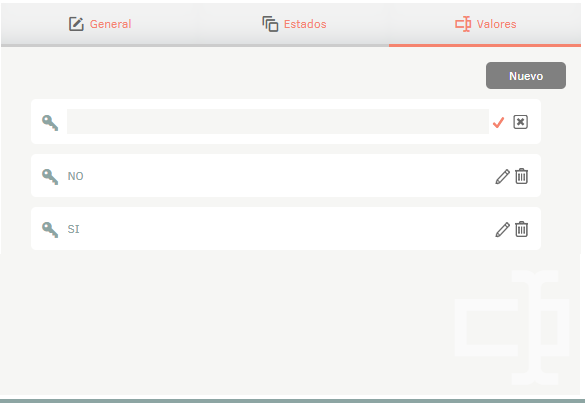
4. If the data type selected in the General tab was List, the Values, where you can specify the items in the list.
5. When you finish setting up the additional fields, click Save in the Detail View of the ASMS Management Console to confirm the changes made.
⚐ Note: When you enable the Web Service Type field, enable the Trust the web service’s remote certificate. This action enables the functionality of the field.
Homologation of additional fields
This functionality allows you to homologate the values that are filled in the additional fields of the case or task to another model or type of case. In order to perform this process, the additional fields must have the same identifier and field type in the models, in addition to complying with the following conditions according to the type of field:
| Fields | Conditions |
|---|---|
| Text | They should be the same length. |
| Catalogues | They must have the same catalog assigned. |
| List Tree Multiple Choice |
The value to be approved must exist in the values of the new model. |
Notes: 1. In the Tree and Tree Catalogue fields, it is validated that the value to be approved is selectable in the new field. 2. In the multiple choice field, the existing values are standardized.
Export Format for Additional Fields
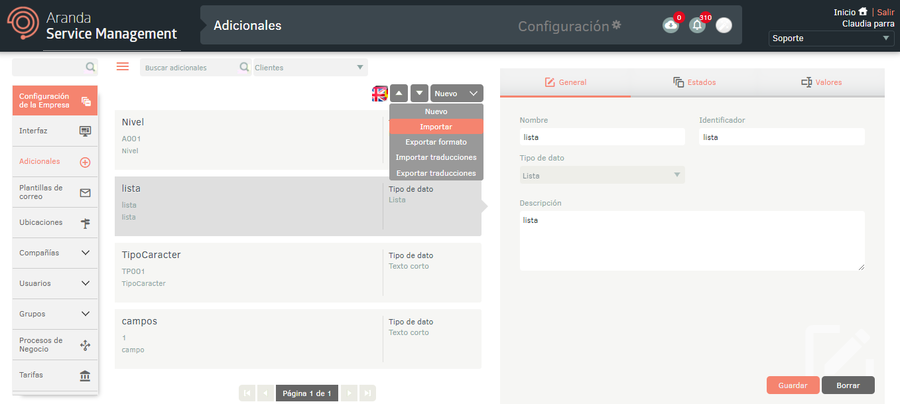
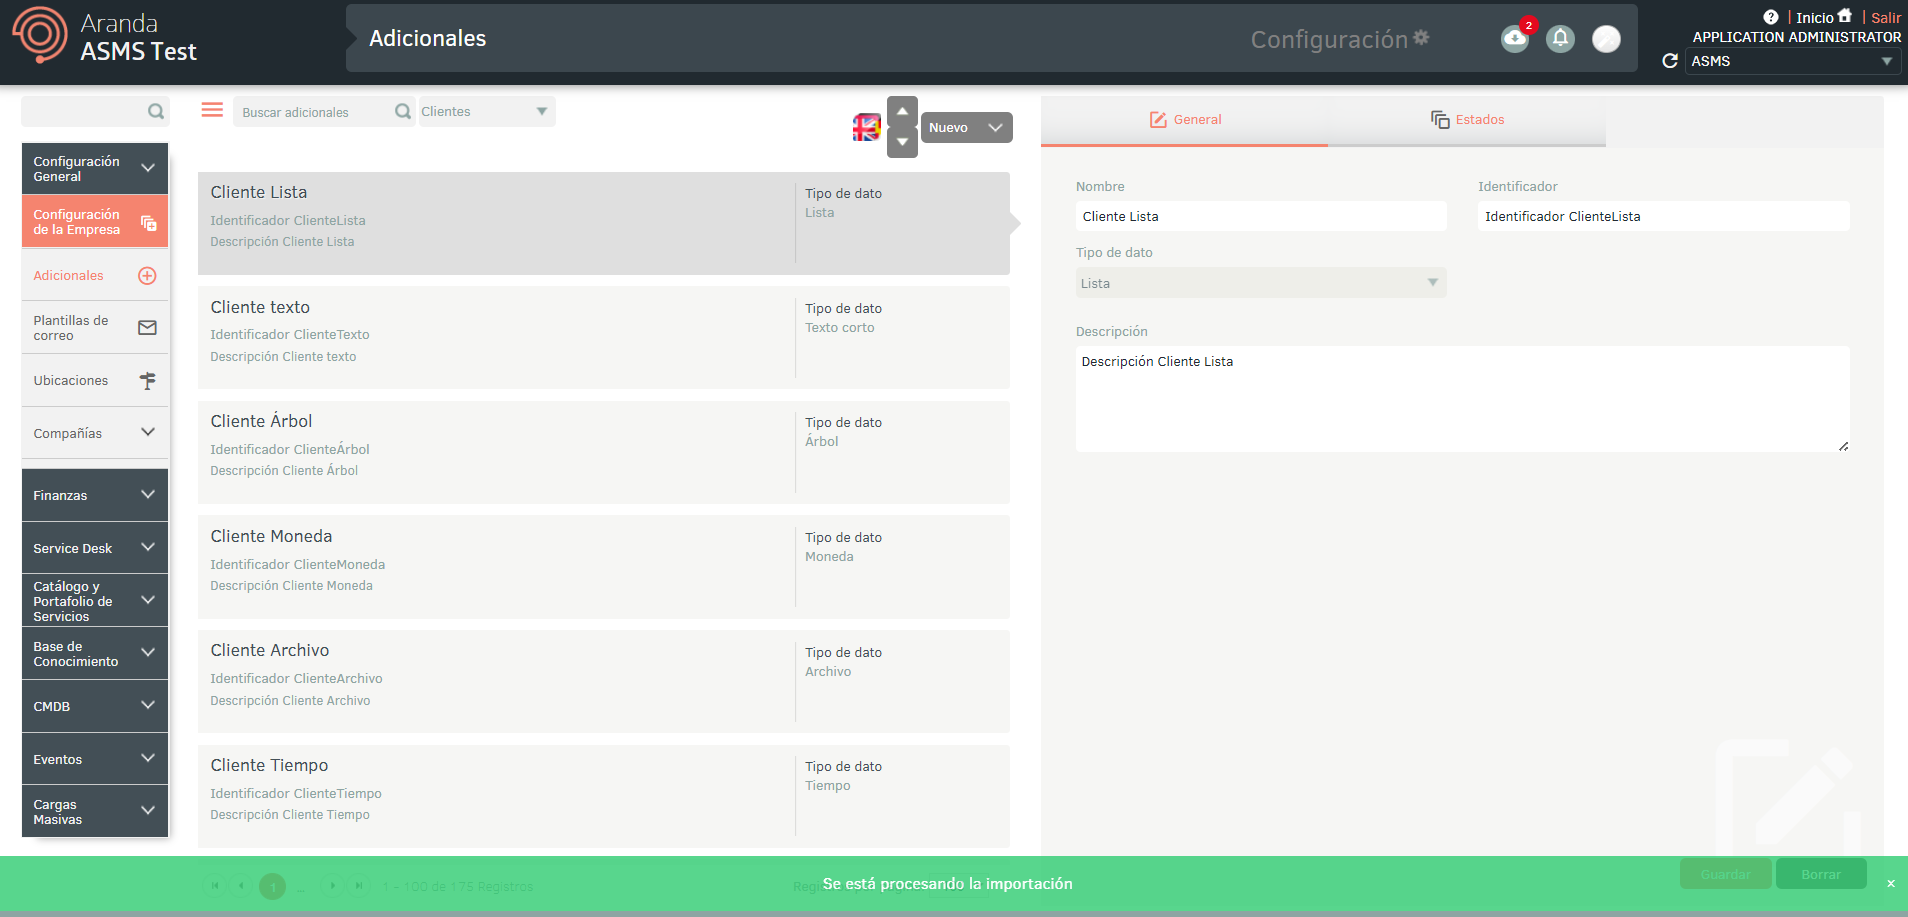
1. To export the additional field information, log in to the ASMS Admin Console in the Service Management from the main menu, select the Additional. Define a project, and in the information view, select the New/Export Format; This option will allow you to export the information with or without data for updating and/or creating additional fields.
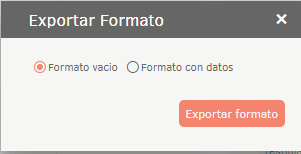
2. The window is enabled Export format where you must select whether you need to export the empty format (creation of additional fields) or with data (update of additional fields). Click Export Format.
3. If you download the empty format, a file in Excel format is automatically generated. If you downloaded the form with data, the file is scheduled for download, generating an informative message at the bottom of the screen.
4. From the Admin console header menu, select the Notifications option.
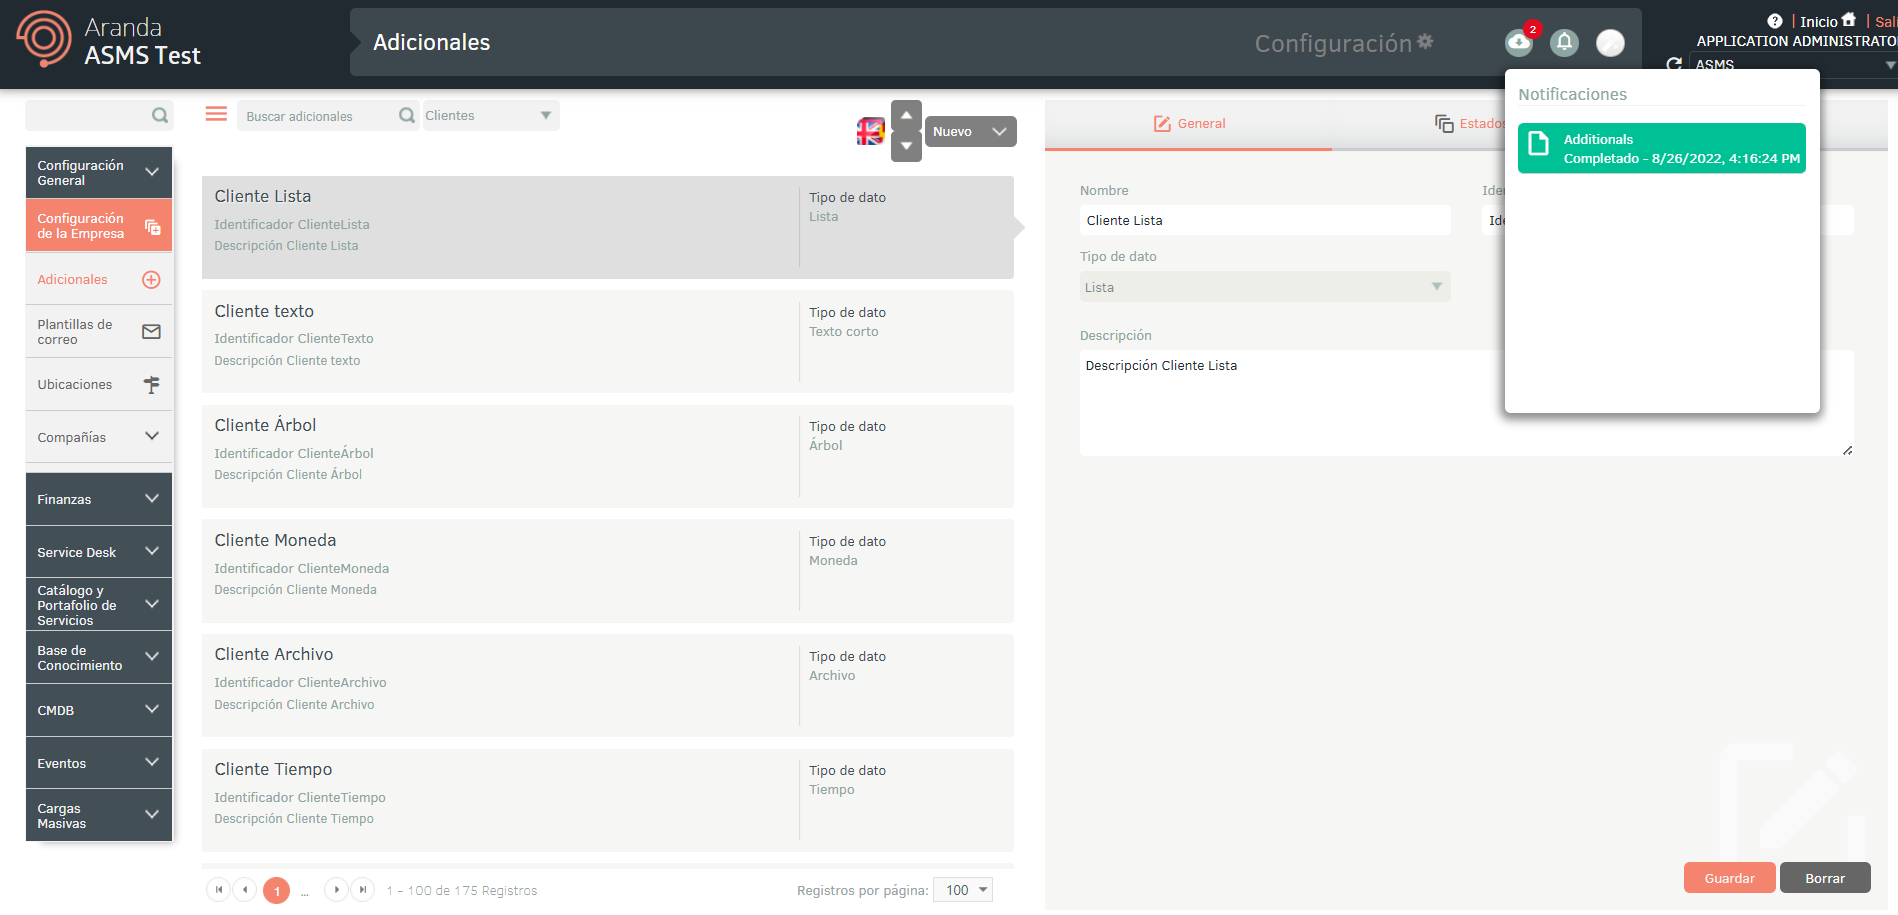
⚐ Note: In the Notifications option you will be able to view the generated format in Pending status (Orange color) and once the export process is finished, it will change to Completed status (Green color) with the download date.
5. Click on the notification to download the file.
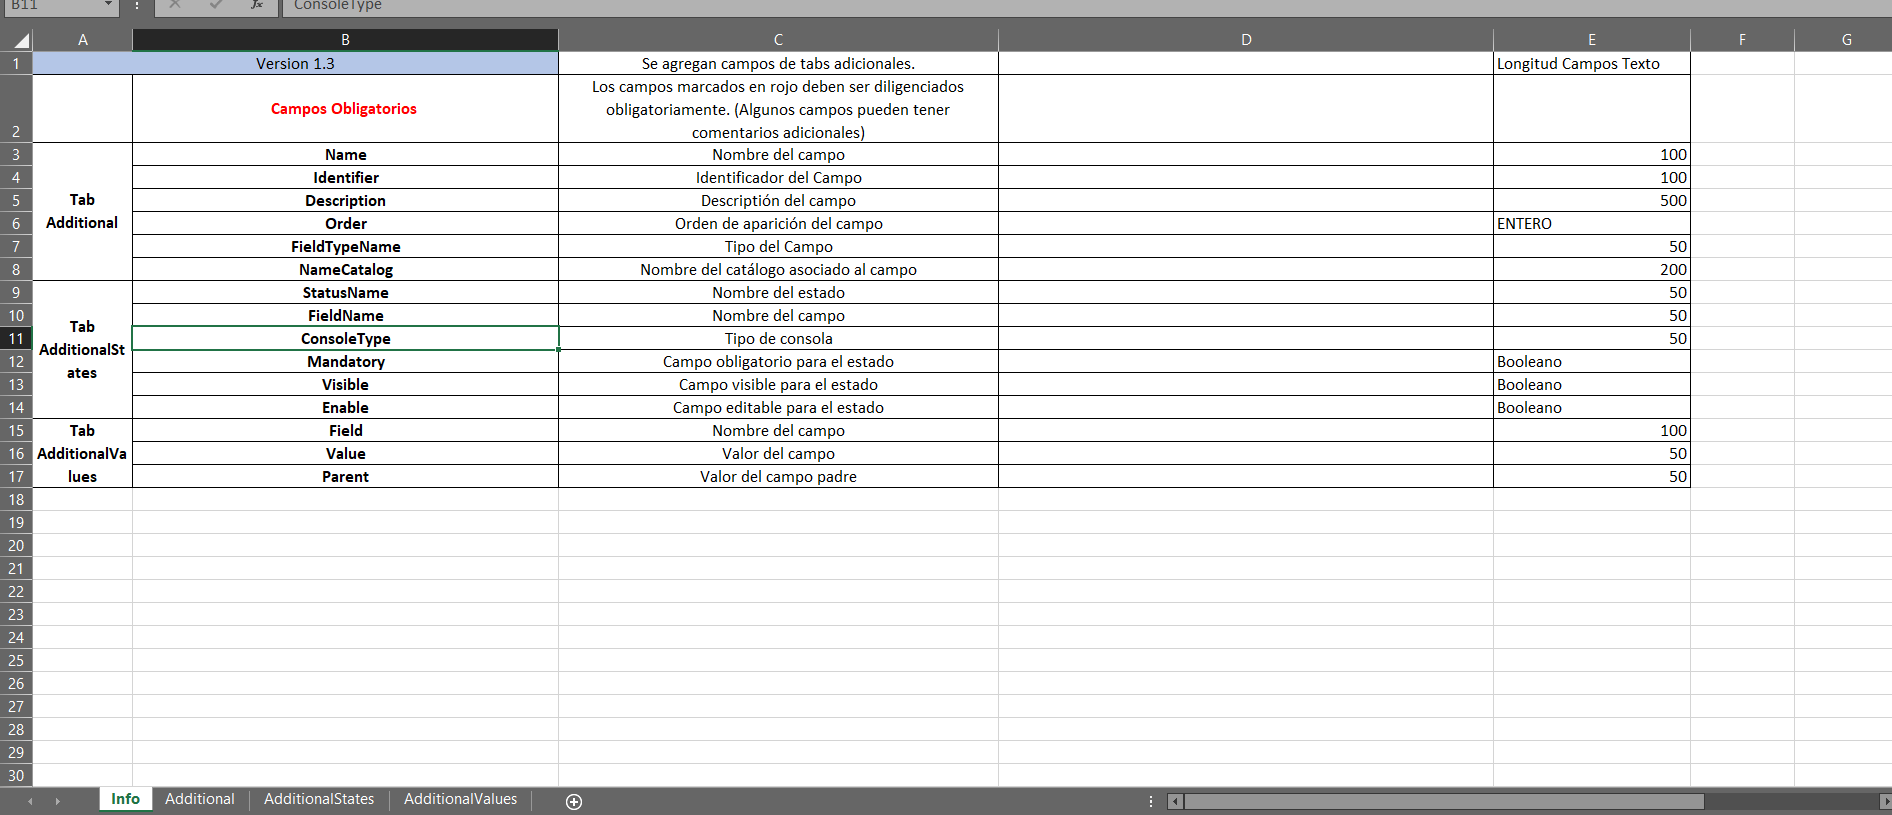
The downloaded file includes all the fields of the additional fields; You will also find the fields required for the creation and/or updating of the additional fields.
The Info tab describes in detail the obligation and information to be filled in on each field.
Import Format for Additional Fields
1. Once the form has been completed, enter the ASMS administration console, in the Service Management from the main menu, select the Additional. Define a project, and in the information view, select the New/Import Format.
2. In the window Import, upload the file, and click the Save.
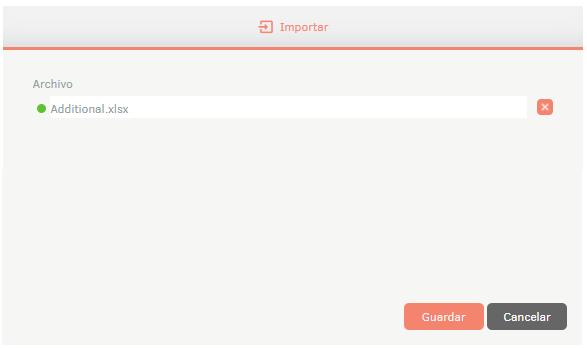
3. Clicking the save button to start importing or updating additional fields will schedule the file for import, prompting with a message at the bottom of the screen and added in the notification panel.
4. When the import is complete, the corresponding notification will change from orange to green, indicating that it has been completed.

5. When you click on the notification, a window will be displayed where you can view the details of the import.
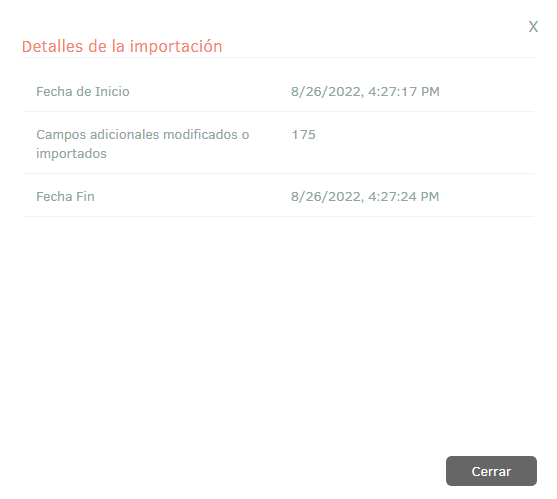
6. If during the import the file generated an error in one or more of its records, when viewing the import details it will be possible to download a file with the details of the records that generated error.
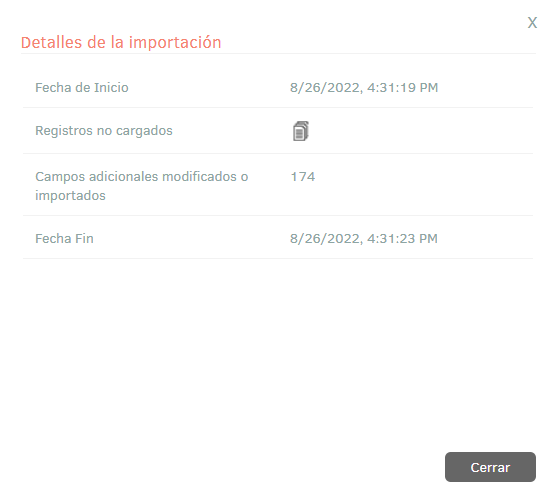
7. In the import details window, by selecting the unloaded records icon, you will be able to download an Excel file with the details of the errors generated during the import.

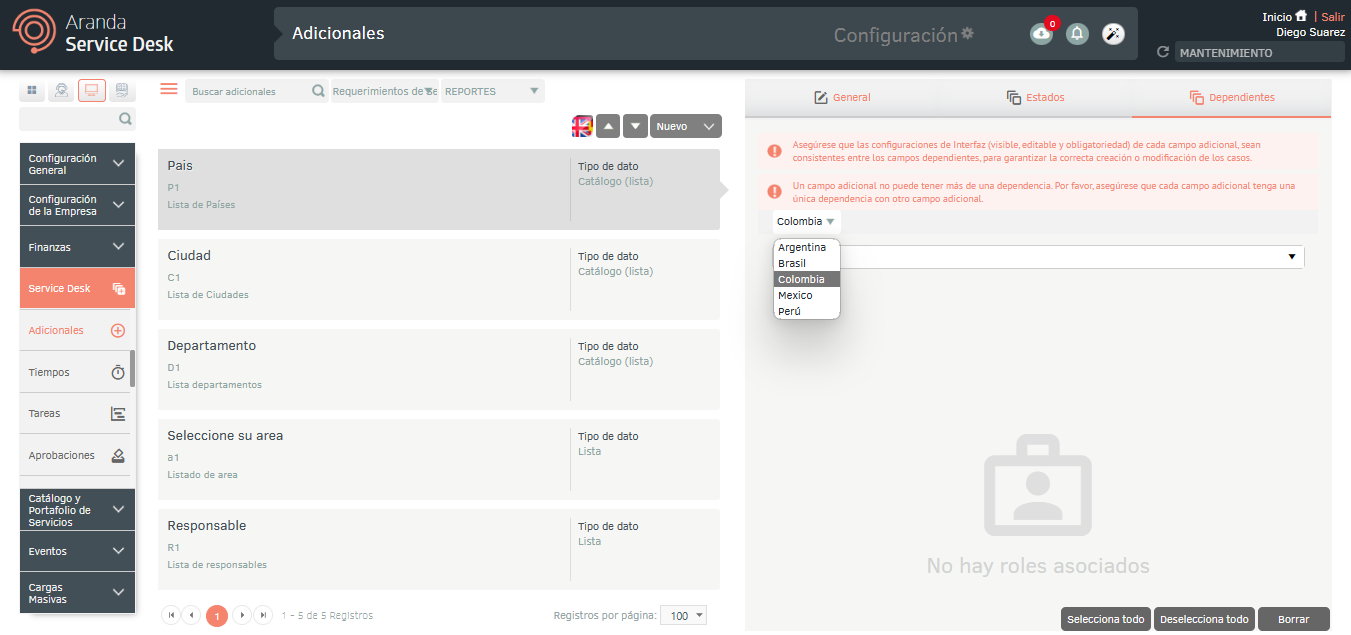
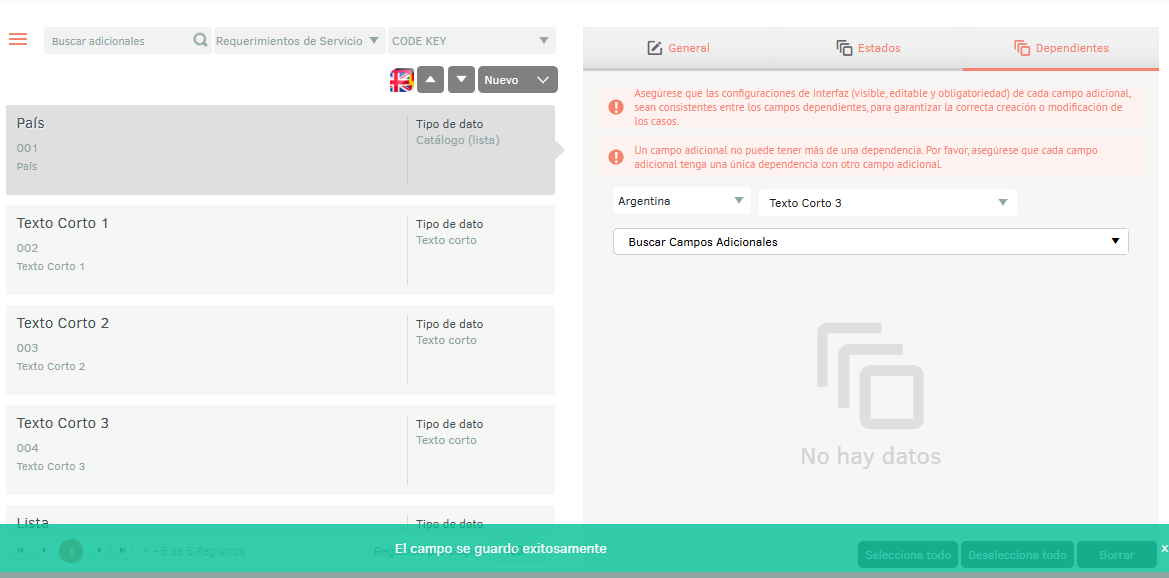
Additional dependent fields
This functionality allows you to establish relationships between different additional fields within a case. This means that the visibility, editing, and enforceability of certain additional fields may depend on the selections or actions taken on other additional fields.
⚐ Note:
· This functionality applies to the following types of List, List Catalog and False/True. |
· You should not allow searching for the same field or additional fields that are already dependent on another additional field. |
· The order established in the creation and configuration of additional dependents will be the same as that shown in the Specialist and Customer consoles. |
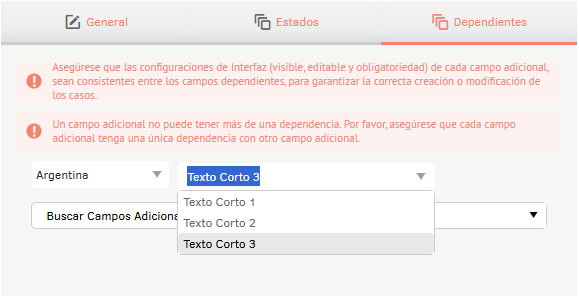
1. To set up a dependent additional field, you must create an additional field (create additional fields).
2. In the Additional Field Detail view, on the General tab, select the data type that you want to set as a dependent additional field, and click Save.
3. In the detail view of Additional Fields you can see the Enable Dependency check. Checking this option enables the Dependents tab, where you can configure additional fields that will be linked to the main additional field.
4. On the Dependent From the Additional field, in the drop-down option, select a value from the list.
5. To add an additional dependent field, search by the name of the additional field to be linked, check the box, and click the Add.

Configuring visibility on dependents
It is possible to configure the visibility of the dependent field according to the value selected in the parent, the configuration made in the child field will take precedence over the configuration made on the visibility of the additional field in the status section.
⚐ Note:
- To enable visibility settings on dependent fields, check the enabled box and configure the field visibility according to the value selected in the parent field.
- By unchecking the enabled box, the additional field will take the visibility settings made in the field states tab, clearing the visibility settings made as a dependent field.
Associate List or List Catalog Values
This option allows you to associate values of additional field type List or List Catalog that depend on the selection of a primary value.
1. Para asociar valores de una lista que dependen de la selección del valor principal, haga clic en el botón Asociar ; en la ventana Dependientes, seleccione los valores correspondientes y haga clic en Guardar.
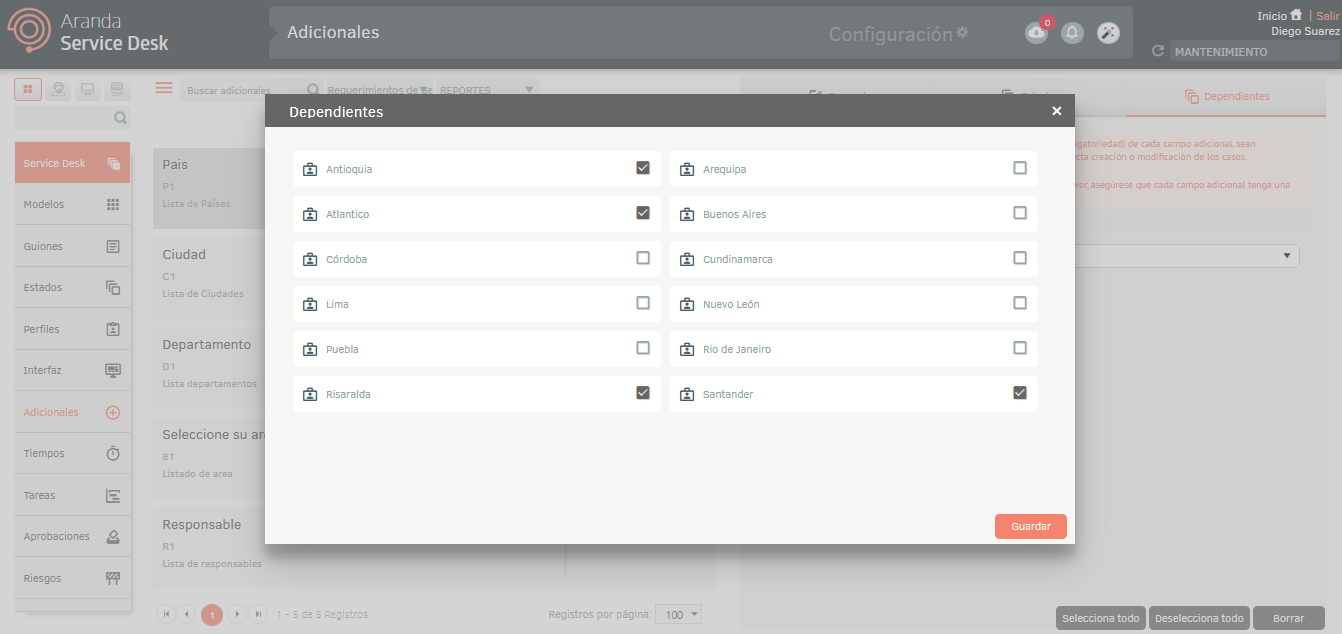
|When you select the primary Colombia value, you can display the Department dependent field with the configured values.|
⚐ Note:
- The additional field type False True You do not have the option available to Associate.
Values in a list that are not associated with any specific field will always be displayed when filling in the additional fields of a case.
Example:
If the value “Neiva” is not associated with any country, when you select a country in the “Country”how “Argentina” or “Colombia”, the value “Neiva” will still appear in the field list “City”, regardless of the previous selection in the field “Country”.
Automatic Copy of Values in List or Catalog Fields
You can automatically assign the selected value in an additional field of type List or List Catalog to one or more fields associated as child list or list catalog field, as long as the child fields are marked “Copy” and the value exists within the available values.
Detach dependent fields
This option allows you to unlink an additional field that has been set as dependent on another field.
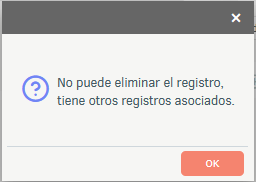
1. To detach a dependent field, select the check of the field to be unlinked and click Erase; A message will confirm this action.

⚐ Note: If the dependent to be detached is of type List or List Catalog and they have values associated with them, the console will notify that it is not possible to detach.
Detach List or List Catalog Values
1. To detach values from additional List or List Catalog types, click the Associate in the dependent field, uncheck the selected values, and then click Save.
Assign List Catalog Code Key Value in Additional Short Text
1. To associate a type field Short text and allow it to inherit the value of the code_key corresponding to a value from the catalog list, expand the combo option “Select field to assign key”.
This option will display the list of all Short Text fields, as long as they are not assigned as a dependency on an additional field.
Select the additional short text field you want to associate; The settings will be automatically saved and the system will display a confirmation message.
⚐ Note:
- You can only associate an additional Short Text field with a value in the list.
- To detach an inheritance value, click the selector and delete the selected field.
- The type field Short text that is used to inherit the value of code_key It will not be available in the selection of dependent fields.
- When you set up a rule to create or modify a case, additional fields type Short text who inherit the value of code_key will be shown as editable; however, when the rule is met, the inheritance configuration will prevail. The rule will only be validated when short text fields have no value inheritance.
Multilanguage
To configure the multilanguage option in additional fields in Service Management, you must consider the documentation for translations. View Multilanguage.