
In this module, the services that make up the catalog and the portfolio of services are configured according to the needs of the organization.
Creating Services
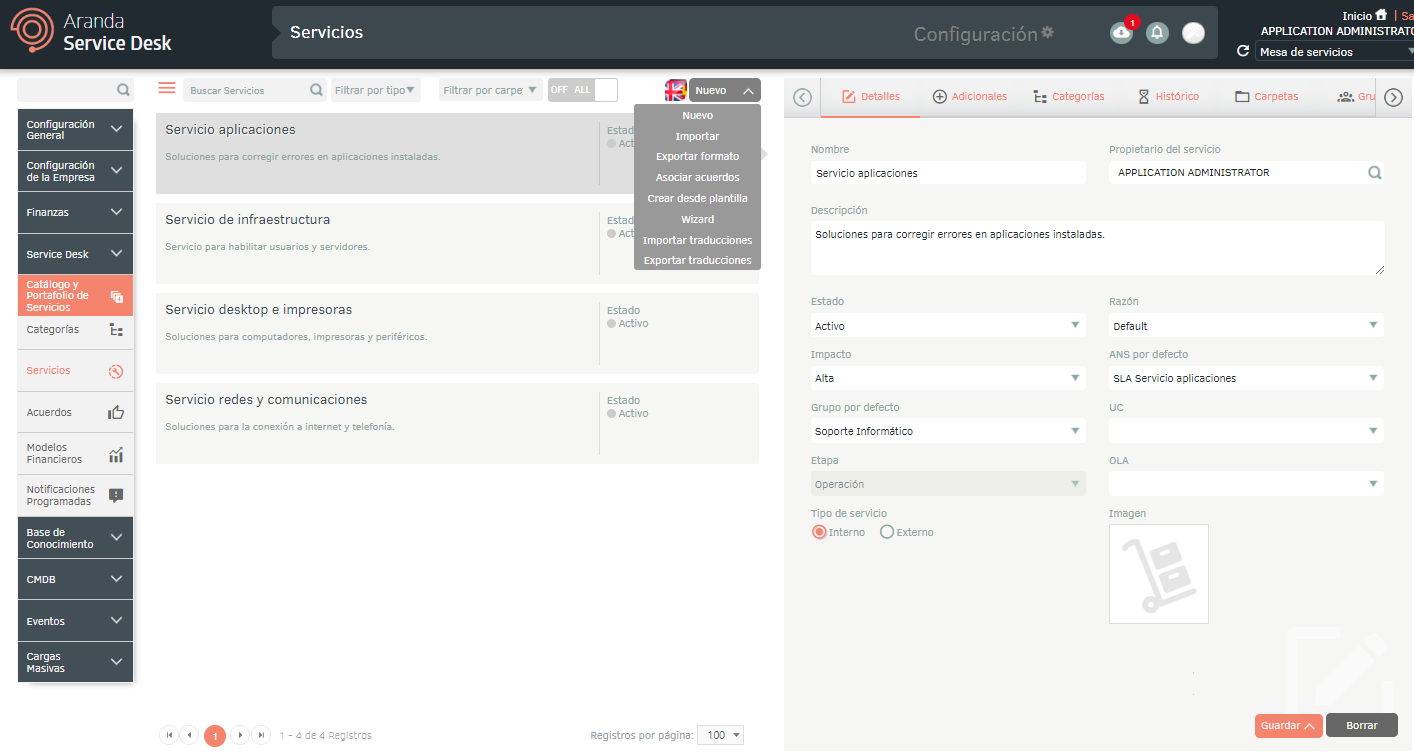
1. To create a service, log in to the ASMS Management Console, in the Catalog and portfolio of Services from the main menu, select the Services. Define a project and configure filters to search for services by type (stage), folder, or service status.
2. In the information view, select the New and in the Detail view, configure the basic information of the services, additional fields, and stages of the service.
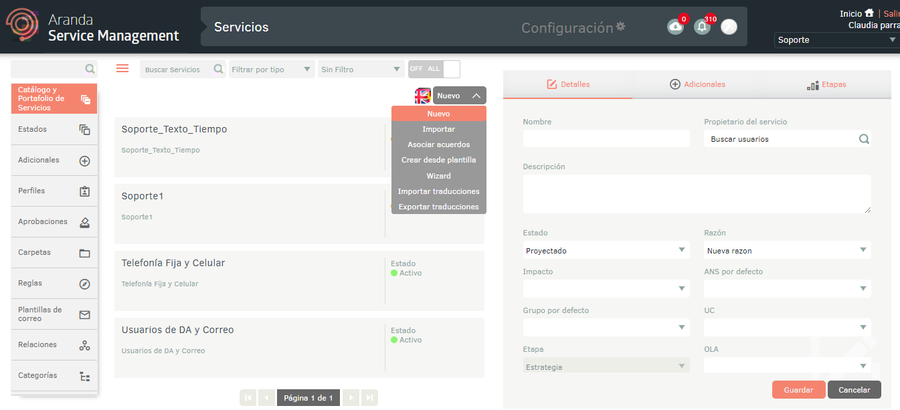
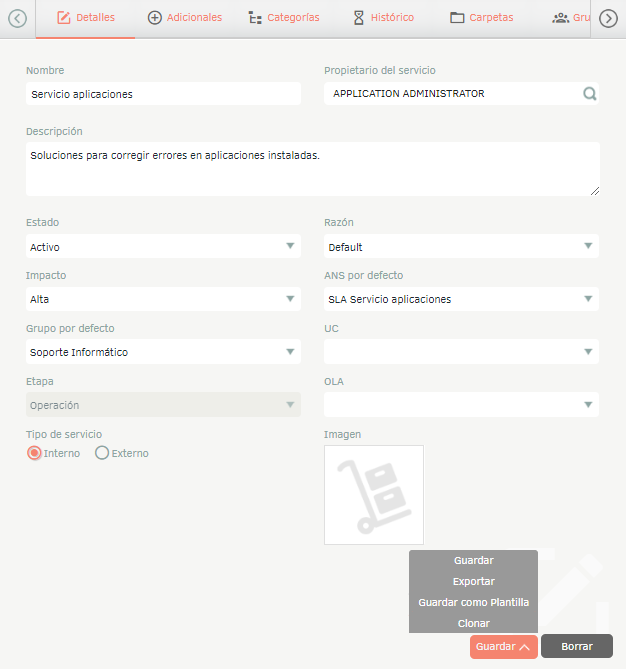
3. In the Services Detail View in the ASMS Management Console, select the Details, where you can fill in the following information:
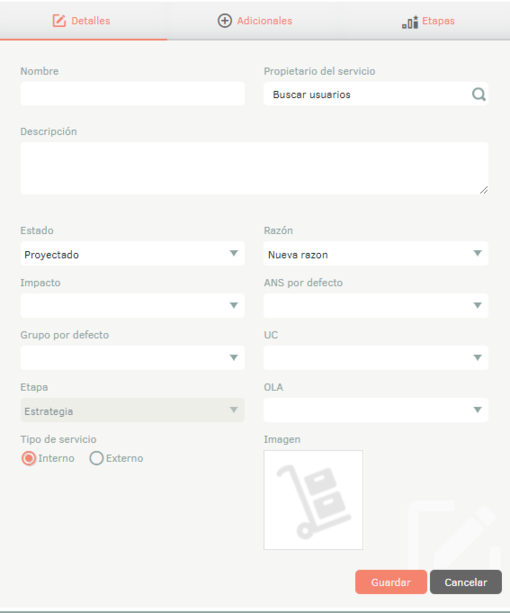
| Field | Description |
|---|---|
| Name | Enter the name of the service. |
| Service Owner | Choose the user in charge of the service; This is obtained from the list of users imported from the Active Directory or from manually created users. View Sections View LDAP and View Users. |
| Description | Description: Enter a description of the service. |
| State | Initial state according to the previously defined flow. View States |
| Reason | Reason for the initial state. |
| Impact | Select the impact for the service. View Catalogs. |
| Default SLA | Choose a default SLA. See Agreements. |
| Default Groups | Select a default group for the service. View Specialist Groups. - Service Type: Define whether the service type is internal or external. - Stage: Choose the stage to which the service corresponds (strategy, design, transition, operation, or retirement). |
| UC by default | Choose a default UC. See Agreements. |
| Default OLA | Choose a default OLA. See Agreements. |
| Image | Recommended size 179x * 179px. |
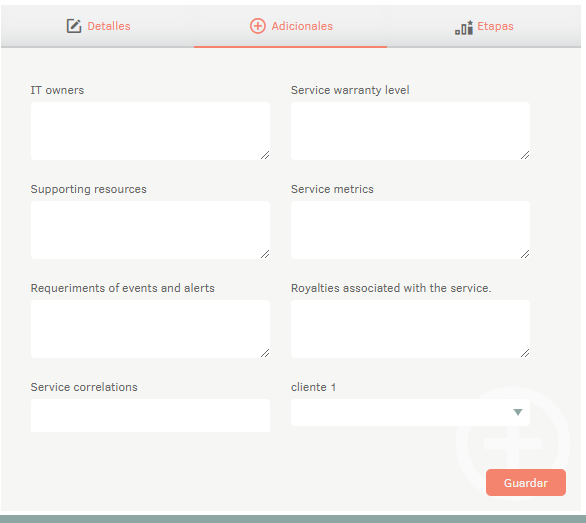
4. In the Services Detail View in the ASMS Management Console, select the Additional, where you can view the additional fields configured by default (for more information, see 6.2 Additional Fields):
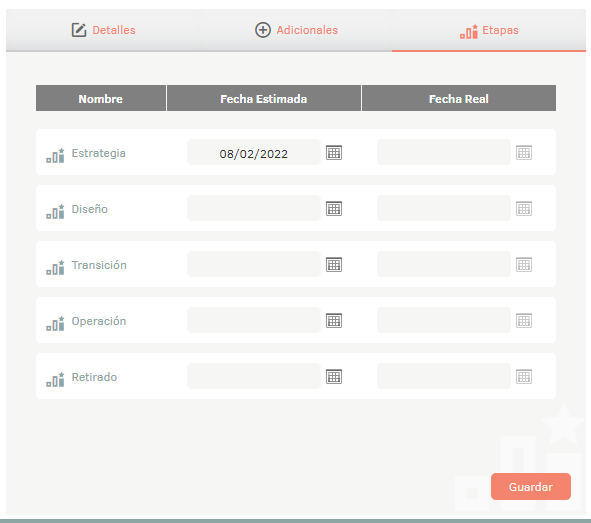
5. In the Services Detail View in the ASMS Management Console, select the Stages, where you can define the estimated date and end date for the service type.
6. When you finish configuring the basic information for the service, click Save to confirm changes made; in the Detail View, other configuration items are enabled:
Add Categories and Services
7. In the Services Detail View in the ASMS Management Console, select the Categories, where you can search for and associate previously created categories.
8. In the search field, type the name of the categories that you are going to associate with the service (in the search you will get the cross-sectional categories and those created on the project). Select the category and type of association (node or hierarchy) and click Add.
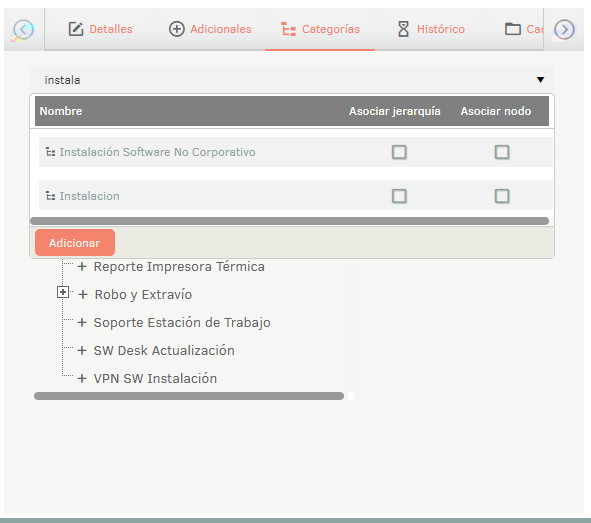
Check the checkboxes as needed:
| Field | Description |
|---|---|
| Associate Hierarchy | This option associates the entire category tree and all categories remain active. |
| Associate node: | This option associates only the selected category as active, and if it has hierarchy, it leaves the parent categories inactive. |
9. The categories will be associated with the selected service.
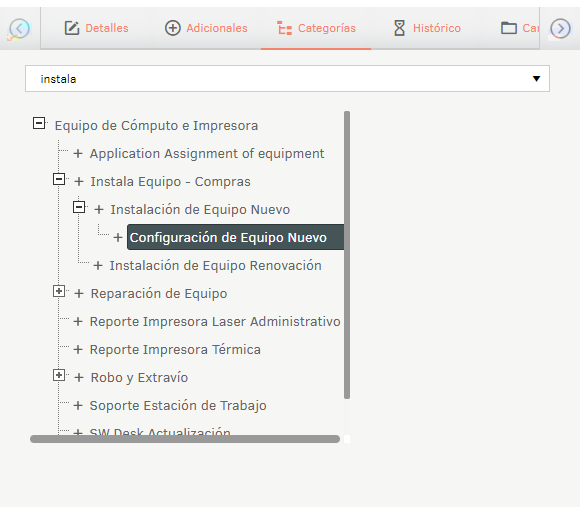
10. In the defined category hierarchy, right-click on a service or category and choose the Edit.
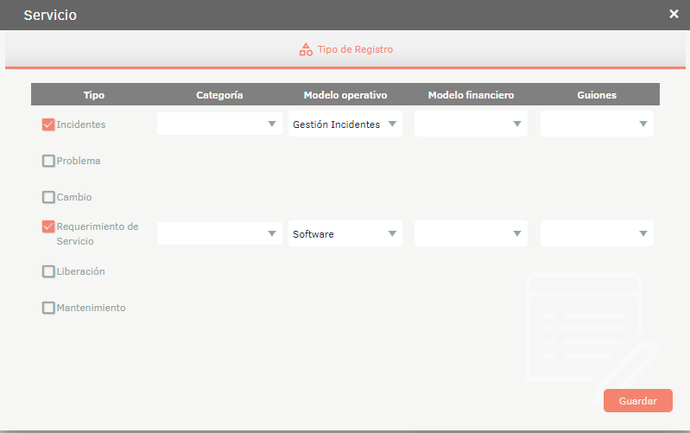
Edit the service: When editing the service, the corresponding window is enabled where you must configure the case type, the operating model (see 5.1 Models), the financial model (see 6.12 Financial Models) and the script (see 5.2 Scripts) to which the service will belong. Click the Save.
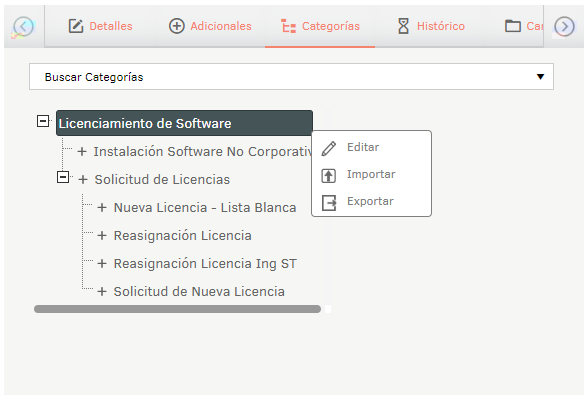
Edit the category: Once the category is associated with the service, right-click on the category and select Edit. The window is enabled Category where you can configure the type of record, the additional fields and the times of the category associated with the service.

| Eyelash | Description |
|---|---|
| Record Type | On this tab, choose the case type and operating model to which the category will belong, as well as the financial model and script. Check the checkbox if you want the category to be visible to users. Note: The hyphens associated with the categories take precedence over the hyphens associated with the model. View Models Check the box (Category on the users’ home) if you want the flagged categories to be visible on the AssistMe app home page View AssistMe. Note: Please note that this box can only be checked if the previous one is selected. If you have more than 20 categories checked, only the first 20 will be displayed in alphabetical order. 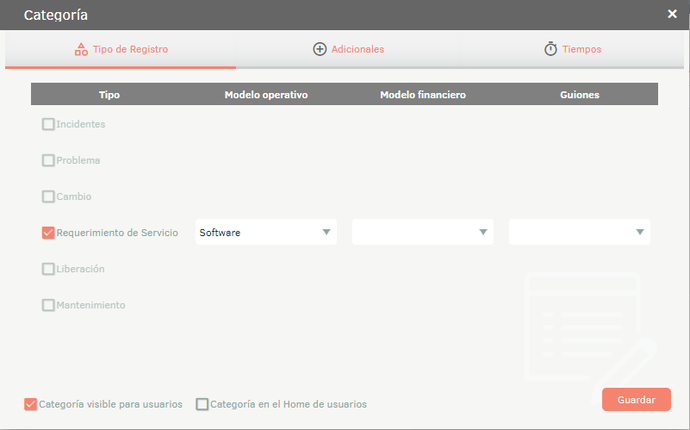 |
| Additional | In this tab you can choose the additional fields that will be unique in the creation of a case for the previously selected service, category and case type. It is possible to bulk select and deselect additional fields to include them in the defined category. Select the top checkbox to mark or uncheck the values in bulk. 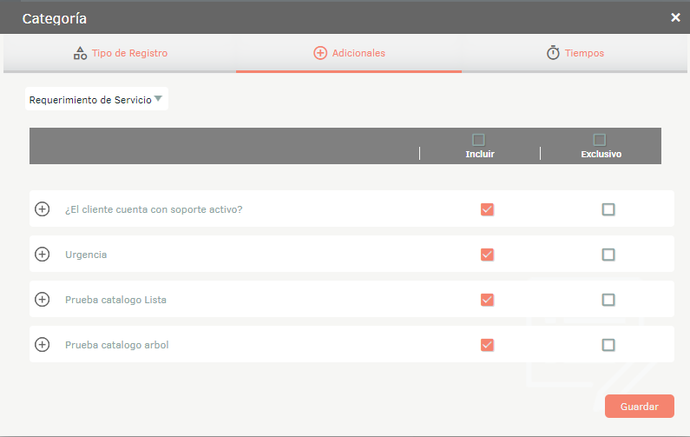 |
| Times | In this tab you can choose the timers that will apply to the service, the category, and the type of case previously selected. See Weather (Stopwatches).. It is possible to select and deselect times in bulk to include them in the defined category. The time (stopwatch) available in this tab is the model chosen in the first Record Type tab. 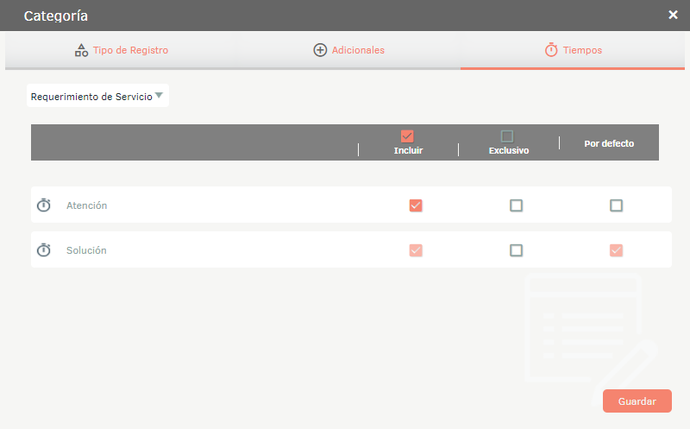 |
Deactivate category: Once the category is associated with the service, right-click on the parent category to display a list of options; from these records, select the Deactivate category option.
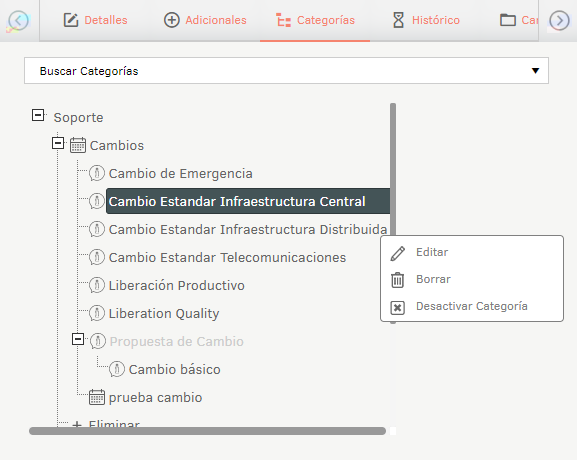
Once the parent category has been disabled, it will be displayed in a lighter tone than the other categories.
11. When finished, click the Save to finish the category creation.
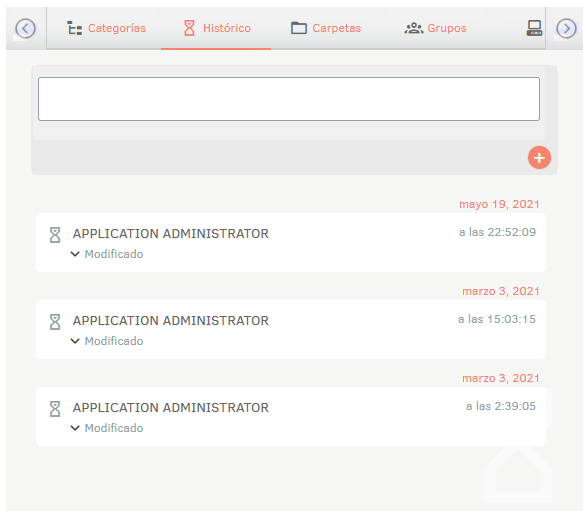
12. In the Services Detail View in the ASMS Management Console, select the Historical, where you can view the record of all modifications made to the service. You can also add annotations.
13. In the Services Detail View in the ASMS Management Console, select the Folders where you can associate the services to previously created folders. View Folders.
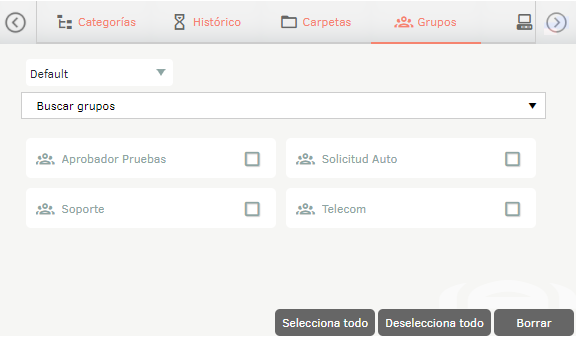
14. In the Services Detail View in the ASMS Management Console, select the Groups; may Associate the groups of specialists who will manage the service to the previously created profiles. View Profiles.
To make the association, select the profile, find the corresponding groups, and add them to each of the profiles as appropriate.
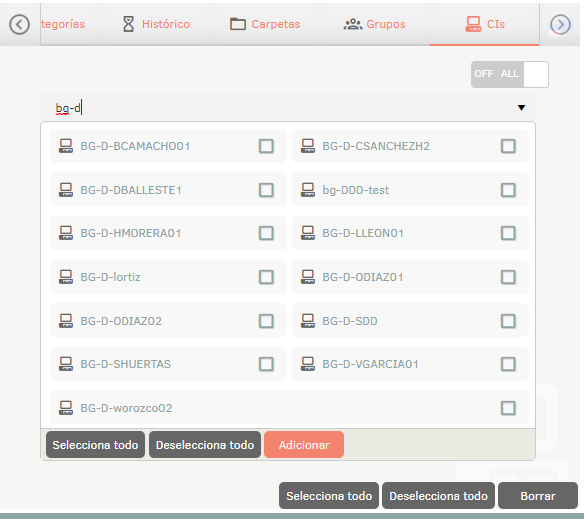
15. In the Services Detail View in the ASMS Management Console, select the Cis; you will be able to associate the CIs that are part of the service on which you are working.
16. In the Services Detail View in the ASMS Management Console, select the Agreements
You will be able to select the types of users (customers, companies, suppliers, organizational areas, customer groups, categories, locations, and CIs) and the types of agreements
involved in the provision of services. For more information, see the sections See Agreements
and View Users.
SLA Allocation Prioritization
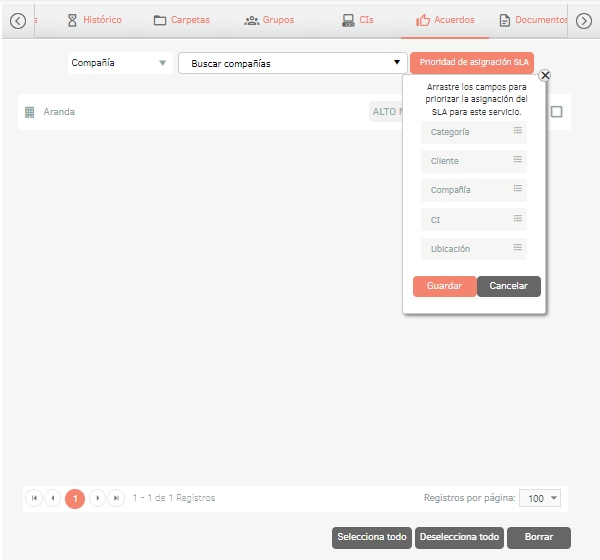
This feature allows you to prioritize the SLA assignment for the service according to customer, company, category, CI, or location. To adjust the priorities, simply drag the values in the order you want to assign.
If when creating a case, the item with the highest priority does not have an agreement associated with it, the system will automatically select the next one in set priority order and assign it to the case.

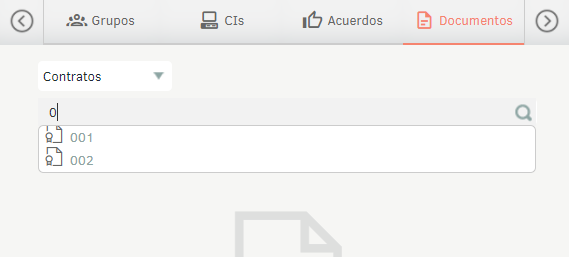
17. In the Services Detail View in the ASMS Management Console, select the Documents; You can associate contracts, invoices, and other documents with the service. View Contracts, View Invoices and See Other Documents.
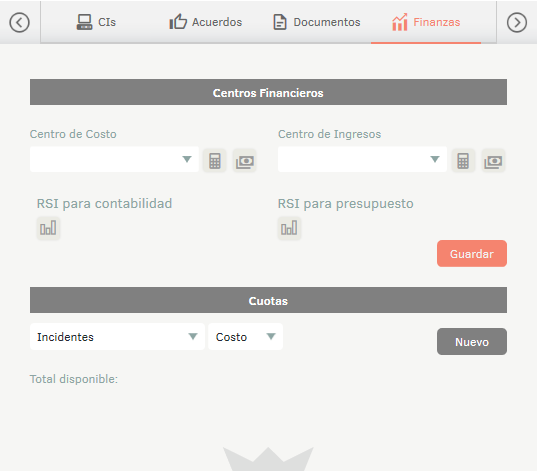
18. In the Services Detail View in the ASMS Management Console, select the Finance; You will be able to configure the following financial aspects of the service. View Finance.
| Financial Concepts | Description |
|---|---|
| Financial Centers: | Associate the cost center and revenue center to determine the financial status of the service. |
| RSI for accounting: | Graphically represent the costs and revenues of the project. 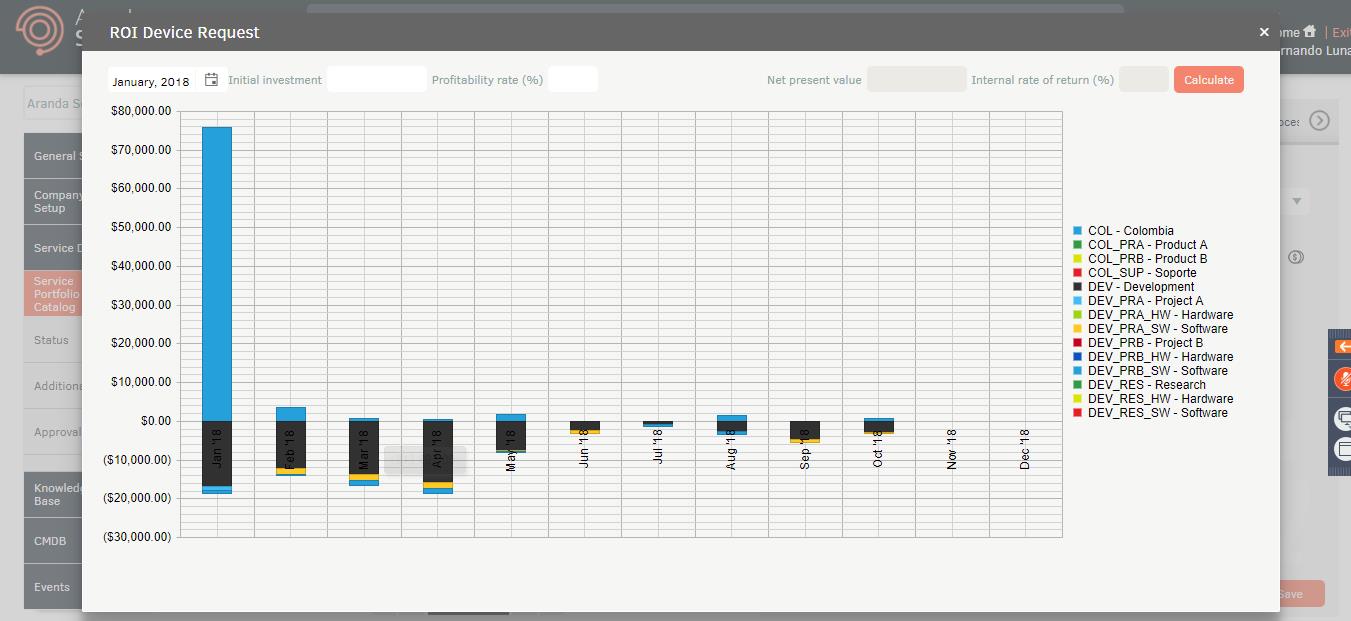 |
| RSI for budget: | Graphically represents the costs and revenues of the project budget. See 4.9 Budgets. 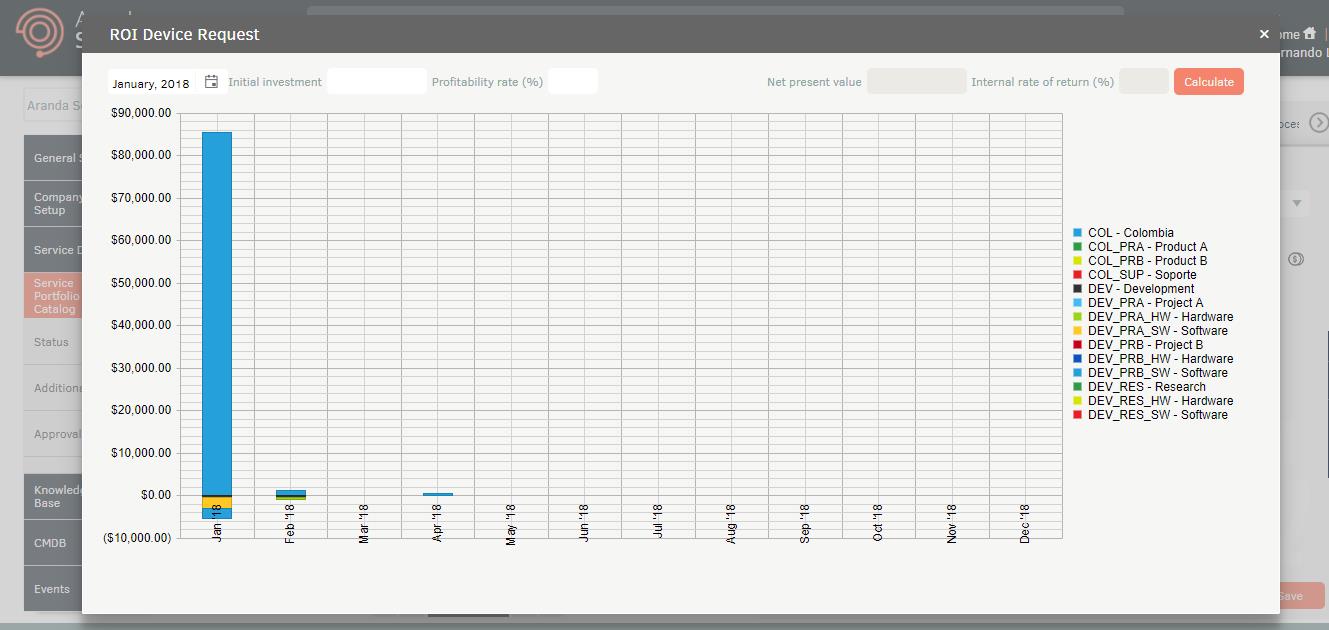 |
| Quotas: | Quotas allow you to assign values for effort, costs, prices and the number of cases that the service will provide in a given time. |
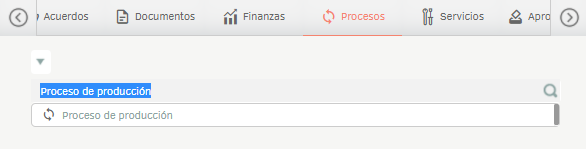
19. In the Services Detail View in the ASMS Management Console, select the Processes; You will be able to associate the business processes supported by the service. View Business Processes.
20. In the Services Detail View in the ASMS Management Console, select the Services; may establish relationships between the services. For example, a parent-child relationship. View 5.14 Relationships.
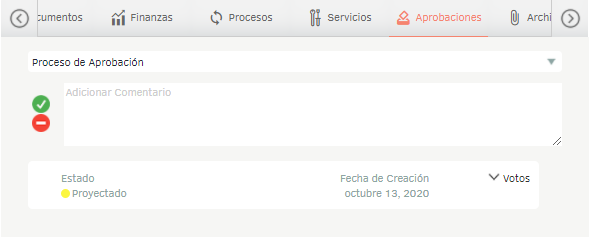
21. In the Services Detail View in the ASMS Management Console, select the Approvals; You will be able to display the results of the approval processes for the services.
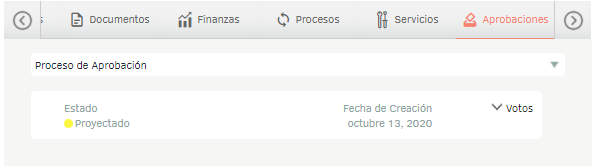
If the service is in the process of being approved, you can vote here. View Approvals.
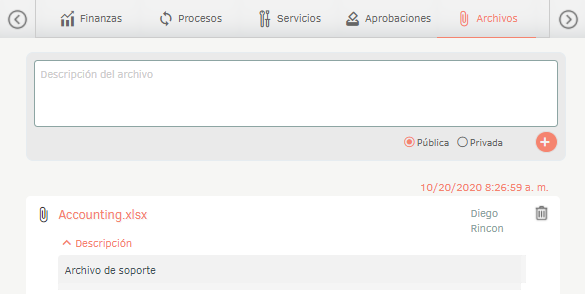
22. In the Services Detail View in the ASMS Management Console, select the Records; You will be able to attach files related to the service.
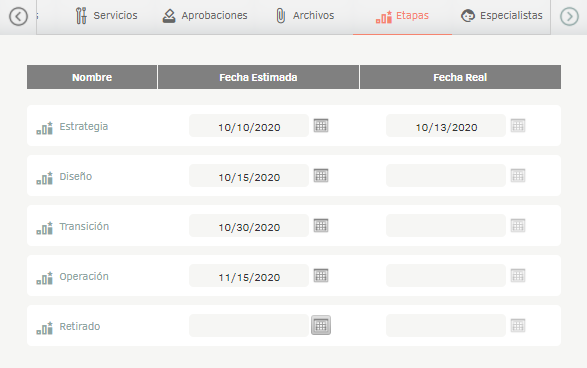
23. In the Services Detail View in the ASMS Management Console, select the Stages; You will be able to define the stages of the service and the estimated date of service. The actual date is automatically calculated based on the progress of the service.
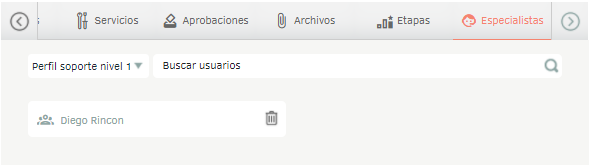
24. In the Services Detail View in the ASMS Management Console, select the Specialists; You will be able to associate the specialists with a profile for the assignment of voting processes and/or previously configured tasks. For more information, see View Tasks and View Approvals.
Bulk uploading and/or updating of services
1. To create and/or update services, go to the ASMS administration console, in the Catalogue and portfolio of services from the main menu, select the Services. Define a project, and in the information view, select the New/Export Format.

2. The Export Format window is enabled where you must select whether you need to export the empty format, with basic data, with advanced data or model update.
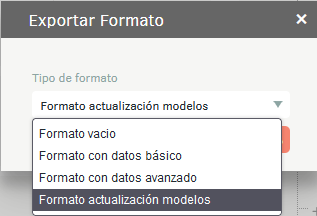
3. If you select the Format with Basic Data, Advanced, or Model Update option, the file is scheduled to download through the notification panel. If you select the Empty format option, the download is done directly.
4. When selecting the Empty format and click Export format A .zip file will be downloaded, which contains a folder to include the image of the service(s) to be imported.
⚐ Note: In an empty format it will only be possible to create the basic data of several services or to create a service with its related information.
5. When selecting the Format with basic data and click Export format a .zip file will be downloaded, which contains a folder with the images of the services and an Excel file for the creation and/or updating of services with basic information (Service sheet and ServiceCategoryDefault filled out). It will only be possible to create or update services in their basic information.
6. When selecting the Advanced Data Format and click Export format a .zip file will be downloaded, which contains a folder with the image of the service that has been selected and an Excel file for the service update.
7. When you select the Model Update Format option and click Export Format, a .zip file is downloaded, which contains a folder with the image of the service you have selected and an Excel file for updating the service models. The Excel file will only contain the Info, Services, and CategoryService sheets, which allow you to update the models in the category; When you update the models, the corresponding additional times and fields are automatically updated.
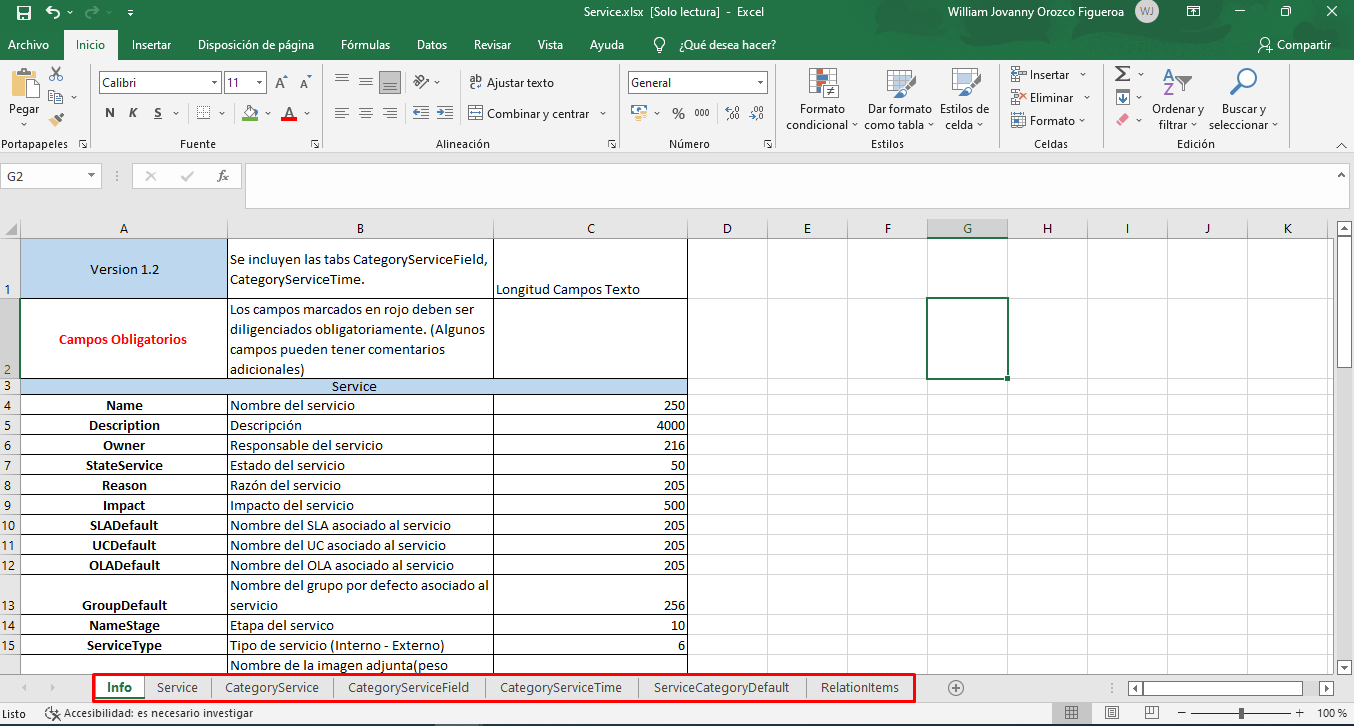
The following sheets are available in the Excel file:
| Leaf | Description |
|---|---|
| Info | Describe the obligation and information to be filled out on each field. |
| Service | It contains the basic information for adding or updating services (name, assignee, additional fields, images, etc.). |
| CategoryService | It allows you to associate and/or detach categories to services and enable operating models. |
| CategoryServiceField | Allows you to include, exclude, or mark as unique additional fields per category according to the operating model. |
| CategoryServiceTime: | Allows you to include, exclude, or mark as exclusive timers by category according to the operating model. |
| ServiceCategoryDefault: | It allows you to associate default categories with the service. |
| RelationsItems | It allows associating and/or disassociating the concepts of customers, companies, suppliers, organizational areas, ICs, contracts, invoices, other documents and locations to the service. |
| GroupService | It allows associating and/or disassociating groups of specialists to the service. |
8. Once the form is completed, from the administration console click on the New/Import.
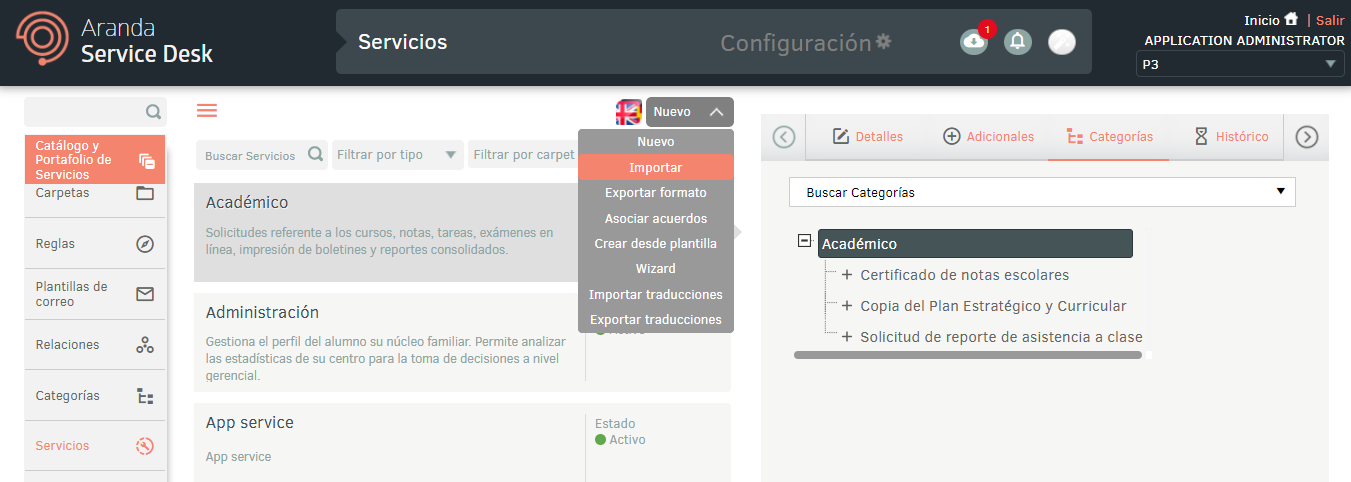
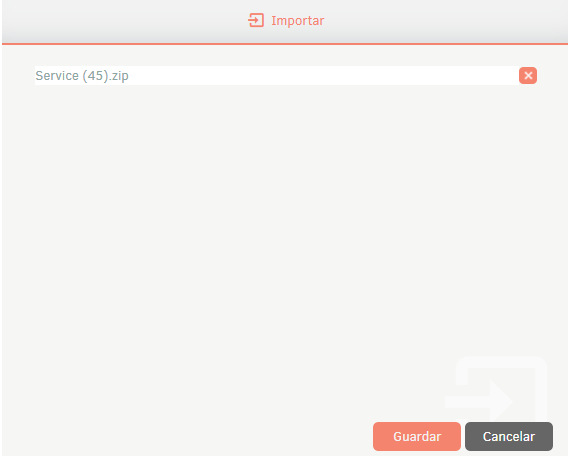
9. In the window Import Upload the file and click the Save.
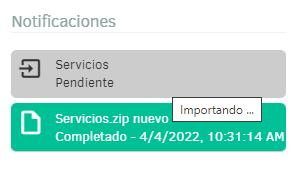
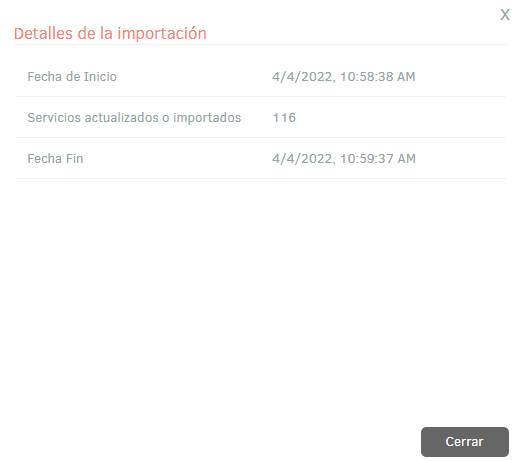
10. Expand the notification panel, there the import will be displayed in status Earring and once it is finished, it will become a state Completed with the upload date.
11. Click on the notification, there a window will be displayed with the details of the creation and/or update of the services.
Export AMDL Format
1. In the Services Detail View in the ASMS Management Console, select the Details; on the Save You will have the following options enabled:
- Save- This option allows you to save changes made to the service.
- Export- This option allows you to export the service in AMDL format.
- Save as Template: This option allows you to save the service information as a template.
- Clone: This option allows you to clone the service.
Import AMDL format
1. To import in AMDL format and create from templates, enter the ASMS administration console, in the Catalog and Services Portfolio section of the main menu, select the option Services. Select the New/Import or New/Create from Template.
Multilanguage
To configure the multilanguage option in catalog and portfolio services, you must consider the documentation for translations. View Multilanguage.