
The surveys are carried out to identify weaknesses and strengths, and thus contribute to continuous improvement in service management.
Creating Surveys
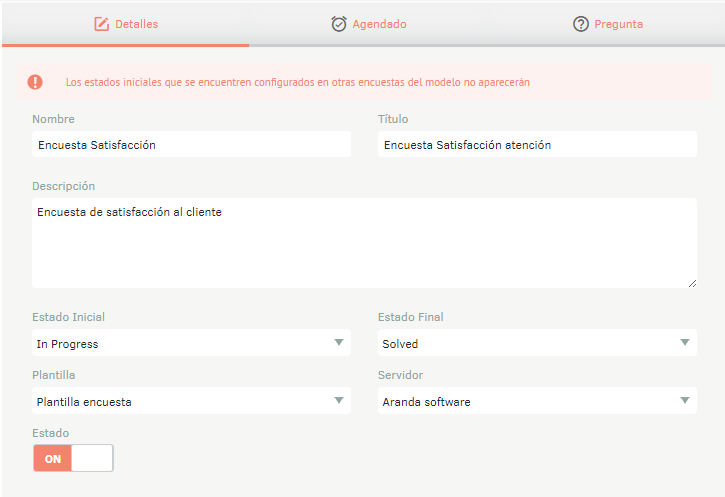
1. To create surveys, log in to the ASMS Admin Console, in the Service Management or CMDB from the main menu, select the Surveys. In the information view you will be able to view the list of created surveys; Select the New And in the detail view fill in the general information of the survey like this:
| Fields | Description |
|---|---|
| Name | Enter the name with which the survey will be identified. |
| Title | Enter the title that the customer will see when they enter the survey from the console. |
| Description | Enter a brief description of the survey. |
| Initial Status | Choose the state in which the survey will be created, in this state the notification will be sent to the customer and the survey will be available in the client console. The status selected for one survey will not be available for other surveys. |
| Final State | This will be the last state in which the survey will be available to the customer. |
| Template | Choose the email template to use to send to the customer. |
| Server | Choose the output server that will be used to send the notification to the client. |
| State | Turn on the options ON (active) or OFF (inactive) as required. |
Note: Each time the case enters the initial state designated for the survey, a new survey is automatically generated if the previous one has already been completed. In this process, the data from the previous survey will be lost.
2. When you finish setting up the basic survey information, click Save to confirm changes made; in the Detail View of the ASMS console, the Scheduled and Questions tabs are enabled.
3. In the Survey Detail View in the ASMS Admin Console, select the Scheduled tab, where you can define the following fields:
| Fields | Description |
|---|---|
| Start Date | Choose the start date for the survey. |
| Programming Type | Choose the desired frequency of synchronization, the options are: Once: It is only synced once on the defined start date. At intervals: It syncs at user-defined minute intervals. Daily: Syncs at user-defined intervals of days. Weekly: Syncs at user-defined intervals of weeks. Monthly: Syncs at user-defined intervals of months. |
| End date | Choose the final date on which the survey will stop being sent. |
⚐ Note: The dates are taken at 0 hours on the selected day.
4. When you finish setting up the dates, click Save to confirm the changes made.
5. In the Survey Detail View in the ASMS Admin Console, select the Questions tab, where you will have 4 types of questions available to be configured according to your needs:
- Open
- Ranking
- False or True
- Multiple Choice
⚐ Note: Questions can be modified or deleted, as long as the survey has not been resolved.