
This module allows you to set up rules for editing and creating cases, generating alarms and notifications, and using web services. The rules engine is designed for the execution of automatic actions when the case meets certain (user-defined) conditions.
Creating a Rule
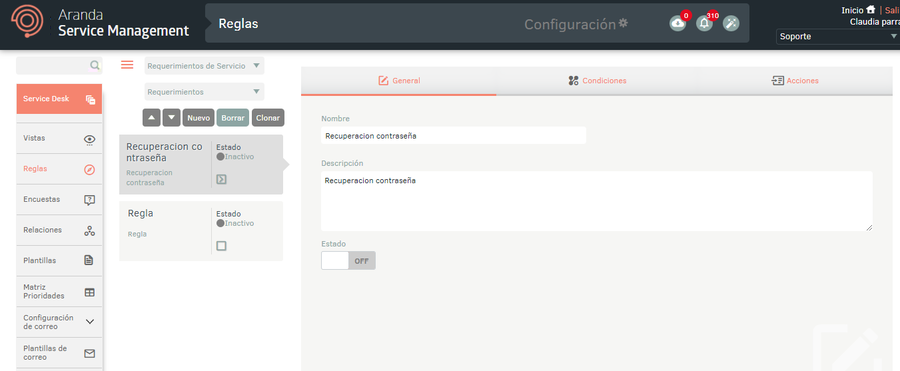
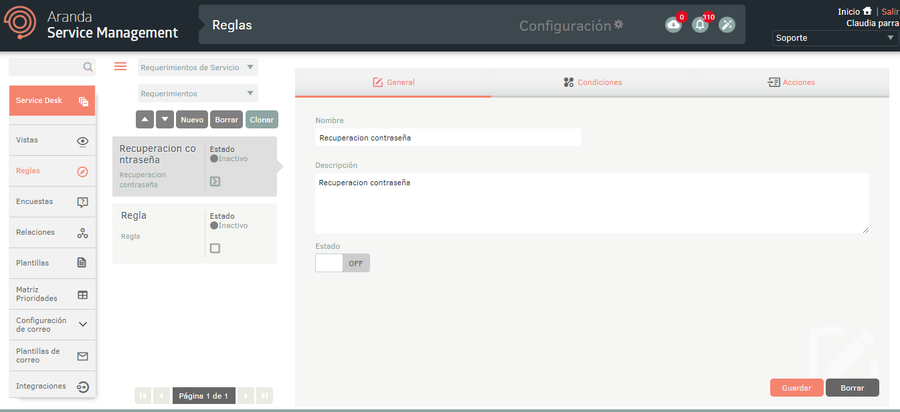
1. To create a rule, log in to the ASMS Admin Console, in the Service Management from the main menu, select the Rules . Define a project and a case type; In the information view, select the New and in the detail view, configure the rules on the General, Conditions, and Actions tabs.
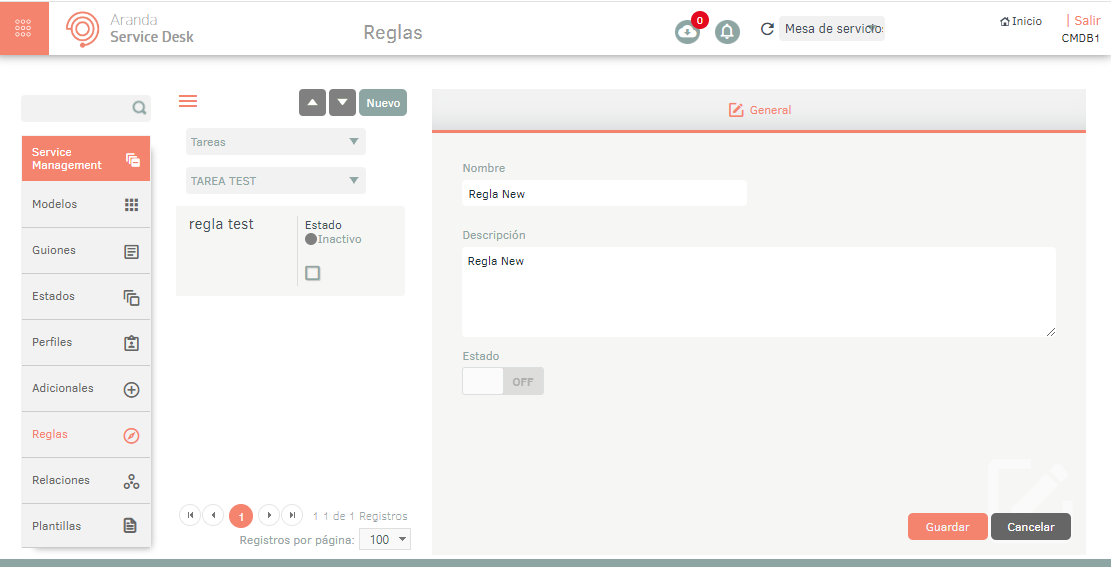
2. In the Rules Detail View in the ASMS Management Console, select the General, you will be able to fill in information such as the rule name, description, and the status of the active or inactive rule.
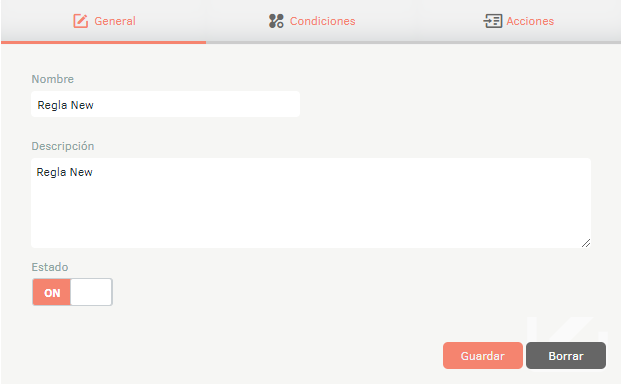
3. When you finish configuring the basic rule information, click Save to confirm the changes made Erase to remove the rule. In Detail View, tabs are enabled Conditions and Actions.
Conditions
4. In the Rules Detail View in the ASMS Management Console, select the Conditions, where you can define the logical conditions with their respective operators that must be met for the execution of the rule. To do this, click the New.
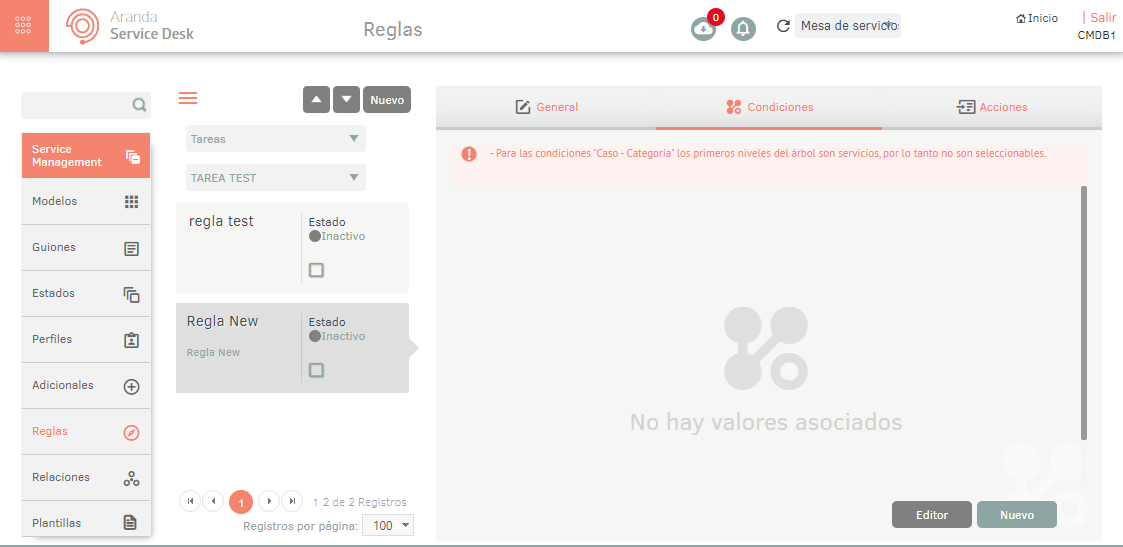
5. The DESIGN view is enabled where you can define the concept and field to be evaluated of the condition. The actions available to configure the condition are:
| Action | Icon | Description |
|---|---|---|
| Save Condition |  |
This action allows you to save the condition configured for the rule. |
| Close Condition |  |
This action allows you to close the condition configured for the rule. |
| Edit Condition |  |
This action allows you to edit the condition configured for the rule. |
| Remove Condition |  |
This action allows you to delete the condition configured for the rule. |
| Add Condition |  |
This action allows you to include a new condition in the rule. |
⚐ Note: The field to determine the value to be evaluated supports a maximum of 100 characters.
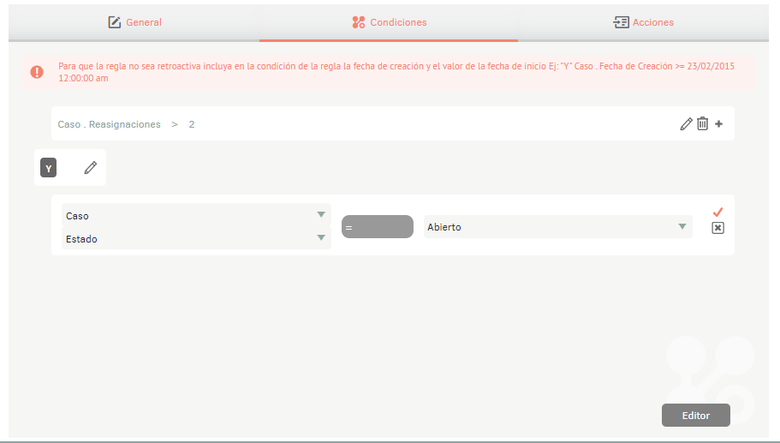
6. To add more conditions to the rule in the DESIGN view, click the Add Condition , select the logical operator, choose the concept and value to evaluate.
7. At any time select the General and click Save to commit the generated changes.
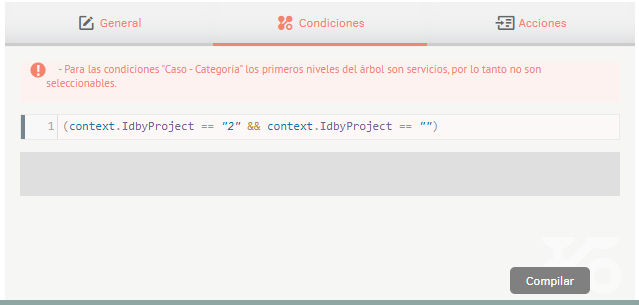
8. During the configuration of the rule conditions, you will be able to access the CONDITION EDITOR view by selecting the Editor and configure the different variables with a line of code. When finished, select the Compile to confirm the condition.

⚐ Note:
- Once the rule conditions are compiled in Editor view, it is not possible to return to Design view.
- When you save the rule by viewing the condition editor even if it has not been compiled, it will not be possible to return to Design view.
9. Select the General and click Save to commit the generated changes. On the Conditions the DESIGNER view access button is disabled.
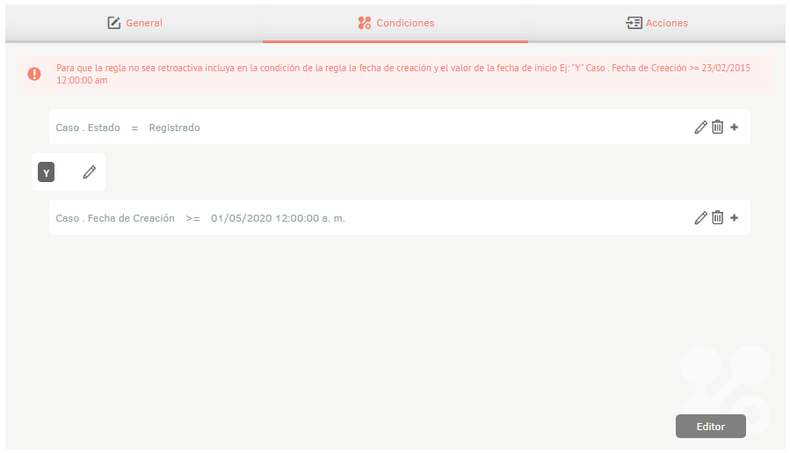
⚐ EXAMPLE: The following image gives continuity to the example represented in step 6 where the times a case has been reassigned and the status of the case is evaluated. In this way, if the case is in the Registration state and has been reassigned more than 2 times, the conditions of the rule will be met and the respective action will be executed. It is also possible to compare values between fields of the same type. To do this, create a new condition, select the field and value to evaluate, and choose the Field option.
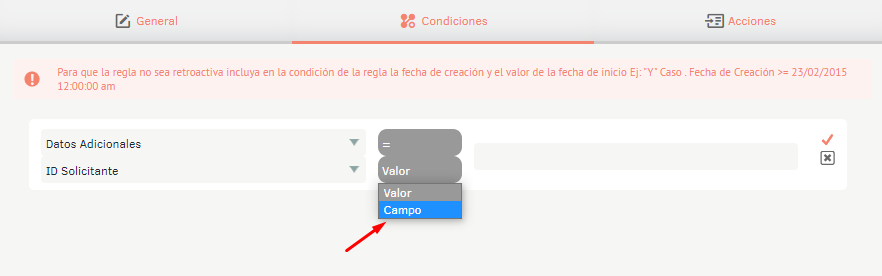
On the right side, choose the concept and value you want to compare with and click on the confirmation icon.
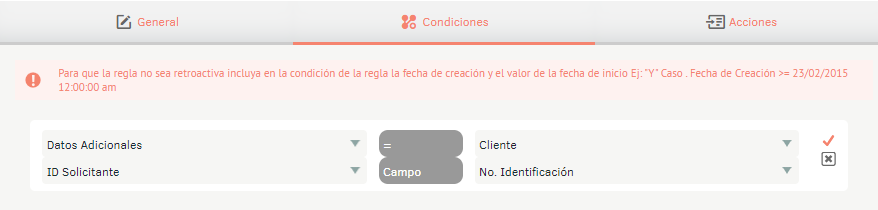
If the additional field Requester ID is equal to the field No. Customer ID, the condition of the rule will be met and the respective action will be executed.
⚐ Note: For the creation of Time-based conditions, the maximum value to use is 3600 minutes.
⚐ Note: The rules are executed for all cases to which the defined condition applies, as long as one of the conditions is configured within the conditions Time, Progress, Estimated Date or Actual Date.
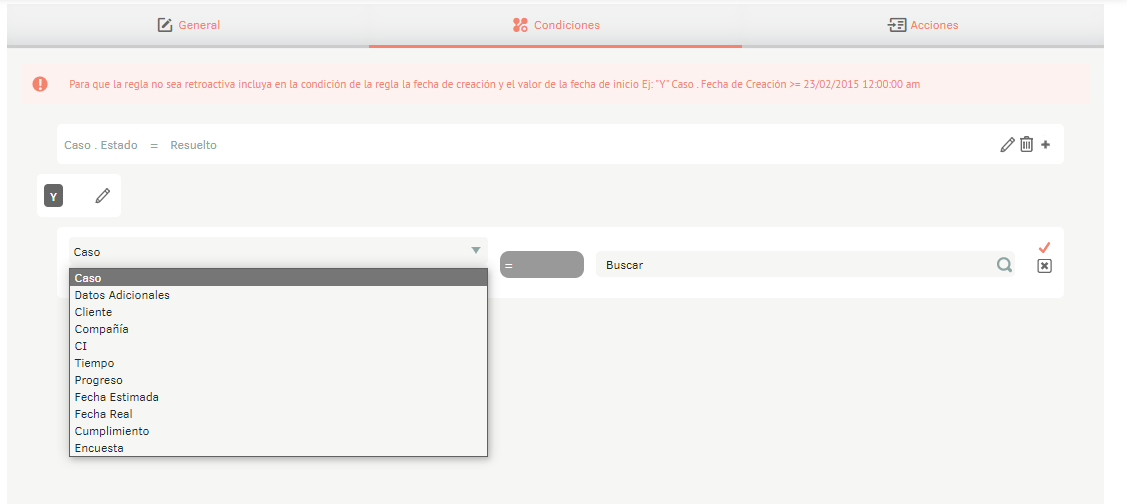
⚐ Note: If you want to run the rule from a specific date, you must include a date condition to segment the case set. For example:
Actions
7. In the Rules Detail View in the ASMS Management Console, select the Actions, where you can define the actions that will be executed once the conditions set in the previous step are met. There are specific actions for different types of cases.
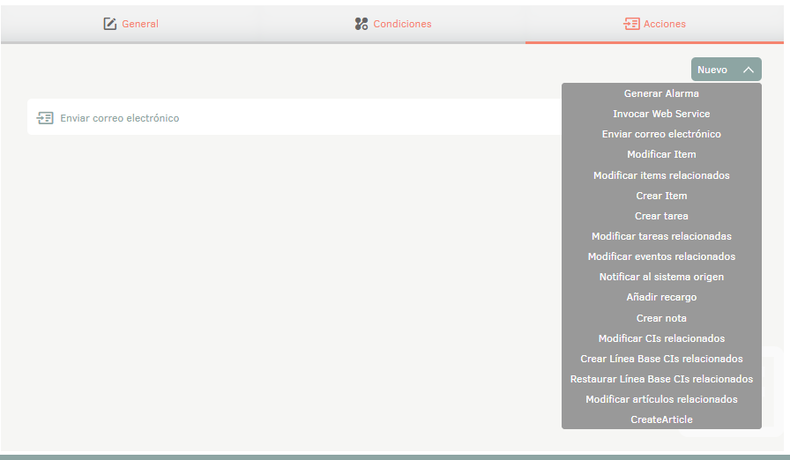
The available actions to configure in the rule are:
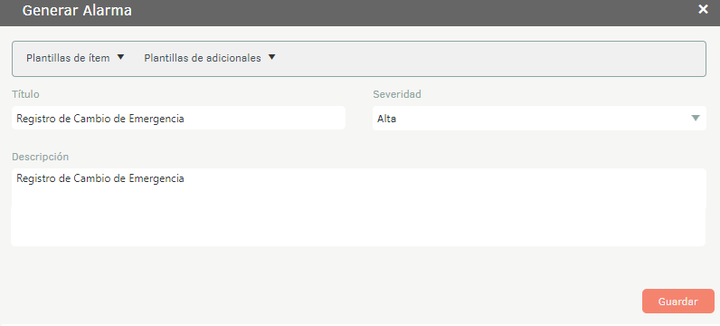
Generate Alarm
This action generates an alert that will be displayed in the Alerts section. View Alerts.
Invoke Web Service
This action allows a process to be run through a web service, which may require authentication.

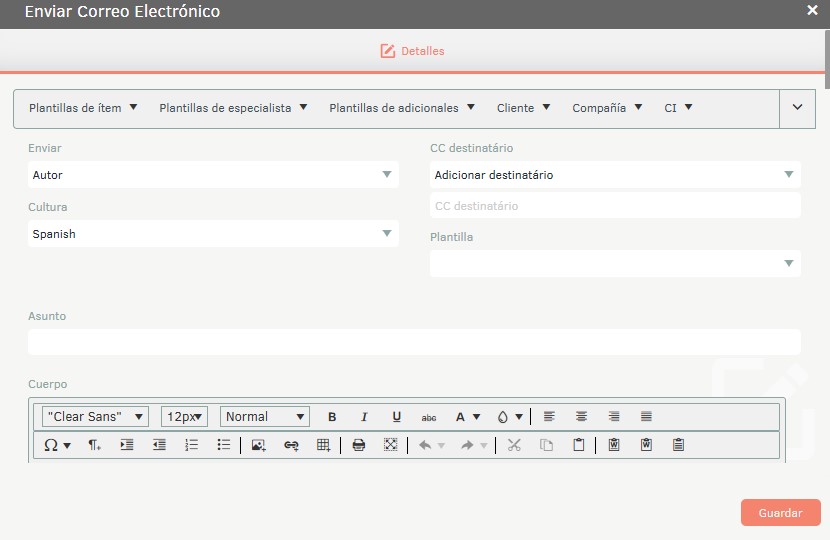
Send an email
This action allows you to send an email notification to different recipients. (clients, specialists, group of specialists, group of specialists assigned to the case) You can use templates to structure the subject and body of the message and include tags that are replaced by the corresponding concept value.
To send emails with a copy, select in the Target CC to the recipients. The Option Add recipient It will display an edit field where you can add the necessary emails, separated by (;). If you add a character that doesn’t correspond, the console will report the error.
These are the available labels:
- Case Labels (Item Templates).
- Specialist Tags (Specialist Templates).
- Additional field labels (Additional Field Templates).
- Customer Tags (Customer).
- Company (company) tags.
- CI (CI) tags.
- Time labels (Time).
- Progress Tags (Progress).
- Estimated Date Labels (Estimated Date).
⚐ Notes: 1. The labels of the date and time fields will be replaced based on the time zone of the user receiving the notification. If the user does not have a defined time zone, the values will be adjusted to the UTC time zone, and the text (UTC) will be added to the end of the corresponding value. 2. When sending an email notification with the grouped recipients, the system will group the recipients by culture and the date and time labels will be replaced based on the time zone of the first user in the group.
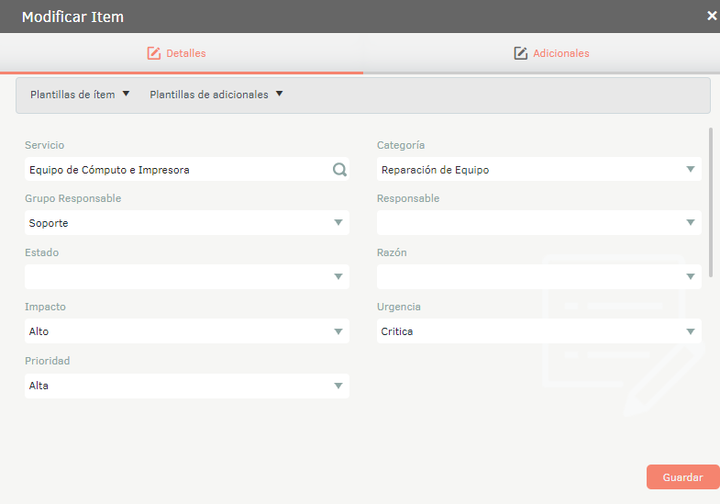
Modify Item
This action modifies the parameters of a previously created Item on a rule. Example: Change the priority and group responsible for the print service.
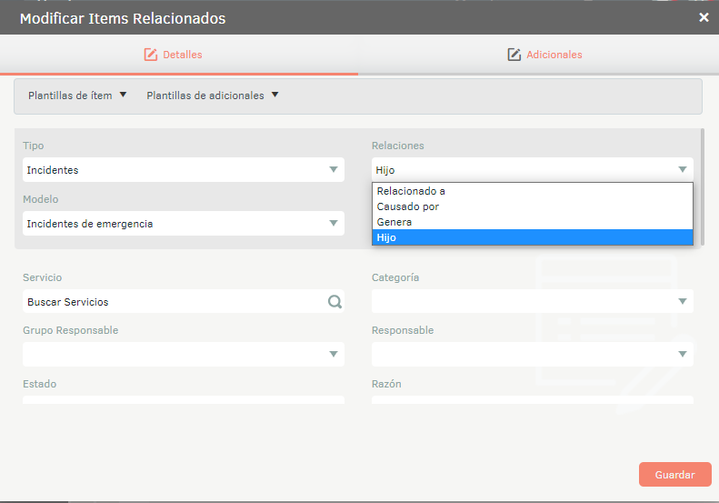
Modify Related Items
This action modifies different fields of the cases that are related to the main case taking into account the previously defined conditions.
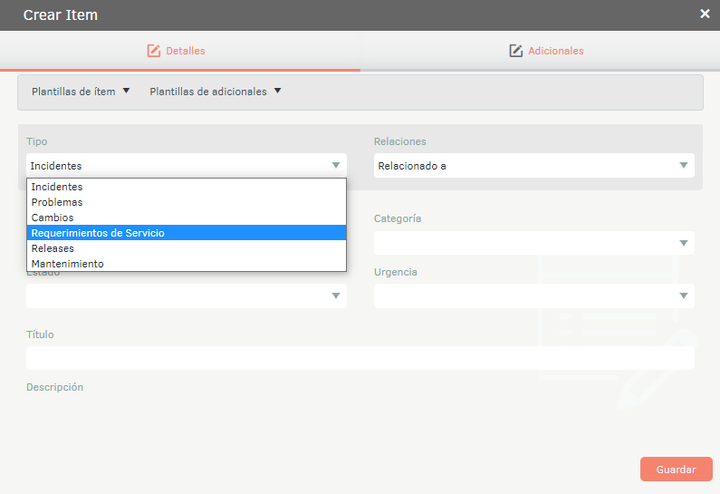
Create Item
This action creates a new item of any type of category (Incidents, Problems, Changes, Service Requirements, Releases, and Maintenance) and associates it as an action to the previously created rule.
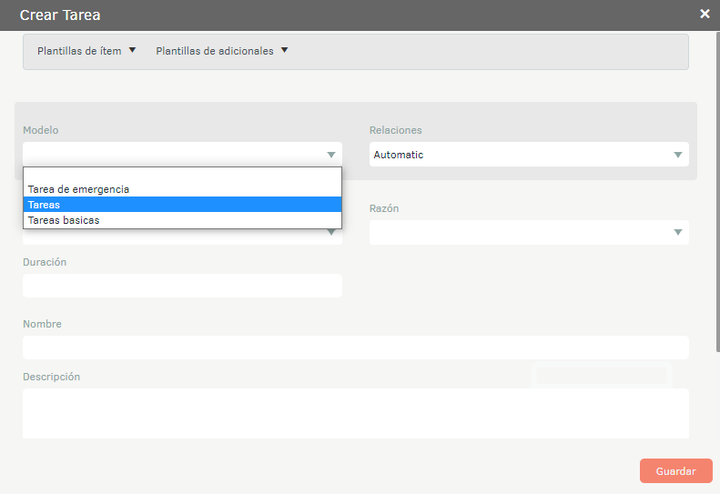
Create Task
This action creates a new task, which can be a simple or complex model, and appends it to the previously created rule.
Modify related tasks
This action modifies a created task and associates it with the previously created rule.

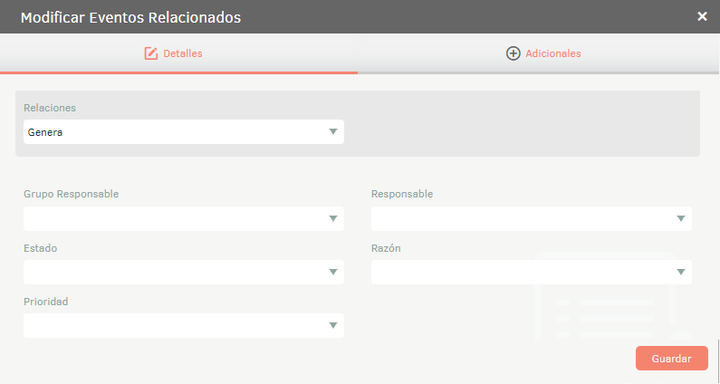
Modify related events
This action modifies an event that has been associated with a previously created rule. Within the editing options of this event it is possible to modify the responsible group, the responsible group and the priority of the associated event.
Notify the Source System
This action informs the source platform of a change made in (CIs, Articles, Cases) in the event that there is an integration with another tool.
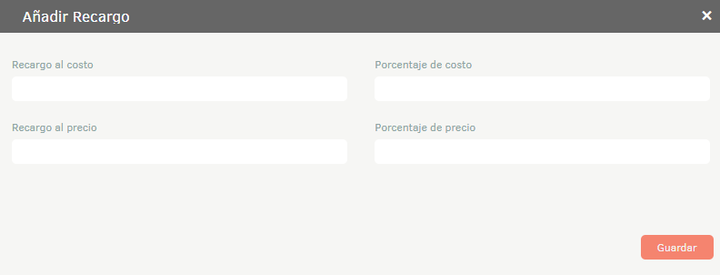
Add surcharge
This action adds one of the following surcharges:
- Surcharge at cost.
- Percentage of cost.
- Surcharge to the price.
- Percentage to price.
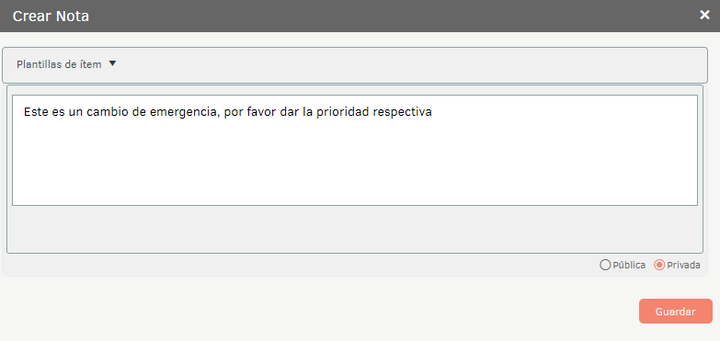
Create Note
This action allows you to add a private and/or public note to the case.
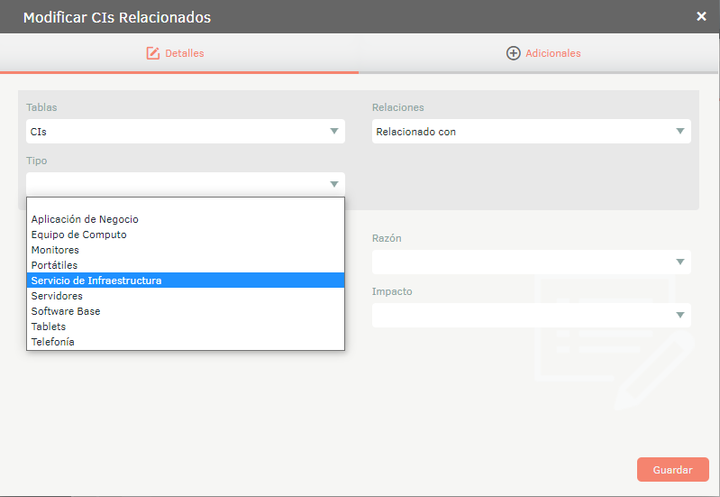
Modify related Cis
This action modifies the baseline of CIs related to the previously created rule. You can edit the CI types (Desktop, Printer, Laptop, Server, Switch).
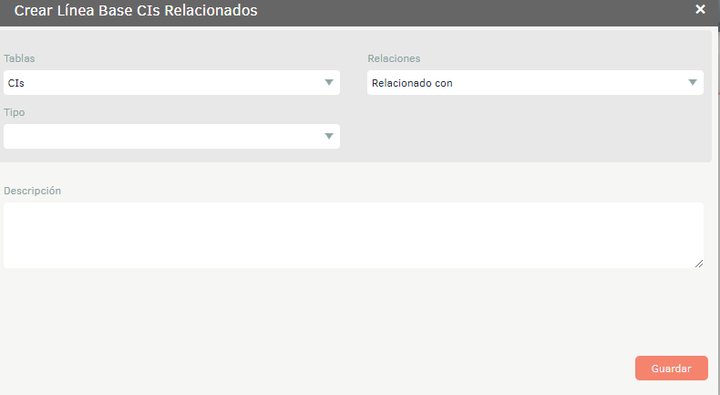
Create baseline related CIs
This action allows you to create a new CI baseline to the previously created rule.
Restore baseline related CIs
This action edits or modifies the CI Baseline associated with the previously created rule.

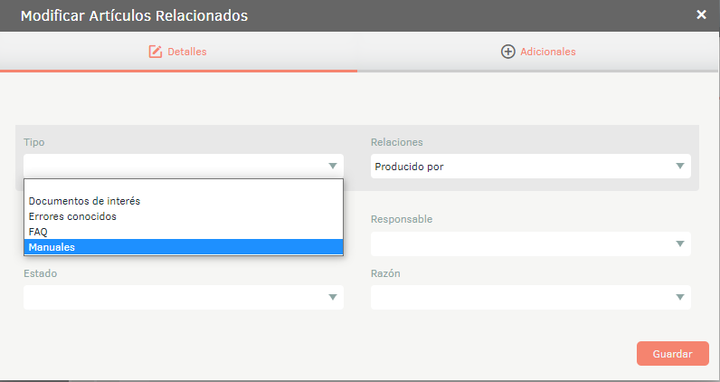
Edit related articles
This action modifies the articles previously associated with the created rule. Among the changes that this action can make is to change the type of article, the responsible group and the responsible group.
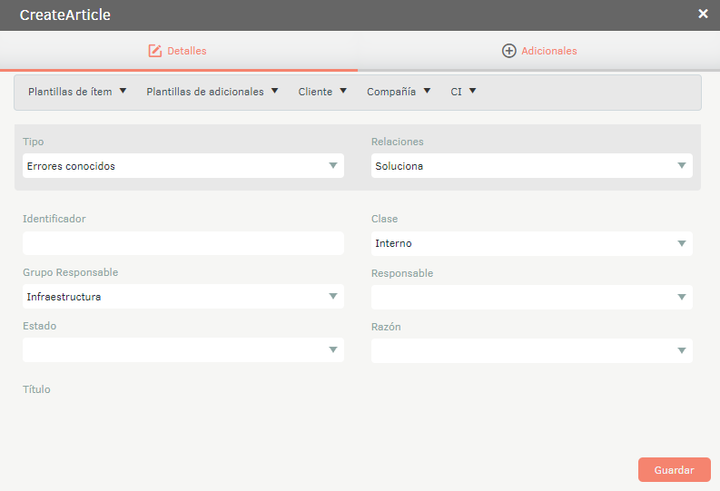
Create Article
This action creates a new article and associates it with the previously created rule. This action will be reflected in the Actions tab.
Invoke WebHook
This action allows you to establish communication with other systems through the consumption of APIs.
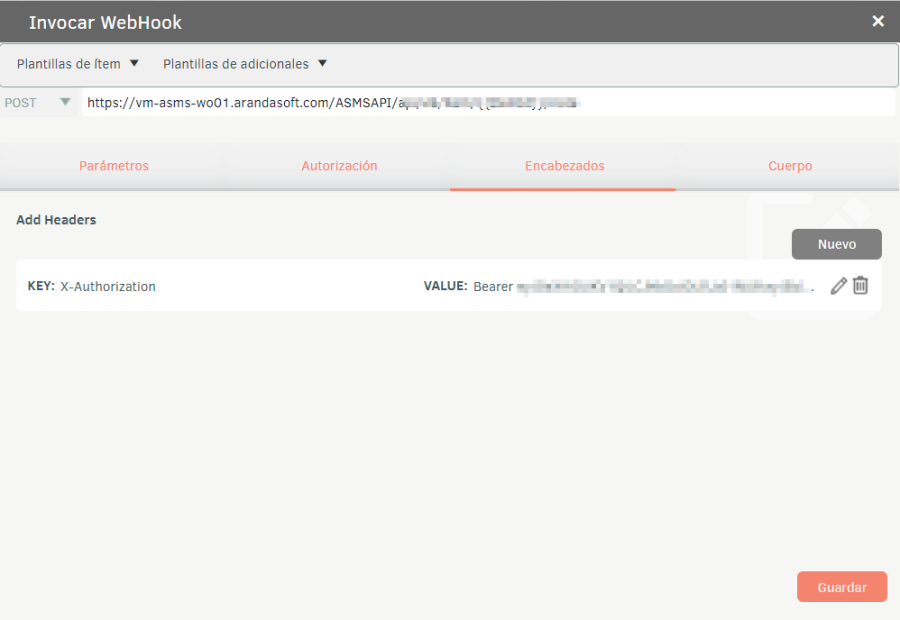
- Type of request- In the drop-down list, set the type of request (POST, GET, PUT, etc.)
- URL- Fill in the URL of the request. Example: (
https://dominio.com/ASMSAPI/{valor}) - Parameters: Enter the parameters required for the request call.
- Authorization: Fill in the authorization data for the request call.
- Headlines: Fill in the necessary headings for the request call.
- Body: Fill out the body of the application.
It is also possible to include case information and additional fields in the application via the item and additional templates
⚐ Note:
- The replacement of the survey tag is carried out based on the client associated with the case, the system administrator is responsible for the correct configuration of the WebHook and the recipient users of the send.
8. Once the actions to be performed have been defined, click on the General and activate the rule.
⚐ Note: It is possible to define how many conditions and actions are required for the rules.
9. To edit a rule, in the information view select the type of case and model, select a record from the list of created rules and in the detail view you can modify the required information
Cloning and bulk deletion of rules
10. To delete a rule in the information view, select a record from the list of rules created and select the Erase to delete associated information about the same project.
11. To clone a rule in the information view Select the case type and model, select a record from the list of created rules, and select the Clone to duplicate the information associated with another model either in the same project or with another project in another model.
⚐ Note: It should be noted that all the conditions and actions of each of the cloned rules must be edited in the new projects, so that both the conditions and the actions of the new cloned rules will be executed in each of the projects in which they were cloned
12. The window where you can select the projects and models in which the selected rules are to be cloned is enabled:
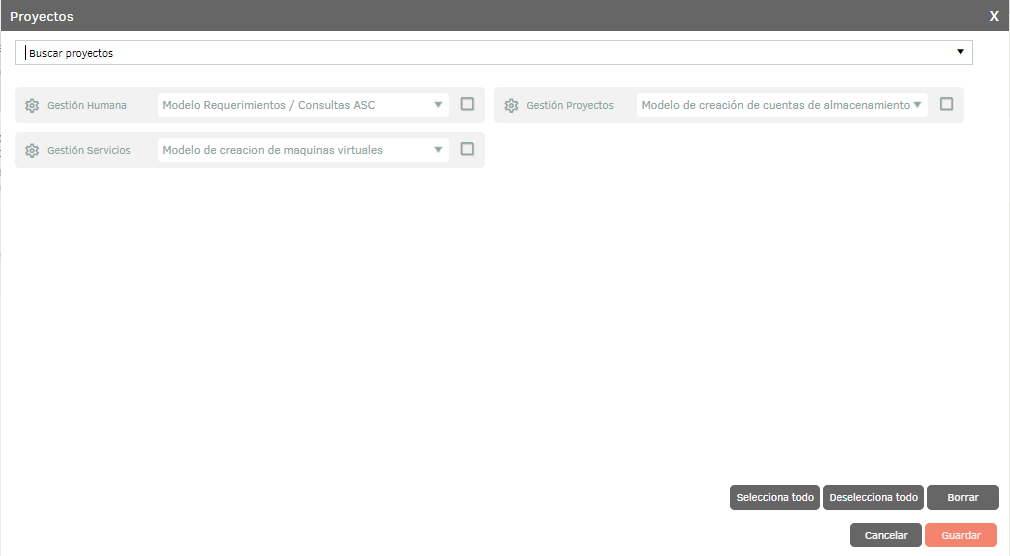
13. Once you have the projects and models to clone the rules to in the list of projects, save your changes.
14. The rules that are marked on the card with the admiration icon, is because they were created by the cloning process and the model was changed. These rules will have a text in the details tab which requests that the conditions and actions of the same be reviewed.

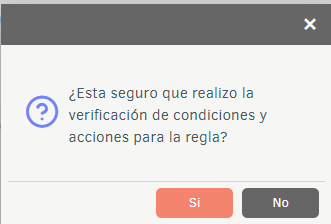
Once the conditions and actions of the rule are verified, click on the option Enable rule, a message requesting confirmation is displayed.
⚐ Note: The rules created from the cloning will be created deactivated and with the same name as the original ones and a number will be added according to the number of clones that have been made of the same rule in the project and model.
⚐ Note: The actions of the rule must be edited and saved to verify that the actions to be carried out are fulfilled and that it is updated correctly according to the new project, services, specialists, etc.
15. When you finish setting up the Rule, click Save in the Detail View of the ASMS Management Console, to confirm the changes you have made
Rule Position Management
The system allows you to organize the order of execution or display of the rules using the positioning functionality. Each rule has a numerical position associated with it that determines its location within the list.
1. Locate the sort icon and click.
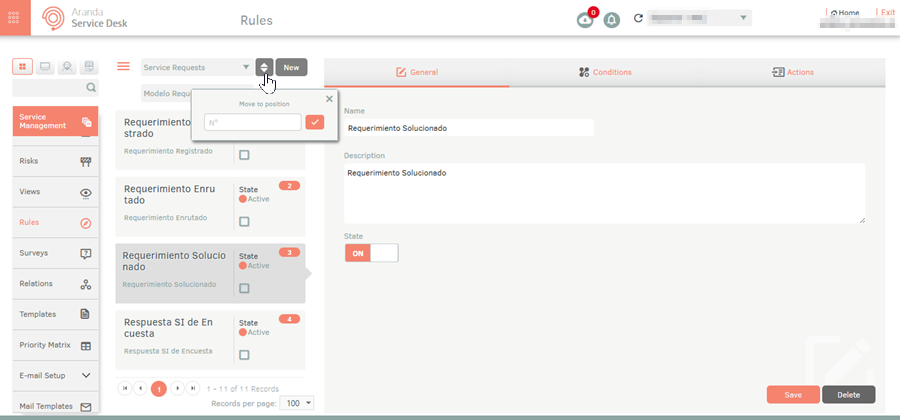
2. Enter the number of the new position in the field “N°”.
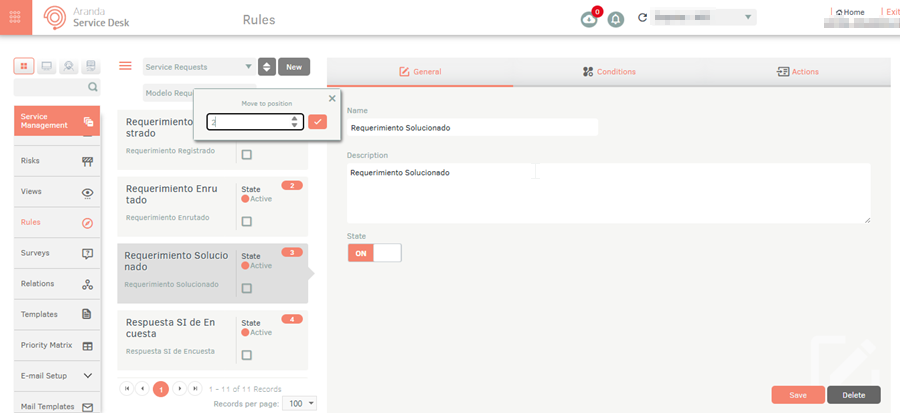
3. Confirm the action by clicking on the accept button

⚐ System Behavior:
- The selected ruler will be moved to the indicated position.
- The other rules will be automatically rearranged to keep the sequence without duplicates.
- The numbering will be updated immediately in the interface.