


In the Inventories module, you can configure and define the products, warehouses, and units of measure that are used by the business during work order management.
Create Measures
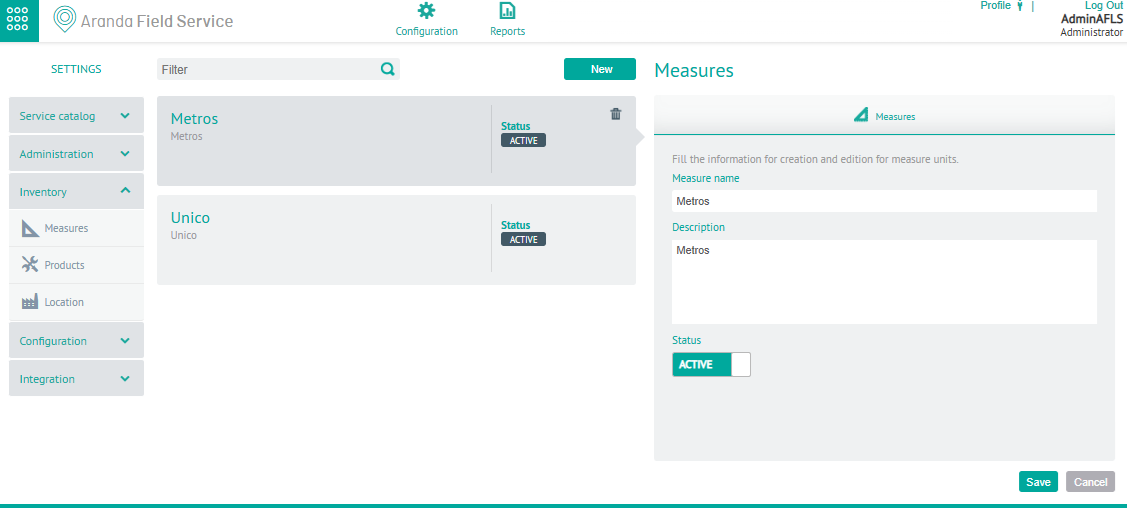
1. To Create a Measure, go to the AFLS configuration console, in the Inventories from the main menu, select the Measurement. In the information view, select the New
2. In the Detail View, you can fill in the following information about the measures to be used in product creation:
| Fields | Description |
|---|---|
| Name of the Measure: | Unit of measure. Example meters (mt), centimeters (cm). |
| Description: | Summary of the use that will be given to this type of measure. |
| State: | The measure can be active or inactive and this will determine whether it can be used for product creation or editing. |
Edit Measurements
3. To edit a Measure, in the information view, select a record from the existing measures, and in the detail view you can modify the required information.
Delete Measurements
4. To delete a measure, in the information view, select a record from the list of existing measures and select the icon to delete the associated information.
5. When you finish setting up the measurements, click Save in the Detail View of the AFLS Configuration Console, to confirm the changes made.
Create Products
1. To Create a Product, go to the AFLS configuration console, in the section Inventories from the main menu, select the Products. In the information view, select the New .
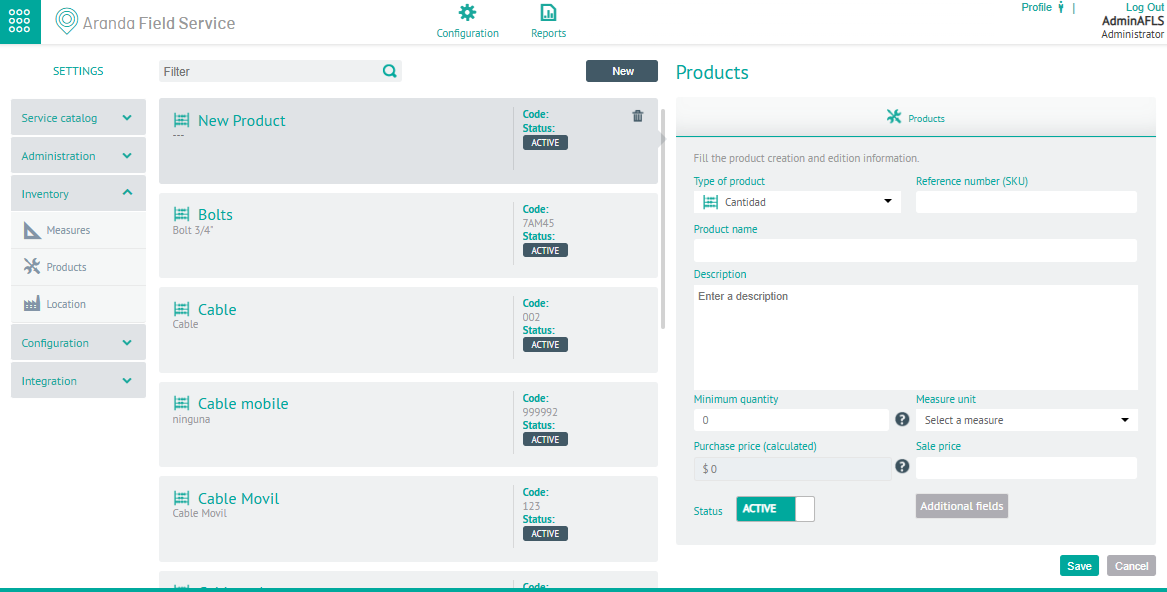
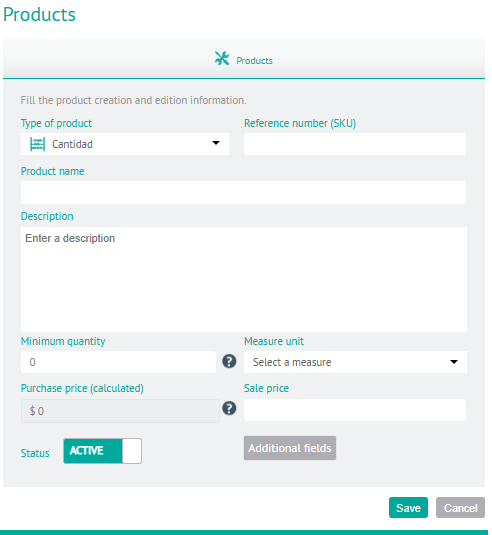
2. In the Detail View, you can fill in the following product information that will be used in the operation of the business:
| Fields | Description |
|---|---|
| Product Type: | The product types of inventories are: - Quantity: A product that can be measured by quantities and does not have a unique identifier. E.g. coaxial cable, meter measurement. - Unique code: Product that can be identified with a serial. E.g. Decoder. |
| Reference Number | (SKU) |
| Product Name | Name designated to the product. |
| Description: | Maximum 250 characters. |
| Minimum Quantity: | Minimum quantity that must be in inventory. Trigger an alert when this amount is reached. |
| Unit of Measure | Select the unit of measure. |
| Purchase price (calculated): | This value is calculated automatically once the product is entries are made in the inventory. |
| Sale price: | Price at which the product is sold. |
| State: | It can be active or inactive and this will determine whether the product can be used or not. |
⚐ Note: All fields are required for product creation
3. When you finish setting up the inventory product, click Save, to confirm the changes made.
Additional fields
4. In the Products detail view, the Additional Fields which correspond to information for each of the products created.
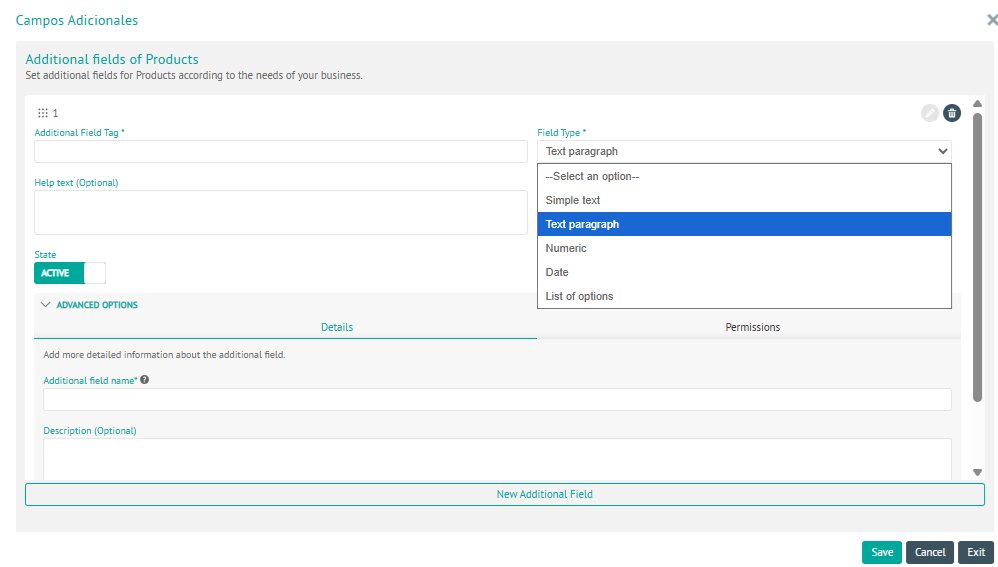
5. In the window Additional Fields when you click on the New Additional Field, you will be able to fill in basic information and advanced options for additional fields
| Fields | Description |
|---|---|
| Additional field label | Name of the additional field |
| Field Type | Set the additional field type from the following options: Plain Text, Paragraph Text, Numeric, Date, or List of Options. |
| Help Text | Optional supplementary information for the additional field. |
| State | It can be Active or Inactive, thus determining whether the field can be used or not. |
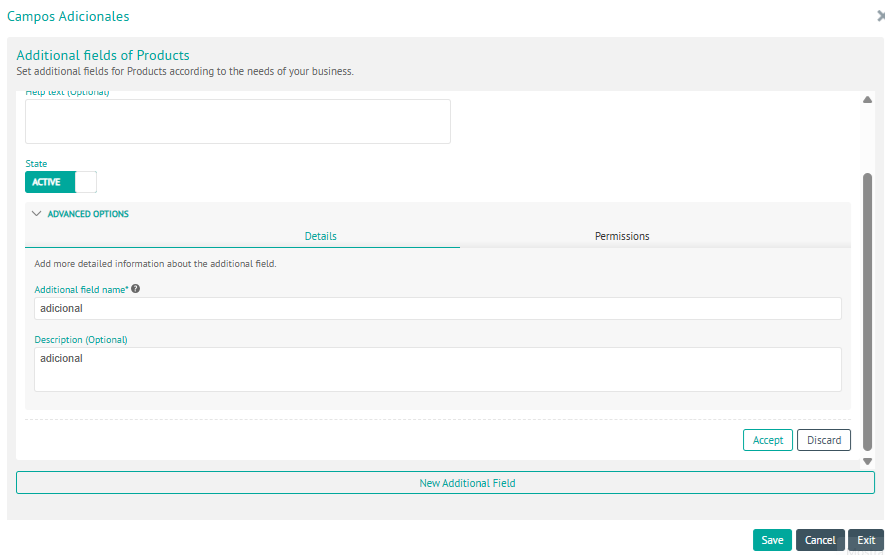
6. In the advanced options of the Additional Fields window, you can configure the details and permissions tabs of the additional fields.
On the Details You can configure the name and description of the detail of the additional field.
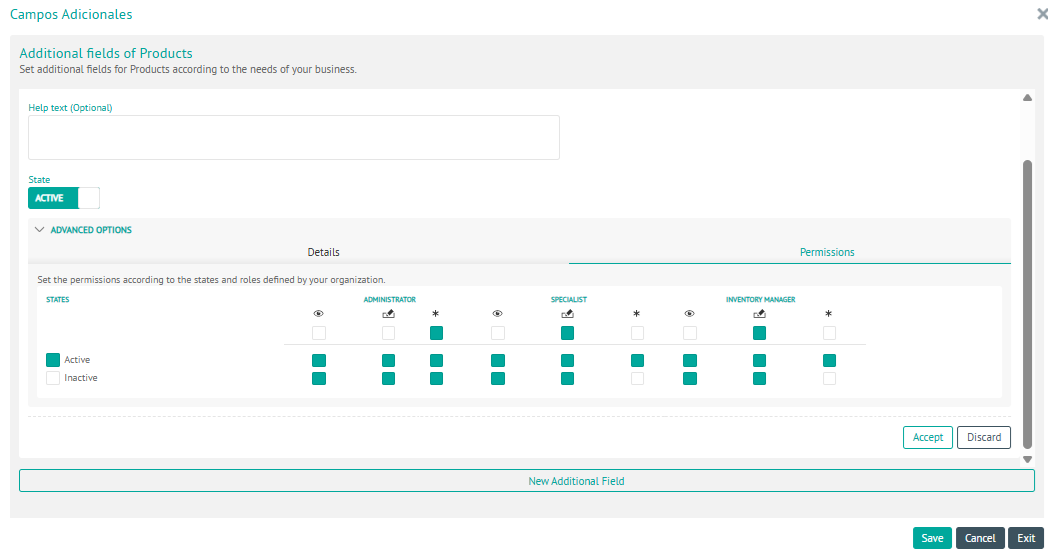
7. On the Permissions You will be able to activate the permissions that allow you to control the following actions (visibility, writing, required), for roles such as Administrator and/or Inventory Manager in the web application and Specialist in the mobile application.
Additionally, you can configure these permissions in each of the states.
⚐ Note: Once the additional fields for products have been configured, they can be filled in the incoming inventory entries of each field.
8. After configuring the additional fields, click Accept or Discard in the appropriate window and click Save, to confirm the changes made.
Edit Products
9. To edit an inventory product, in the information view, select a record of the existing products, and in the detail view you can modify the required information.
Remove Products
10. To delete a measure, in the information view, select a record from the existing product listing and select the icon to delete the associated information.
Create Locations
Here the zones, headquarters and transports are configured to distribute the inventory.
1. To create an Inventory location, go to the AFLS Configuration Console, in the Inventories from the main menu, select the Locations. A tree is displayed with the different locations (headquarters, transports, zones).
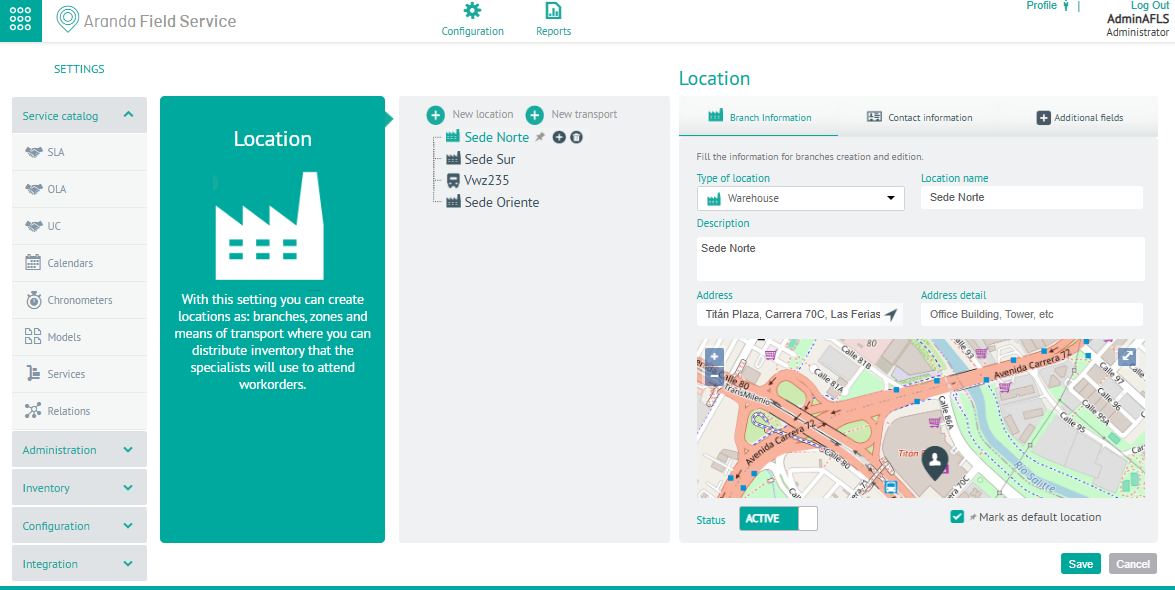
New Headquarters
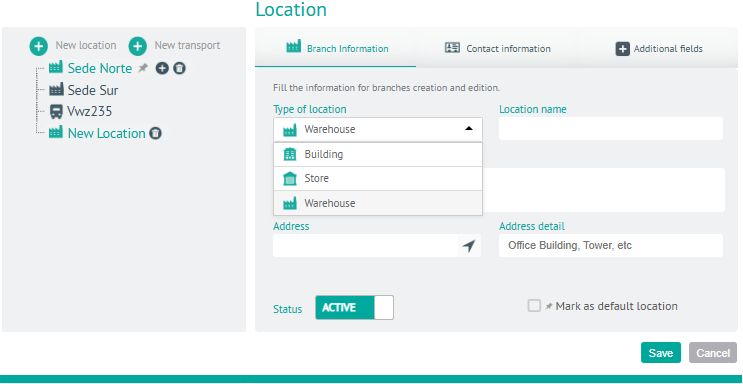
2. To create a new inventory location, in the Locations information view, select the New Headquarters and in the Detail View select the Venue information, where you can enter the following information:
| Fields | Description |
|---|---|
| Type of venue | The types of venues available are: Building, Warehouse and Warehouse. |
| Name of the headquarters | Name of the headquarters. |
| Description | Description of the location of a maximum of 250 characters. |
| Address | Nomenclature that defines as the location of the headquarters. |
| Address Detail: | Complementary information that helps to better identify the location of the headquarters. |
| State | It can be active or inactive. |
| Mark as default location | This option sets the default location that is assigned to a Mobile Specialist when you do not select an inventory location when you create it. |
3. In the Locations Detail View in the AFLS Configuration Console, select the Contact Information, where you can enter information such as the contact’s name, phone, and email. This information is optional and is not required for the creation of the headquarters.
4. In the Locations Detail View in the AFLS Configuration Console, select the Additional Fields, where you can view and fill in the additional fields defined in the configuration module of Aranda FIELD SERVICE AFLS.
5. When you finish setting up the inventory locations, click Save in the Detail View of the AFLS Configuration Console, to confirm the changes made.
New Transportation
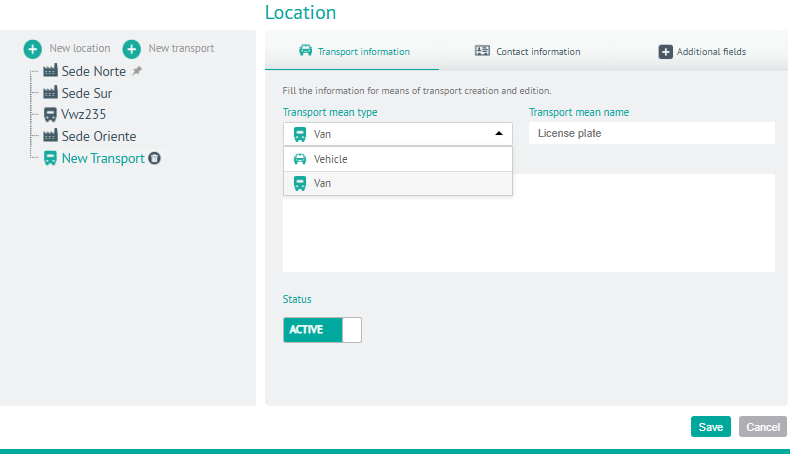
6. To create an inventory shipment, in the Locations information view, select the New Transportation and in the Detail View select the Transportation Information, where you can enter the following information:
| Fields | Description |
|---|---|
| Type of transport | The types of transport available are: Truck and Vehicle |
| Transport name | It can be the license plate or some other identifier of the means of transport. |
| Description | Description of the transport. |
| State | It can be active or inactive. |
7. In the Locations Detail View in the AFLS Configuration Console, select the Contact Information, where you can enter information such as the contact’s name, phone, and email.
⚐ Note: Contact information is optional and is not required for the creation of the headquarters.
8. In the Locations Detail View in the AFLS Configuration Console, select the Additional Fields, where you can view and fill in the additional fields defined in the AFLS configuration module.
New Zones
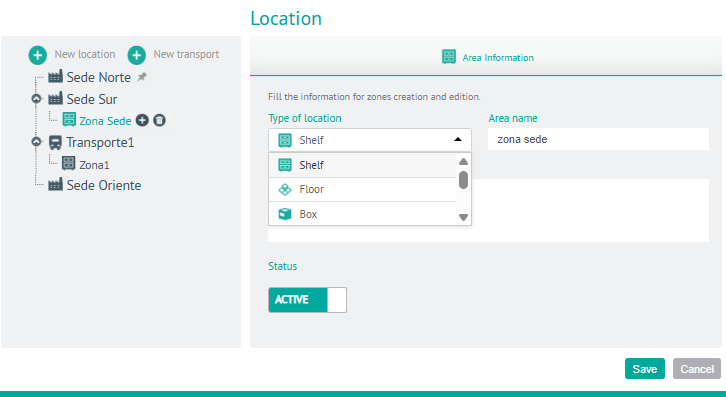
9. In the information view for the Locations configuration, you will be able to include a new zone for each location or transport created, select the icon Add  and fill in information such as:
| Fields | Description |
|---|---|
| Zone Type | The types of zone available are: shelf, floor and box. |
| Area Name | Name designated to the area. |
| Description | Description of the area. |
| State | It can be active or inactive. |
⚐ Note: These zones may contain zones between them. Example: A flat can have box 1 and box 2 and in turn the boxes can contain box 001.
10. When you finish setting up the inventory locations, click Save, to confirm the changes made.
⚐ Note: You can edit a location, transport or zone by clicking on its name and selecting the icon of the desired action. You can only delete nodes that don’t have children.